Book Image

Unreal Engine 4 Game Development Quick Start Guide

By : Rachel Cordone
Book Image

Unreal Engine 4 Game Development Quick Start Guide

By: Rachel Cordone

Overview of this book

Unreal Engine is a popular game engine used by developers for building high-end 2D and 3D games. This book is a practical guide designed to help you get started with Unreal Engine 4 and confidently develop interactive games. You’ll begin with a quick introduction to the Unreal Engine 4 (UE4) ecosystem. Next, you’ll learn how to create Blueprints and C++ code to define your game's functionality. As you progress, you’ll cover the core systems of UE4 such as Unreal Motion Graphics (UMG), Animation Blueprints, and behaviour trees to further build on your game development knowledge. The concluding chapters will then help you learn how to use replication to create multiplayer games. By the end of this book, you will be well-versed with UE4 and have developed the skills you need to use the framework for developing and deploying robust and intuitive games.
Table of Contents (10 chapters)

The Unreal editor

Once the editor finishes loading, we will get our first look at it. This is what we will see:

The editor's layout will quickly be decipherable to anyone who has used Unity or another game engine before, but there's always the fear of clicking something and having everything go wonky, so let's take it panel by panel. We'll start at the bottom left with the Content Browser.

The Content Browser

This is where all of our game's content will appear, from code to static meshes, materials, sounds, and animations. If we press the arrow button in the top-left corner above the folders, we can see a complete folder view for the content in our project, as shown in the following screenshot:

To get a quick overview of the template you're using, you can press the play icon on the ThirdPerson Overview asset (the ThirdPersonBP folder in our case) as shown in the following screenshot:

This will point you to the location of the important assets provided with that template. For the ThirdPerson template, the two assets we'll be digging into the most are the ThirdPersonCharacter and ThirdPersonGameMode under ThirdPersonBP\Blueprints.

At the end of the overview, a Tutorials tab will pop up with links to tutorials for everything from C++ to animation and landscapes. You can also find a link to this tab under Help | Tutorials.

Back to the Content Browser, if you look at the top, you'll see the Add New button. This lets you create a new asset of any type, including Blueprints, behavior trees for AI, and sound cues. At the top of this list, you'll see Add Feature or Content Pack, which is what I was describing earlier in this chapter in the Using project templates section. If you require Vehicle template functionality in your ThirdPerson project, for example, this is where you would add it.

The Viewport

Next in our tour of the Unreal editor is the Viewport. This displays our currently loaded level and can be configured to make navigation easier. There are two ways to move the camera around in the Viewport:

  • Mouse and WASD: Holding the right mouse button down will let you rotate the camera, while using the WASD keys will move the camera forward/backward and left/right. Anyone with experience in Unity will be used to this camera movement.
  • Mouse only: It is also possible to navigate using only the mouse, which people with experience in previous Unreal editors will be familiar with. Holding the left mouse button will let you move the camera along the horizontal plane along with looking left/right. Holding the right mouse button will keep the camera in place while letting you look around. Holding both the left and right mouse buttons will let you move the camera up/down and left/right at the same time while keeping the rotation the same. Combining these three mouse button combinations will let you navigate a level without needing to use the keyboard.
Pressing F11 will let you toggle fullscreen on the Viewport.

Viewport options

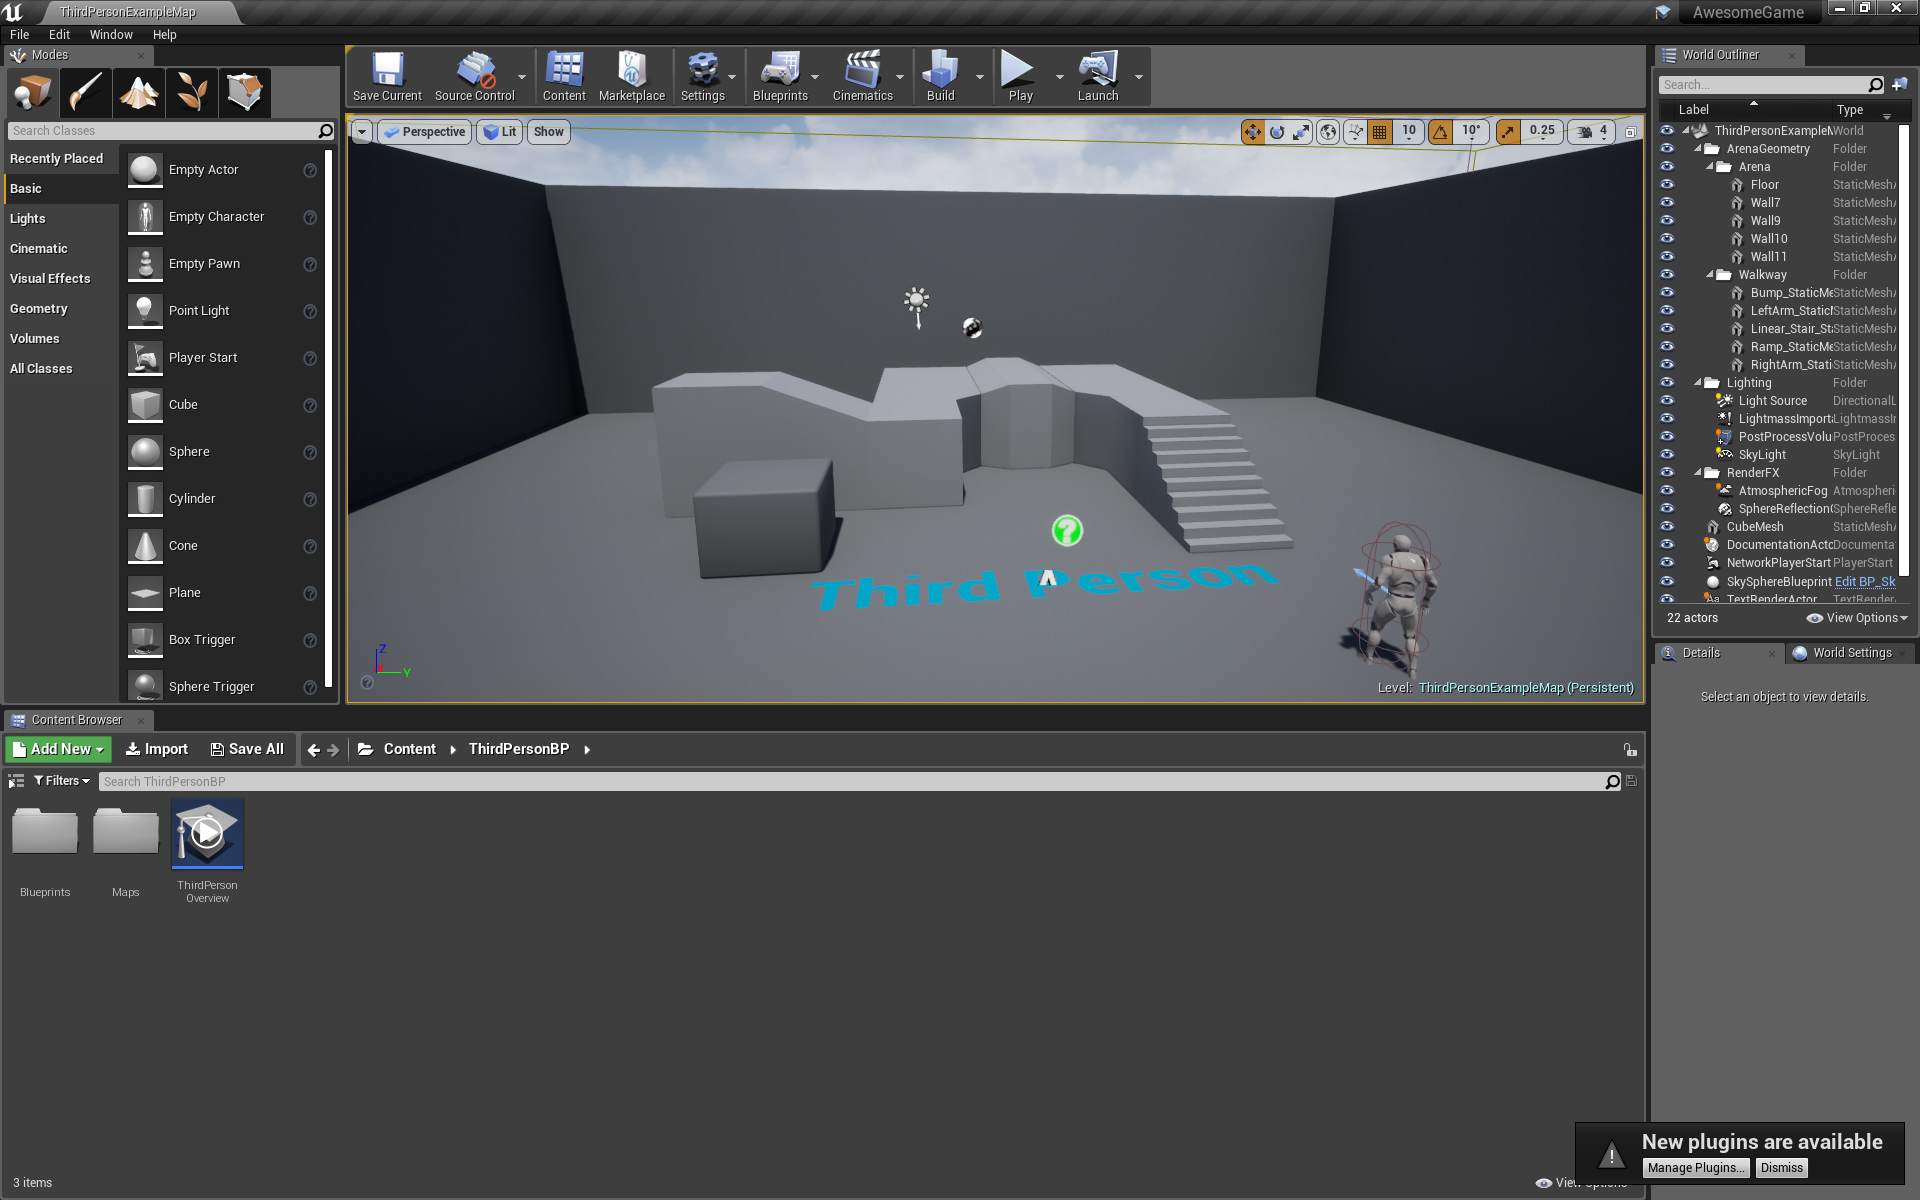
On the upper left of the Viewport are a few drop-down menus that let us customize and configure the Viewport. Starting from the left with the drop-down arrow, a few of the important options are as follows:

  • Realtime: This toggles real-time rendering of any animated elements of the level. You can see it with the spinning green DocumentationActor, but this also applies to any animated materials and particle effects. With this off, elements will only update while you are moving the camera.
  • Show Stats / Show FPS: This toggles frames per second (FPS) and stats that show information such as poly counts, rendering times in milliseconds, and memory usage. A full list of stat options can be found in the Stat submenu a bit further down the menu.
  • Game View: This toggles any editor-only icons and assets so you can see what the level will look like in game. Pressing G also toggles this, so if you've accidentally hidden the editor icons, it was probably this way.
  • Bookmarks: This allows you to set bookmarks for camera locations so you can use keyboard numbers to teleport there. This option is incredibly useful and often overlooked, so getting into the habit of using these early can save you a lot of time navigating your levels. These are level-specific, making them even more useful, but don't forget to save your level if you change these; otherwise, you will lose them.
  • Layouts: This lets you choose from a variety of Viewport layouts with up to four views. If, for some reason, you need even more Viewports, at the top of the editor, press Window | Viewports and select one of the other Viewports (Viewport 1 is the existing one). Each of these can also be configured with up to four panes.
  • Advanced Settings: This lets you further customize the Viewports by inverting the mouse, combining the translate/rotate widgets, and adjusting highlight intensity, among other things. Don't worry about messing things up here; you can always press the Reset to Defaults button in the top-right corner.

Next to the drop-down arrow at the top of the Viewport is Perspective. This is the setting for the Viewport type. By default, it shows a 3D perspective, but this can be configured to show a 2D wireframe view from the top or left, and so on.

Navigation while in a 2D perspective is a bit different than the 3D view. Holding the right mouse button lets you move around, and the mouse wheel lets you zoom in and out.

While in a 2D view, holding the left mouse button lets you drag a selection box. Another useful tool is holding the middle mouse button to use the measuring tool. This is useful for programmers when we're trying to figure out how far enemies should be able to see, for example.

Next in the Viewport options is the Viewport's visual style, which defaults to Lit. You can choose Unlit and Wireframe for example, but this also offers a lot of optimization views, such as Shader Complexity and Collision views. Most of these are more useful for artists.

The final dropdown in the upper-left corner is the Show list. This can be used to hide things that might be in your way, such as fog, or to show extra options, such as a collision. This includes a few advanced options, such as showing bones for skeletal meshes. This menu also includes a Default so that you can reset anything you've changed here.

Grid and snap settings

In the upper-right part of the Viewport are the settings for the translation tool, grid, snap, and camera:

  • The first three buttons (labelled 1 previously) allow us to switch between translation, rotation, and scaling for world objects (although it's easier and quicker to use W, E, and R on the keyboard for this).
  • Next is the global/local toggle (2). This changes the way the translation, rotation, and scaling work to be world oriented or dependent on the selected object's rotation.
  • The next setting is the grid snap (3). The first button of these three (with a curve and three arrows) lets you toggle surface snapping, which will automatically place objects on the floor when moving them around, with an option to automatically rotate them to align with the floor's rotation.
The Unreal editor bases its unit system on centimeters. Although this is all relative and you can choose any reference scale you want, the default character you control is built around 1 unreal unit = 1 centimeter.
  • The next button (section 3, second button), which is orange with a grid, toggles grid snapping completely. If you need to precisely align an object, turning grid snapping off will help with that.
  • The final button in the grid snap section (section 3, third button) lets you choose the grid snap distance. Lower values will let you adjust objects more finely.
  • After the grid snap, we have the rotation snap (4) and scale snap (5) sections. They operate the same as the grid snap, and the scale snap has an additional option to preserve the ratio between the axes while scaling.
  • The last option in the upper right of the Viewport controls the camera speed (6), with a scalar for more control over the range of speed.

The toolbar

Above the Viewport is the toolbar, as shown in the following screenshot:

This gives access to some of the more commonly used features of the editor:

  • Save Current: This saves the current level. Save on a frequent basis. By default, the editor has autosave turned on, but it's set to 10 minutes, and that can be a lot of work when you're in the zone.
  • Source Control: This hooks your content to subversion, perforce, or Git content control. If your team uses one of these, this will save a lot of time over having to do this outside of the editor.
  • Content: This opens the Content Browser if you have that tab closed.
  • Marketplace: Pressing this may seem like it does nothing, but it opens the Marketplace in the Epic Games launcher. You'll need to switch over to that program to see it, as it doesn't automatically pop back up.
  • Settings: This provides access to some settings menus we'll be talking about in a bit, along with a number of selection, quality level, and snap settings for the Viewport.
  • Blueprints: This lets you create and find Blueprint classes, but this is easier done in the Content Browser. This is also where you access the level-specific Blueprint.
  • Cinematics: This is beyond the scope of this guide, but here is where you would get started with creating cinematics at your level.
  • Build: Here is where you set the rebuild options for the level, and where you rebuild geometry, lighting, and pathing in the level. For programmers, most of this is not our focus, but you will want to rebuild pathing when working with AI, and doing a complete rebuild by simply pressing the Build button in the toolbar will get rid of the red LIGHTING NEEDS TO BE REBUILT notification in the Viewport and in game. To make things quicker, keep the Lighting Quality at Preview until you're ready to do non-test builds.
  • Play: This lets you play the current level without having to build the entire project. By default, this uses the current Viewport, but exiting from this with Esc doesn't reset the camera, so I usually set this to New Editor Window. For multiplayer testing, you can also set the number of players, which will open a separate window for each one. If you have compiled the engine yourself and set up dedicated server functionality, you can enable that here as well. At the bottom is a link to Advanced Settings, such as mouse control, Viewport sizes, and server options.
  • Launch: If you are developing for mobile or browser, you can launch to those devices from here.

World Outliner

The World Outliner tab on the right of the editor window contains a list of all of the objects in the current level, as shown in the following screenshot:

You can group them into folders, right-click to create a new folder, and click the eye icon on the left to hide individual objects or an entire folder at once. Selecting one or more objects here will display their properties in the Details panel (discussed in the next subsection). The right column will also have links to directly open the Blueprint associated with an object if it has one (such as the ThirdPersonCharacter for our project).

You can double-click on an item here to zoom the camera to that object. If you have an object selected, clicking it again will allow you to rename it to make organization easier.

This panel also has a Search... bar, which makes finding objects easier, especially combined with the renaming feature.

Right-clicking on an object in this panel provides more options for that object, including visibility, selecting matching objects, and attachment options. This same menu appears when you right-click on an object in the Viewport.

Details and World Settings

When an object is selected in a Viewport or in the World Outliner panel, its properties appear in the following screenshot:

Here, we can adjust each individual object in the level's properties. Most commonly, we can perform the following actions:

  • Manually set Location/Rotation/Scale if we need precise values
  • Set or find materials, meshes, and so on that it uses in the Content Browser (click the magnifying glass icon to go to that asset in the Content Browser)
  • Adjust physics and lighting properties for that object (if it does not need to cast shadows for instance)
  • Toggle visibility for the object so it appears in the editor but not in game (under the Rendering section of its properties)
  • Adjust any custom properties we've added to our own objects (discussed in Chapter 2, Programming Using Blueprints)

Keep in mind that some of these properties are more easily changed without needing to do it here. For instance, for the material property of a static mesh, you can simply drag the material from the content browser on top of the object in the Viewport. You don't need to use the arrow button in the object's properties unless the object has multiple materials and you're having difficulty while setting up the right one.

World settings

Most of these properties aren't used too often, but there are a few here that interest us:

  • Enable World Composition: For open world style games, this option would need to be enabled. Epic Games has good resources for creating this type of world. Searching for UE4 World Composition will provide you with plenty of tutorials for that.
  • KillZ: This is the height at which actors get destroyed. If you're creating a level with a lot of height and your character keeps disappearing when you drop down, check this value to make sure it's low enough. It will appear as a red line in any of the side/front Viewports.
  • GameMode Override: Instead of using the default GameMode class (which we will discuss with other Project Settings shortly), each level can override that with a specific GameMode class. For example, if you were making a third-person game, but one level was a car race, you could use this to set specific rules and character/HUD classes for this level, instead of needing to integrate both types of gameplay into one GameMode class. Once a GameMode override is set, each individual class default can be edited in the Selected GameMode dropdown beneath it.
  • Override World Gravity: As withGameMode, instead of using the Project Settings value for gravity, each level can have its own.

Next, we will take a look at how to customize the editor itself with editor preferences to make our workflow easier.