

Skeinforge is by far the most versatile slicer available, and it can be the most intimidating one because of its complexity. Taking the time to unravel its mysteries will pay off in the end. The amount of control one can exercise over the numerous setting options can sometimes overcome printing difficulties that other slicers cannot achieve.
You need a RepRap-based 3D printer and have the basic skills to operate it. If you are using Repetier-Host or another host that has Skeinforge built in, make sure you are using the latest version. Its latest update can be found at http://fabmetheus.crsndoo.com/. It has not been updated since March 15, 2012.
To use Skeinforge as a standalone program, you will need to install Python. Python can be found at https://www.python.org/download/. Install Python Version 2.7.6.
In order to create a default settings profile for Skeinforge, we will need to add a profile that is not included in the latest version. This profile will make a good starting point and also provide us with a reference point for future changes. It can be downloaded at https://github.com/romscraj/skeinforge41/zipball/master. Open the folder and navigate into the .skeinforge folder, then into the profiles folder, and finally into the extrusion folder. Copy the Durbie-Normal folder.
Locate the .skeinforge folder that is created by Skeinforge when it is initially opened. It should be in your computer's personal folder if you are using Windows or in your computer's home in Mac or Linux OS. Once it is located, add the Durbie-Normal folder into the extrusion folder nested in the profiles folder. Now, the added profile is available in the Profile Selection menu.
We will proceed as follows:
Open Skeinforge by double-clicking on the Skeinforge Python file in the
skeinforge_applicationfolder.When the Skeinforge window opens, you will be confronted with a menu and an array of tabs for many different plugins. Initially, maneuvering through the selections can be overwhelming, but we are only going to concern ourselves with configuring the printer and filament settings. First, choose the Profile tab and select the Durbie-Normal option from Profile Selection. We can see how this looks in the following screenshot:

Now, we are ready to configure the slicer to your 3D printer. Select the Craft tab. There are 34 tabs that offer options to control your printer. These can be seen in the following screenshot:

We'll make our configuration adjustments by selecting three of these tabs.
Select the Carve tab. This is seen in the following screenshot:

Here is where we tell Skeinforge what size of nozzle we are using and how thick our printing layer will be. Unlike Slic3r, we don't simply enter a nozzle size. Skeinforge uses a ratio of edge width over height to determine the nozzle size. If you're using a 0.5 mm nozzle, this is the Durbie-Normal profile default. If you're using a 0.35 mm nozzle, change the
1.55value in Edge Width over Height (ratio) to1.4. Then, change the Layer Height (mm) from0.4to0.3.
Note
Refer to Chapter 3, Scanning and Printing with a Higher Resolution, to learn how these values are selected for different nozzle sizes and layer heights.
Select the Dimension tab. This is seen in the following screenshot:
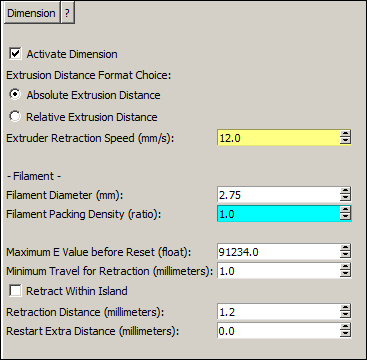
Place your filament size in the Filament Diameter (mm) window. The Durbie-Normal default value is
2.75mm.
Select the Inset tab. This is seen in the following screenshot:

The infill width over thickness ratio should be kept similar to the edge width over height ratio in the Carve plugin. The Durbie-Normal default value is
1.55.
Select Save All at the bottom of the window.
To generate the G-code, we need to left-click on the Skeinforge button at the bottom-left corner of the program window. From the pop up, choose STL files from the extension list.
Choose one of your models to begin with. Locate the STL file and click on Open. Skeinforge begins to compile the G-code.
When the G-code has been compiled, two windows containing analytical information will appear. Close these windows and locate the G-code file by checking the bottom lines in the Python.exe window. It will show you where the file was exported.
Open your host and load the G-code. You are now ready to print the model.
For a new user, the adjustments in Skeinforge may seem arcane. For example, instead of simply entering the size of the print nozzle, Skeinforge requires a ratio of the width to height of the extruded filament. This becomes more complicated as variables change. This is just one aspect of Skeinforge's complexity in comparison to other slicers. Yet, with this additional complexity, far more control can be mastered. Throughout the course of this book, we'll be exploring many different features offered by the Skeinforge plugins.
It won't be unusual for us to have many different profiles and a need to label and store them in Profile Selection. To make a profile, start by selecting one that's similar to your target profile. Make your alterations and select the Profile tab, as shown in the following screenshot:
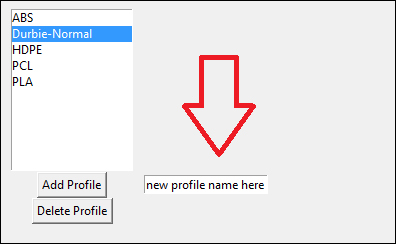
Enter the name of the new profile in the window and select Add Profile. This is shown in the preceding screenshot.