Book Image

Mastering Android Studio 3

By : Kyle Mew
Book Image

Mastering Android Studio 3

By: Kyle Mew

Overview of this book

Android Studio is an Integrated Development Environment (IDE) designed for developing Android apps. As with most development processes, Android keeps resources and logic nicely separated, and so this book covers the management of imagery and other resources, and the development and testing tools provided by the IDE. After introducing the software, the book moves straight into UI development using the sophisticated, WYSIWYG layout editor and XML code to design and test complex interfaces for a wide variety of screen configurations. With activity design covered, the book continues to guide the reader through application logic development, exploring the latest APIs provided by the SDK. Each topic will be demonstrated by working code samples that can be run on a device or emulator. One of Android Studio's greatest features is the large number of third-party plugins available for it, and throughout the book we will be exploring the most useful of these, along with samples and libraries that can be found on GitHub. The final module of the book deals with the final stages of development: building and distribution. The book concludes by taking the reader through the registration and publication processes required by Google. By the time you have finished the book, you will be able to build faster, smoother, and error-free Android applications, in less time and with fewer complications than you ever thought possible.
Table of Contents (10 chapters)

The Android SDK

Technically speaking, it is quite possible to describe the Software Development Kit(SDK) as not being a part of Android Studio, as it is used by other IDEs. However, the IDE would be useless without it, and now is as good a time as any to take a quick look at it and its manager.

The Android SDK is a huge collection of APIs, consisting of Java classes and interfaces organized into complex but logical hierarchies along with other utilities, such as USB drivers and hardware accelerators.

The SDK and its components update far more frequently than the operating system itself, a setup that users should be blissfully unaware of. Android users think in terms of Lollipop or Honeycomb; as developers, we see the Android world in terms of SDK levels.

The SDK is controlled with SDK Manager, which can be accessed via the main toolbar or from Settings | Appearance & Behavior | System Settings | Android SDK from the File menu. There is also a standalone SDK Manager, which can be run without Android Studio. This can be found in the following directory: \AppData\Local\Android\sdk.

The Android SDK standalone manager

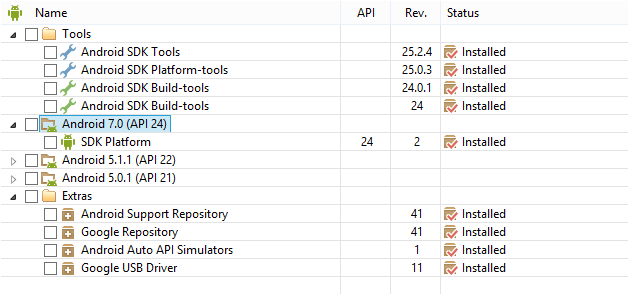
There are three sections to the SDK manager: tools, platforms, and extras. At the very minimum, you will need to install the latest SDK tools, platform tools, and build tools. You will also need to install the most recent platform and any other platform you intend to target directly. You will also need system images for any virtual devices you wish to create as well as the Google USB driver and HAXM hardware accelerator.

If you have been using Eclipse to develop Android apps, you will be acquainted with the Android support libraries. When using Android Studio, it is the Support Repository that should be installed instead.

The easiest way to manage the various updates is to set them to be installed automatically, and this can be done from the Settings dialog (Ctrl + Alt + S) under Appearance and Behavior | System Settings | Updates.

The SDK forms the backbone of our development environment, but however well we master it, we still need some way to test our creations, and in the absence of a large number of real devices, this depends on creating virtual devices with the Android device emulator.

Virtual devices

There are so many Android devices available on the market that it would be an impossibility to thoroughly test our apps on very many real devices . It is for this reason that the system allows us to create emulated devices using the virtual device manager.

The AVD Manager allows us to create both form factor and hardware profiles from scratch and to provide several ready-made virtual devices and system images that can be downloaded from various manufacturers' websites.

AVD configuration screen

Android emulators can be notoriously slow, even on very powerful machines, and this is to be expected, as creating a fully functioning virtual device is a remarkably complex task. There are, however, a few things that can be done to speed things up a little by designing each virtual device to match the particular tasks of the app we are developing. For example, if your app does not make use of the device camera, then do not include it in the configuration. Likewise, do not allocate much more memory than the app itself requires.

Android virtual devices are not the only option available to us, and there are a small but growing number of third-party emulators. Many of these are designed with gamers rather than developers in mind; although Genymotion is specifically a development tool, it contains more functions and is generally faster than the native emulators. Its only drawbacks are that is only free for personal use and only provides system images for phones and tablets and not wearables or large screen devices, such as TVs.

Real-world devices naturally respond far faster than any emulator and, when it comes to testing basic functionality, using our own devices will provide swifter results. This approach is great for testing the fundamentals of an app but provide little to no feedback on just how our apps will look on the wide variety of screen sizes, shapes, and densities that Android devices can have.

Using real devices is a fast way to test application logic but developing apps for specific models or even generic size and shapes will inevitably require the creation of virtual devices. Fortunately, Android Studio comes equipped with an accelerated build process: Instant Run.

Instant Run

In earlier versions of Android Studio, each time a project was run on any kind of device, a full build had to be performed. Even if we made only tiny changes to our code, we would still have to wait for the entire app to be rebuilt and reinstalled. This could prove very time-consuming, especially on less powerful machines. This slowness often resulted in having to test several modifications at once, leading to a more complex debugging process than is ideal.

Instant Run attempts to build only those classes or activities that have been changed since the last build, and providing the manifest file has not been edited, the app is not even reinstalled, and in some cases, the launch activity is not even restarted.

As Instant Run is a recent innovation, it is unfortunately not available on all versions of Android and, to take full advantage of it, you will need to set the minimum SDK level to API 21 or higher, although elements of it will work with API level 15 and higher. In Android Studio, this level is set from the build.gradle (Module: app) file, as follows:

android { 
compileSdkVersion 25
buildToolsVersion "25.0.1"
defaultConfig {
applicationId "com.mew.kyle.chapterone"
minSdkVersion 21
targetSdkVersion 25
versionCode 1
versionName "1.0"
testInstrumentationRunner "android.support.test.runner.AndroidJUnitRunner"
}

More often than not, we try to make our apps as backward-compatible as possible and developing an app that only works with API level 21 or higher would seriously limit the number of users we can reach. However, the time Instant Run saves us makes it worthwhile to test and debug an app API 21 or higher and then, later, reassemble it to match the versions we wish to target.

When deciding which Android versions to target, a useful dashboard displays the up-to-date usage data of platforms and screens. It can be found at developer.android.com/about/dashboards/index.html.

Moving from another IDE to Android Studio need not be a difficult transition and will prove invaluable once complete. However, it may be that you have projects developed in other IDEs that you wish to continue developing using Studio. Fortunately, this is a simple task, as the following section demonstrates.