Book Image

App Inventor 2 Essentials

Book Image

App Inventor 2 Essentials

Overview of this book

App Inventor 2 will take you on a journey of mobile app development. We begin by introducing you to the functionalities of App Inventor and giving you an idea about the types of apps you can develop using it. We walk you through the technical set up so you can take advantage of the interactive development environment (live testing). You will get hands-on, practical experience building three different apps using tutorials. Along the way, you will learn computer science principles as well as tips to help you prepare for the creative process of building an app from scratch. By the end of the journey, you will learn how to package an app and deploy it to app markets. App Inventor 2 Essentials prepares you to amass a resource of skills, knowledge and experience to become a mobile app developer
Table of Contents (15 chapters)
App Inventor 2 Essentials
Credits
About the Authors
About the Reviewer
www.PacktPub.com
Preface
Index

Adding buttons


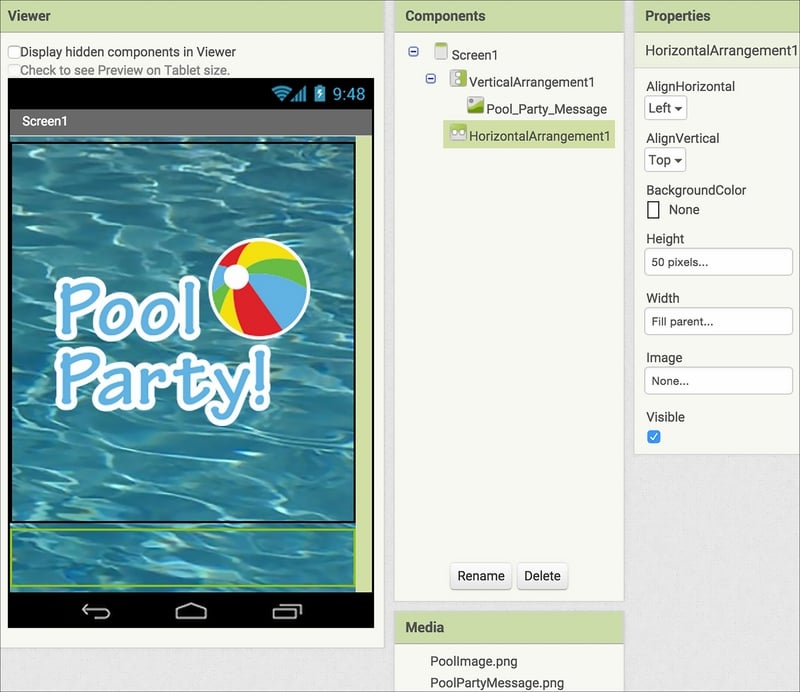
We are going to place our buttons within a HorizontalArrangement component. Drag it from the same place you found VerticalArrangement (the Layout drawer drawer) and drop it underneath VerticalArrangment that currently exist on the Viewer. You can double-check that HorizontalArrangement is indeed below and not within VerticalArrangement by seeing that their names align in the Components panel column, as shown in the following screenshot. The list of components shows that Pool_Party_Message is indented so that it is indeed within the VerticalArrangement1 component, but HorizontalArrangement1 is not. Next, set the properties for HorizontalArrangement1 to match those indicated in the following screenshot:
Go to the User Interface palette, drag out a Button, and place it inside HorizontalArrangement in the Viewer. Repeat this step four more times. You will now have five buttons at the bottom of the screen, as shown in the following screenshot. Since we already set the height of...