Book Image

Qt5 C++ GUI Programming Cookbook - Second Edition

By : Lee Zhi Eng
Book Image

Qt5 C++ GUI Programming Cookbook - Second Edition

By: Lee Zhi Eng

Overview of this book

With the growing need to develop GUIs for multiple targets and multiple screens, improving the visual quality of your application becomes important so that it stands out from your competitors. With its cross-platform ability and the latest UI paradigms, Qt makes it possible to build intuitive, interactive, and user-friendly user interfaces for your applications. Qt5 C++ GUI Programming Cookbook, Second Edition teaches you how to develop functional and appealing user interfaces using the latest version of QT5 and C++. This book will help you learn a variety of topics such as GUI customization and animation, graphics rendering, implementing Google Maps, and more. You will also be taken through advanced concepts like asynchronous programming, event handling using signals and slots, network programming, various aspects of optimizing your application. By the end of the book, you will be confident to design and customize GUI applications that meet your clients' expectations and have an understanding of best practice solutions for common problems.
Table of Contents (15 chapters)

Customizing properties and sub-controls

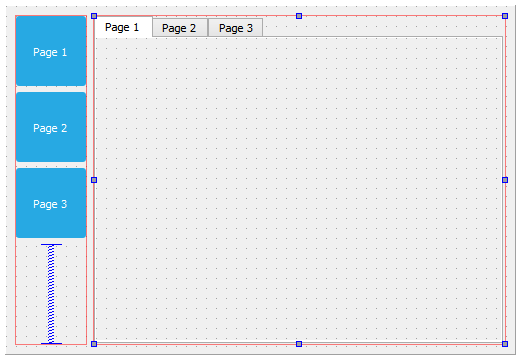
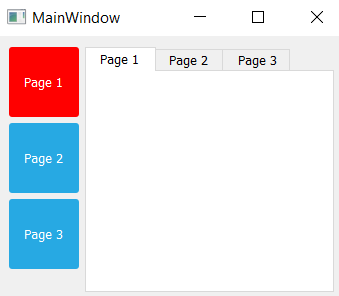
Qt's style sheet system enables us to create stunning and professional-looking UIs with ease. In this example, we will learn how to set custom properties to our widgets and use them to switch between different styles.

How to do it...

Let's follow these steps to customize widget properties and sub-controls:

  1. Let's create a new Qt project. I have prepared the UI for this purpose. The UI contains three buttons on the left side and a Tab Widget with three pages located on the right side, as shown in the following screenshot:
  1. The three buttons are blue because I've added the following style sheet to the main window (not to the individual button):
QPushButton {
color: white;
background-color: #27a9e3;
border-width: 0px;
border-radius: 3px;
}
  1. I will explain what pseudo-states are in Qt by adding the following style sheet to the main window, which you might be familiar with:
QPushButton:hover {
color: white;
background-color: #66c011;
border-width: 0px;
border-radius: 3px;
}
  1. We used the preceding style sheet in the previous Creating a login screen using style sheets recipe, to make the buttons change color when there is a mouse-over event. This is made possible by Qt Style Sheet's pseudo-state, which in this case is the word hover separated from the QPushButton class by a colon. Every widget has a set of generic pseudo-states, such as active, disabled, and enabled, and also a set of pseudo states that are applicable to their widget type. For example, states such as open and flat are available for QPushButton, but not for QLineEdit. Let's add the pressed pseudo-state to change the buttons' color to yellow when the user clicks on it:
QPushButton:pressed {
color: white;
background-color: yellow;
border-width: 0px;
border-radius: 3px;
}
  1. Pseudo-states allow the users to load a different set of style sheets based on the condition that applies to it. Qt pushes this concept further by implementing dynamic properties in Qt Style Sheets. This allows us to change the style sheet of a widget when a custom condition has been met. We can make use of this feature to change the style sheet of our buttons based on a custom condition that we can set using custom properties in Qt. First, we will add this style sheet to our main window:
QPushButton[pagematches=true] {
color: white;
background-color: red;
border-width: 0px;
border-radius: 3px;
}
  1. This changes the push button's background color to red if the pagematches property returns true. Obviously, this property does not exist in the QPushButton class. However, we can add it to our buttons using QObject::setProperty():
    • In your mainwindow.cpp source code, add the following code right after ui->setupUi(this):
ui->button1->setProperty("pagematches", true);
    • The preceding code will add a custom property called pagematches to the first button and set its value as true. This will make the first button turn red by default.
    • After that, right-click on the Tab Widget and choose Go to slot.... A window will then pop up; select the currentChanged(int) option from the list and click OK. Qt will generate a slot function for you, which looks something like this:
private slots:
void on_tabWidget_currentChanged(int index);
    • The slot function will be called whenever we change the page of the Tab Widget. We can then decide what we want it to do by adding our code into the slot function. To do that, open up mainwindow.cpp and you will see the function's declaration there. Let's add some code to the function:
void MainWindow::on_tabWidget_currentChanged(int index) {
// Set all buttons to false
ui->button1->setProperty("pagematches", false);
ui->button2->setProperty("pagematches", false);
ui->button3->setProperty("pagematches", false);

// Set one of the buttons to true
if (index == 0)
ui->button1->setProperty("pagematches", true);
else if (index == 1)
ui->button2->setProperty("pagematches", true);
else
ui->button3->setProperty("pagematches", true);

// Update buttons style
ui->button1->style()->polish(ui->button1);
ui->button2->style()->polish(ui->button2);
ui->button3->style()->polish(ui->button3);
}
  1. The preceding code sets the pagematches properties of all three buttons to false when the Tab Widget switches its current page. Be sure to reset everything before we decide which button should change to red.
  2. Check the index variable supplied by the event signal, which will tell you the index number of the current page. Set the pagematches property of one of the buttons to true, based on the index number.
  1. Refresh the style of all three buttons by calling polish(). You may also want to add the following header to mainwindow.h:
#include <QStyle>
  1. Build and run the project. You should now see the three buttons changing to red whenever you switch the Tab Widget to a different page. Also, the buttons will change to green when there is a mouse-over, as well as change to yellow when you click on them:

How it works...

Qt provides users the freedom of adding their own custom properties to any type of widget. Custom properties are very useful if you want to change a particular widget when a special condition is met, where Qt doesn't provide such a context by default. This allows the user to extend the usability of Qt and makes it a flexible tool for customized solutions. For example, if we have a row of buttons on our main window and we need one of them to change its color depending on which page the Tab Widget is currently showing, there is no way the buttons would know when they should change their color, because Qt itself has no built-in context for this type of situation. To solve this issue, Qt gives us a method to add our own properties to the widgets, which uses a generic function called QObject::setProperty(). To read the custom property, we can use another function called QObject::property().

Next, we will talk about sub-controls in Qt Style Sheets. Often, a widget is not just a single object, but a combination of more than one object or control, used to form a more complex widget. These objects are called sub-controls.

For example, a spin box widget contains an input field, a down button, an up button, an up arrow, and a down arrow, which is quite complicated compared to some other widgets. In this case, Qt grants us more flexibility by allowing us to change every sub-control using a style sheet if we wanted to. We can do so by specifying the name of the sub-control behind the widget's class name, separated by a double colon. For instance, if I want to change the image of the down button to a spin box, I can write my style sheet as follows:

QSpinBox::down-button {
image: url(:/images/spindown.png);
subcontrol-origin: padding;
subcontrol-position: right bottom;
}

That will only apply the image to the down button of my spin box, and not to any other parts of the widget. By combining custom properties, pseudo-states, and sub-controls, Qt provides us with a very flexible method to customize our user interface.

Visit the following link to learn more about pseudo-states and sub-controls in Qt:
http://doc.qt.io/qt-5.12/stylesheet-reference.html.