$_SERVER is an already populated predefined array made available by PHP. It contains information about the server and the environment. The information available in $_SERVER differs from server to server, so the fields may vary depending on the environment.
Exercise 1.7: Displaying Server Information
In this exercise, we will use $_SERVER to print the server information to the browser. Follow these steps:
- Go to the
chapter1 folder.
- Create a new file named
server.php in the folder.
- Write the following PHP code in the file and save it:
<?php
echo '<pre>';
print_r($_SERVER);
echo '</pre>';
?>
- Open your browser and type the following URL in the address bar:
http://localhost:8085/server.php
You will see a screen like the following:
Figure 1.13: Printing details to the browser
In the preceding code, we used the print_r statement to print the contents of $_SERVER. Since it is an array containing multiple entries, we used PHP's print_r function instead of echo to display its contents. The pre tags above and below it separates each item out on to a new line, making it easier to read.
In the browser, we can see that it has printed a lot of information. We have port information, file locations, and many other fields. As mentioned earlier, the information on your system may vary.
Other Predefined Variables
Here are some often-used predefined variables and their usage:
$_POST: We used $_GET earlier in this chapter. $_POST is similar, but with one difference. $_GET fetches you the values from a query string, whereas $_POST contains the data from a form on any PHP page. You will use it more in later chapters.$_FILES: If a file is uploaded from a form on a page, its information is available in the $_FILES array.$_COOKIE: This allows basic text information to be stored as a cookie on the client's browser to be saved for later. A common example of this is if you log in to a website and tick Remember me, a cookie will be saved on the browser, which will be read on the next visit.$_REQUEST: This contains the combined information of $_GET, $_POST, and $_COOKIE.$_SESSION: These are session variables that are used to maintain state in the application. They allow values to be saved in memory for the duration of a session. This could be a username that is saved and displayed on the page while the session exists.$GLOBALS: This contains all variables that are available to a script. It includes variables, data from $_GET, $_POST, any file upload data, session info, and cookie information.
Assignment by Value and by Reference
It is very important to be aware of different ways in which values can be assigned to a variable. In PHP, there are two ways to do it: assignment by value and assignment by reference. Let's look at each of these one by one.
Assignment by reference means assigning a reference of a variable using an ampersand with a variable like this: $var = &$othervar;. Assignment by reference means that both variables end up pointing at the same data, and nothing is copied anywhere.
Assignment by value means a value will be assigned to a new variable but has no reference back to any other variables. It's a standalone variable with a value.
Exercise 1.8: Assigning a Variable by Reference and Changing its Value
In this exercise, we will assign a variable by reference. Then, we will change the other variable's value and ensure that the original variable's value has also changed. Follow these steps:
- Move inside the
chapter1 folder on your system.
- Create a new file named
assignment.php in this folder.
- First, we will declare a
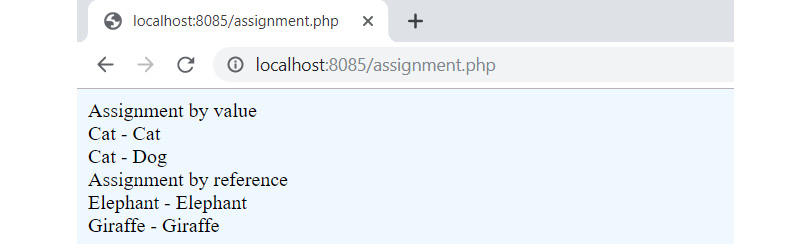
$animal1 variable and assign the value Cat to it. Then, we declare another variable, $animal2, and assign the $animal1 variable to it. This means that the value of $animal1 is copied to the $animal2 variable. We then confirm this by echoing both variables in line 10, where we see that both variables have the value Cat:<?php
// Assignment by value
echo 'Assignment by value';
echo '<br>';
$animal1 = 'Cat';
$animal2 = $animal1;
echo $animal1 . ' - ' . $animal2;
echo '<br>';
- Next, when we write
$animal2 = 'Dog', we change the value of the $animal2 variable to Dog and then again print both the variables. Now, we can see that although the value of $animal2 has changed, it did not have any effect on $animal1. This is what we call assignment by value. The value is just copied from one variable to the other, and both variables remain independent:$animal2 = 'Dog';
echo $animal1 . ' - ' . $animal2;
echo '<br>';
Now, let's look at assignment by reference. "By reference" means that the new variable becomes an alias of the older variable. Hence, changing the value of the new variable changes the value of the older variable.
- Now, we will declare another variable,
$animal3, with the value set to Elephant. Next, we create a new variable, $animal4, and assign the value of the $animal3 variable to it. While doing the assignment, note the ampersand (&) before the variable name. This ampersand tells PHP to assign the $animal4 variable to the $animal3 variable by reference. In the code, we will verify the value of both the variables by printing values of both variables, and they are the same:// Assignment by reference
echo 'Assignment by reference';
echo '<br>';
$animal3 = 'Elephant';
$animal4 = &$animal3;
echo $animal3 . ' - ' . $animal4;
echo '<br>';
$animal4 = 'Giraffe';
- To see assignment by reference in action, we change the value of
$animal4 to Giraffe. After this, we print both variables again and can see clearly that changing the value of $animal4 has changed the value of $animal3 as well:echo $animal3 . ' - ' . $animal4;
?>
- Now, open the browser and point to our file by opening this URL:
http://localhost:8085/assignment.php
You should see a screen like this:
Figure 1.14: Printing output to the browser
Unless specified, variables are always assigned by value in PHP.
Using isset to Check for Variable Declaration
At times, we need to check whether a variable has been set, especially in cases where there is some user input from a form, and we need to verify it before saving it to the database. isset is a built-in PHP function that returns true for declared variables with values other than null.
Null data types are used when a variable has no value.
Let's do an exercise.
Exercise 1.9: Using isset to Check whether a Variable Has Been Set
In this exercise, we will use PHP's isset function to check whether a variable has been set. Follow these steps:
- Go to the
chapter1 folder on your system.
- Create a new file named
isset.php.
- Write the following code in
isset.php and save the file:<?php
$name1 = '';
$name2 = null;
echo 'checking $name1 : ';
var_dump(isset($name1));
echo '<br>';
echo 'checking $name2: ';
var_dump(isset($name2));
echo '<br>';
echo 'checking undeclared variable $name3: ';
var_dump(isset($name3));
?>
- Now, run the built-in PHP web server using the
php -S localhost:8085 command. Make sure that you are in the chapter1 folder.
- Open the following URL in your browser:
http://localhost:8085/isset.php
You should see a screen like this:
Figure 1.15: Printing the output
var_dump is a built-in PHP function that is used to print a variable's value and type. It's useful to see the contents of a variable and also what data type it contains. You can then make decisions about how to work with the variable based on this information.
isset is a built-in PHP function that determines whether a variable is declared and is different to NULL.
In the preceding code, we have declared two variables, $name1 and $name2. $name1 is an empty string and $name2 is set to null. $name3 is not declared. Then, we use PHP's var_dump function to print $name1, $name2, and $name3. Since PHP does not require declaring variables, we can use $name3.
On printing the values, we can see that the isset function returned true for $name1, which means a valid value is set for $name1. This is because $name1 has a valid value – an empty string. But it is returning false for $name2 because it is set to null, meaning that $name2 is not set.
Lastly, we dumped info about an undeclared variable, $name3. Since this is not declared at all, the isset function returned false, meaning this variable is also not set.
isset is a handy function, and you will be using it a lot when working with data.
A related function to isset is unset, which clears the value of a variable.
Activity 1.1: Displaying Query Strings in the Browser
In this activity, we will apply the knowledge gained from the earlier exercises and use variables to retrieve query strings from a URL and print the relevant information to the browser.
You will create a simple application that allows users to view movie information in the browser. Once you complete the activity, you should have an output similar to the following:
Figure 1.16: Expected outcome
These steps will help you complete the activity:
- Create a file named
movies.php.
- Capture query string data in the file to store the details of the movies, such as movie names, actor/actress names, and release year.
- Create a basic HTML structure and then display the captured query strings.
- Go to the Terminal and execute the command to start the built-in web server.
- After the web server is up and running, open the PHP page and append your query strings to the URL in your browser.
Note
The solution for this activity can be found via this link.


 Free Chapter