Written by a 10-time Microsoft MVP with 25 years of IT and technical coaching experience, this practical guide offers real-world expertise in Windows Server management. From building and connecting servers to securing them, and even intentionally breaking them to learn, you’ll find comprehensive, experience-based coverage that takes you deep into professional administration.
Fully updated for the 2025 release, this edition prepares you to manage any Windows Server environment, whether deploying the latest version or maintaining Server 2012 in a modern infrastructure. You'll work with PowerShell, Server Manager, Windows Admin Center, RSAT, and Azure Arc to achieve centralized and efficient administration. While the focus is on Windows Server 2025 LTSC with Desktop Experience, the book also explores Server Core, containerization, and the evolving role of Nano Server.
Along the way, you'll gain hands-on experience with core services, including Active Directory, DNS, DHCP, and Group Policy, and explore advanced topics such as certificate services and PKI, Hyper-V virtualization, Remote Desktop Services, failover clustering, DFS, and Intune integration.
By the end of this book, you’ll have the skills to manage and modernize complex server infrastructures with confidence.
Let’s jump in the wayback machine for a minute and walk through some graphical interface history. Microsoft Windows users have always known and loved their computers, and a large part of the reason Windows became such a standard in the business world is that the global workforce is familiar with navigating a Windows world. This familiarity has paid unimaginable dividends for Microsoft over the years, but there have been a couple of bumps in the road. Unfortunately, Microsoft turned a lot of people off with the introduction of Windows 8 and Server 2012, not because functionality or reliability was lacking, but because the interface was so vastly different from what it had been before. It was almost like running two separate operating systems at the same time. You had the normal desktop experience, in which all of us spent 99.9% of our time, but then there were also those few moments where you found yourself needing to visit the full-page Start menu. More likely, you stumbled into it without wanting to. However you ended up there, inside that full-screen, tablet-like interface, for the remaining 0.01% of your Server 2012 experience, you were left confused, disturbed, and wishing you were back in the traditional desktop. I am, of course, speaking purely from experience here. There may be variations in your personal percentages of time spent, but based on conversations I was involved in at the time, I am not alone in these views, and I haven’t even mentioned the magical, self-appearing Charms bar. Some bad memories are better left in the recesses of the brain.
The major update of Windows 8.1 and Server 2012 R2 came with the welcome relief from these symptoms. There was an actual Start button in the corner again, and you could choose to boot primarily into the normal desktop mode. However, should you ever have the need to click on that Start button, you would find yourself right back on the full-page Start screen, which I still found almost all server admins trying their best to avoid at all costs.
Well, it turns out that Microsoft does listen to the people and brought some much-needed relief in Windows 10 and Windows Server 2016, and they have not deviated in such a major way since. Whether working on Windows Server 2016, 2019, or 2022, you will experience comfort and stability in the flavor of a Windows 10 look and feel, which finally wiped away the full-screen Start menu and brought balance back to the universe.
Then came Windows 11…
Certainly updated, but not nearly as egregiously as the Windows 8 release, Windows 11 is much more rounded and polished while still maintaining Windows-centric roots. As far as the current server graphical interface goes, Windows Server 2025 receives the same facelift, taking on the interface of Windows 11 workstations. If you are comfortable navigating inside Windows 11, you are already well suited to Windows Server 2025.
For anyone new to working within Windows or just looking for some tips and tricks to get them rolling, this section is for you.
The updated Start menu
All throughout Windows 10 sub-version releases, there were small ongoing changes to the Start menu. Backpedaling from Windows 8, we rediscovered a real Start button that launches a real Start menu—one that doesn’t take over the entire desktop. To be honest, personally, I almost never open the Start menu at all, other than to search for an application or feature that I want. We will cover more on that very soon.
Now that we have moved into the Windows 11 interface, Start menu interoperability is relatively the same as Windows 10, though, as I’m sure you noticed during your first interaction with Windows 11, the Start button and Taskbar icons have moved into the middle of your screen. Why? Nobody has been able to tell me a sure answer to that, but it takes some getting used to.
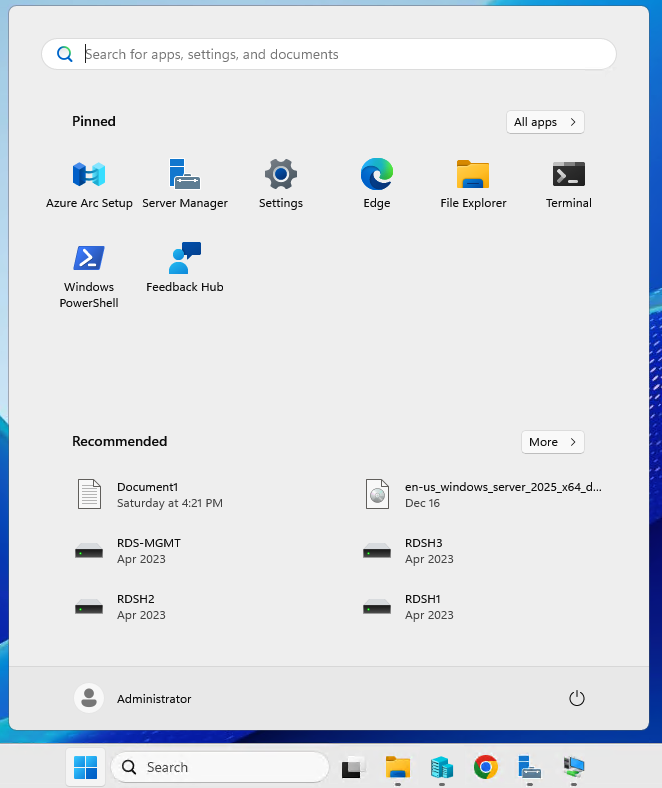
Other than the arguably annoying slide of the Start button to the middle of the taskbar, the new Start menu is quite useful. Click on that button, and a few nice things stand out:
Viewing of all applications installed on the server is possible by clicking the All apps button, but we are creatures of habit, and many times, when the Start button is pressed, we are re-visiting an application or task that we have done a hundred times before. Pinning commonly used items to the top of your Start menu can save time and clicks during your daily work.
Clicking that All apps button lists all applications installed on the server, in alphabetical order. This is very useful for launching an application or for doing a quick check to find out whether a particular app or feature is installed on your server.
The bottom of the Start menu includes a couple of buttons for quick access to account or system items. Easily and more clearly accessible here than in previous versions is the ability to shut down, restart, or log out of a server.
Search, the text bar on top of the Start menu, is by far its most useful decoration, as you can simply click the Start button on your keyboard and immediately begin typing the name of any application, setting, or document that you want to launch.
You can see all of these functions in Figure 1.2:
Figure 1.2: The new Start menu
Now that is a breath of fresh air. A simple but useful Start menu, and more importantly, one that loads quickly over remote connections such as RDP or Hyper-V consoles.
The Quick Admin Tasks menu
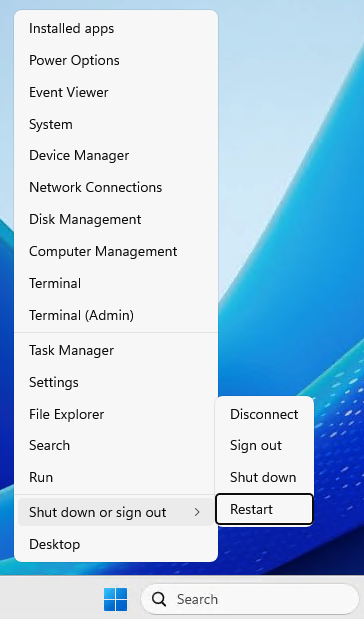
As nice as it is to have a functional Start menu, as a server administrator, I still very rarely find myself needing to access the traditional menu for my day-to-day functions. This is because many items that I need to access are quickly available to me inside the Quick Admin Tasks menu, which opens by simply right-clicking on the Start button. This menu has been available to us since the release of Windows 8, but many IT professionals still make little use of this functionality.
This menu has become an important part of my interaction with Windows Server operating systems, and hopefully, it will be for you as well. Right-clicking on the Start button shows us immediate quick links to do things such as open Event Viewer, view System properties, check Device Manager, and even shut down or restart the server.
The two most common functions that I call for in this context menu are the Run function and using it to quickly launch a Terminal prompt. Even better is the ability from this menu to open either a regular user context Terminal prompt or an elevated/administrative Terminal prompt. Using this menu properly saves many mouse clicks and shortens troubleshooting time:
Figure 1.3: The Quick Admin Tasks menu
Alternatively, this menu can be invoked using the WinKey + X keyboard shortcut! In fact, accessing this menu via keyboard shortcuts has become popular enough that many people have begun referring to this admin menu as the “WinKey+X menu,” though that is not technically accurate.
Using the Search function
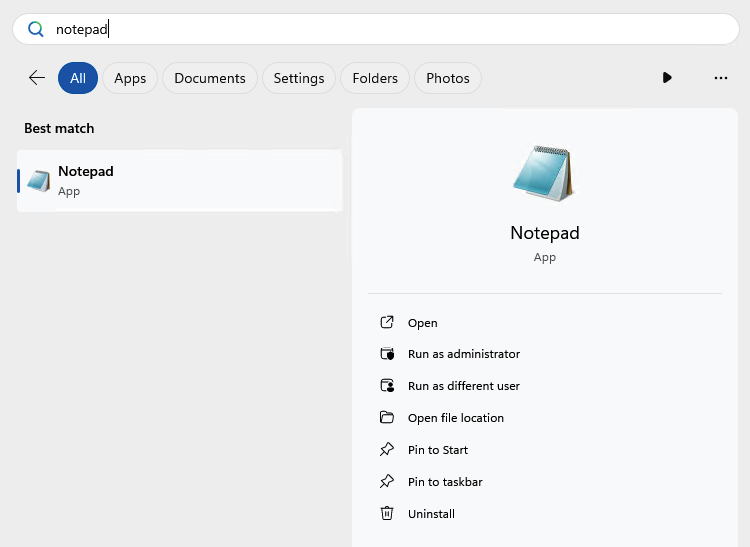
While the Quick Admin Tasks menu hidden behind the Start button is useful for calling common administrative tasks, using the Search function inside the Start menu is a powerful tool for interfacing with literally anything on Windows Server. Depending on who installed applications and roles on your servers, you may or may not have shortcuts available to launch them inside the Start menu. You also may or may not have desktop shortcuts or links to open these programs from the taskbar. I find that it is often difficult to find specific settings that you are trying to tweak, by point-and-clicking your way through the interface. Control Panel is slowly being replaced by the newer Settings menu in newer versions of Windows, and sometimes this results in the discovery of particular settings being difficult. All of these troubles are alleviated with the search bar inside the Start menu. By simply clicking on the Start button or, even easier, by pressing the Windows key (WinKey) on your keyboard, you can simply start typing the name of whatever program, setting, or document you want to open, and you will see search results from across the entire server.
As a most basic example, press WinKey on your keyboard, then type notepad, and press the Enter key. You will see that good old Notepad opens right up for us. We never had to navigate anywhere in the Programs folder in order to find and open it. In fact, we never even had to touch the mouse, which is music to the ears of someone like me who loves doing everything he possibly can via the keyboard:
Figure 1.4: Windows Search
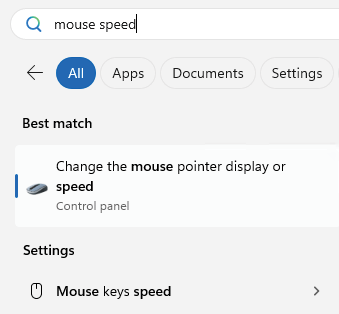
An even better example is to pick something that would be buried deep inside Settings or Control Panel. How about changing the speed of your mouse? A traditional server admin might open Control Panel (if they can find it), probably navigate to the Hardware or Appearance and Personalization sections, because nothing else looks obviously correct, and still not find what they were looking for. After poking around for a few more minutes, they would start to think that Microsoft forgot to add this setting altogether. But alas, these mouse power settings are simply buried somewhere else, and to be honest, I don’t think Microsoft really expects admins to manually seek things out at this point. We will discuss the new Settings screen momentarily, from which many common settings are being re-grouped into new homes, but ultimately, for the purposes of this example, you are currently stuck at the point where you cannot find the setting you want to change. What’s the quick solution? Press your WinKey to open the Start menu, and type mouse speed. You’ll see in the list of available options showing in the search menu one called Change the mouse pointer display or speed. Click on that and you will have found the setting you were looking for all along:
Figure 1.5: Searching for settings
Any other applications, settings, or even documents on your server that are related to “mouse speed” will also be displayed in your search results. I don’t know of a more powerful way to open applications or settings on Windows Server 2025 than using the search bar inside the Start menu. Give it a try today!
Pinning programs to the taskbar or Start menu
While Windows Server 2025 provides great searching capabilities so that launching hard-to-find applications is very easy, sometimes it’s easier to have quick shortcuts for commonly used items available with a single click down in the traditional taskbar. Alternatively, pin them directly to your Start menu for easy access in the future. Whether you have sought out a particular application by browsing manually through the Start menu or have used the Search function to pull up the program that you want, you can simply right-click on the program and choose Pin to taskbar to stick a permanent shortcut to that application in the taskbar at the bottom of your screen. Once you have done this, during future logins to your session on the server, your favorite and most-used applications will be waiting for you with a single click.
As you can see in Figure 1.6, you also have the ability to pin programs to the Start menu, which of course is another useful place from which to launch them regularly:
Figure 1.6: Pinning programs to the taskbar
Many readers will already be very familiar with the process of pinning programs to the taskbar, so let’s take it one step further to portray an additional function you may not be aware is available to you when you have applications pinned.
The power of right-clicking
We are all familiar with right-clicking in any given area of a Windows operating system in order to use some more advanced functions. Small context menus displayed upon a right-click have existed since the two-button mouse rolled off the assembly line.
We often right-click in order to copy text, copy documents, paste these, or get into a deeper set of properties for a particular file or folder. Many day-to-day tasks are accomplished with that mouse button. What I want to take a minute to point out is that software makers, Microsoft and otherwise, have been adding even more right-click functionality into application launchers themselves, which makes it even more advantageous to have them close at hand, such as inside the taskbar.
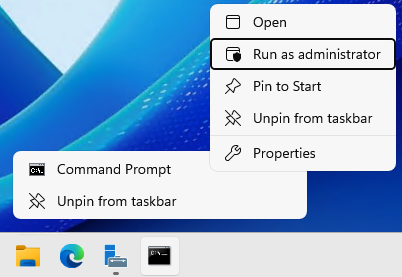
The amount of functionality provided to you when right-clicking on an application in the taskbar differs, depending on the application itself. For example, if I were to right-click on Command Prompt, I have options to either open Command Prompt or Unpin from taskbar. Very simple stuff. If I right-click again on the smaller menu option for Command Prompt, I have the ability to perform the same functions, but I could also get further into Properties or Run as administrator. So, I get a little more enhanced functionality the deeper I go:
Figure 1.7: Right-click to find Run as administrator
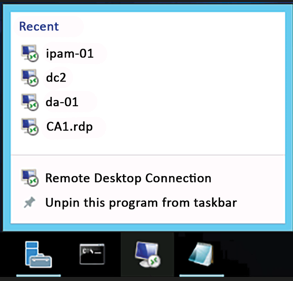
With other programs, you may find even more results. And the more you utilize your servers, the more data and options you will start to see in these right-click context menus. Two great examples are Notepad and Remote Desktop Client. On my server, I have worked on a few text configuration files, and I have used my server to jump into other servers to perform some remote tasks. I have done this using the Remote Desktop client. Now, when I right-click on Notepad as listed in my taskbar, I have quick links to the most recent documents that I have worked on:
When right-clicking on my RDP icon, I now have quick links listed right here for the recent servers that I have connected to. I don’t know about you, but I RDP into a lot of different servers on a daily basis. Having a link for the Remote Desktop client in the taskbar, automatically keeping track of the most recent servers I have visited, definitely saves me time and mouse clicks as I work through my daily tasks:
Figure 1.9: Recent RDP connections
These right-click functions have existed for a couple of operating system versions now, so it’s not new technology, but it is being expanded upon regularly as new versions of applications are released. It is also a functionality that I don’t witness many server administrators utilizing, but perhaps they should start doing so in order to work more efficiently, which is why we are discussing it here.
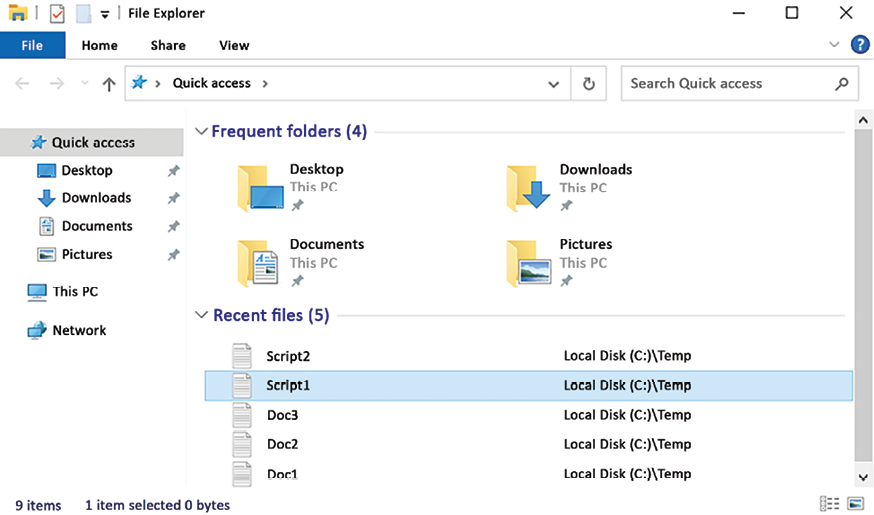
Something that is enhanced in the Windows 11 and Server 2025 platforms that is also very useful on a day-to-day basis is the Quick access view, which is presented by default when you open File Explorer. We all know and use File Explorer and have for a long time, but typically, when you want to get to a particular place on a hard drive or to a specific file, you have many mouse clicks to go through in order to reach your destination. Windows Server 2025’s Quick access view immediately shows us both recently and frequently opened files and folders that we commonly access from the server. We, as admins, often have to visit the same places on the hard drive and open the same files time and time again. Wouldn’t it be great if File Explorer lumped all those common locations and file links in one place? That is exactly what Quick access does.
You can see in the following screenshot that opening File Explorer gives you quick links to open both frequently accessed folders as well as links to your recent files. A feature like this can be a real time-saver, and regularly making use of these little bits and pieces available to you, in order to increase your efficiency, demonstrates to colleagues and those around you that you have a real familiarity and comfort level with this latest round of operating systems:
Figure 1.10: Quick access
You’ll also notice the small pushpin icons next to some of those Quick access locations. You can easily right-click on any folder location via File Explorer and choose Pin to Quick access, adding it to your Quick access menu, and Windows will maintain that pinned location right here inside the Quick access section until you choose to unpin it.
Yet another way that you can use right-clicking to your advantage is when you want to launch Terminal or PowerShell in a particular directory on a filesystem. Opening PowerShell in a standard method will land your PowerShell window directly in C:\Users\(username). Depending on what you need to do with PowerShell, you might spend many keystrokes navigating your way to the correct directory on your server from which you need to run a script or make some changes. Alternatively, if you are already inside File Explorer, you can hold down your Shift key and then right-click on any directory and choose the Open in Terminal option or Open PowerShell window here. This will immediately launch a new instance of Terminal or PowerShell, with your current directory being the folder you right-clicked on!
App snapping
Some of you may be familiar with add-ins to Windows called PowerTools, one of which allows you to easily carve out segments of your screen for different applications. When running multiple windows or applications onscreen at the same time, PowerTools allows an easy way to “snap” applications to a certain size or section of the screen, without any manual click-and-drag resizing of windows. Microsoft has baked some of this capability directly into Windows 11, and now that we are running the Win11 interface inside Windows Server 2025, application snapping is natively included in this newest server operating system as well. To be clear, PowerTools still offers other cool functions, but app snapping that we are discussing here is now a native capability and will work out of the box in Server 2025.
App snapping is quite intuitive, and you won’t need a lot of instruction to make use of it, but it’s good to know that there are three different ways you can call it to action:
Drag a window to the top-center of your screen and hold it there
Hover your mouse over the top of any window’s maximize button
Use WinKey + Z
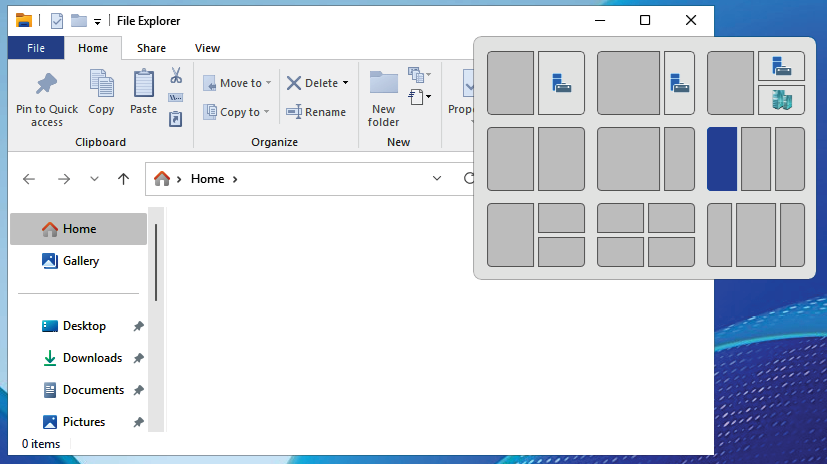
Invoking any of the preceding three procedures will display a nice little bar, which provides you with tons of different options about where and how you would like to position this window. Take a look at the following screenshot, where I have hovered my mouse over the top of the maximize button in a File Explorer window.
Figure 1.11: App snapping in action
As you can see, simply selecting one of the available screen zones will immediately snap this File Explorer window into that size and shape. My mouse is currently hovering over the option you see in blue, which would place File Explorer in the far-left, third section of my screen. When selecting a zone that includes other gray-colored zones, Windows will snap your application into that position, and then immediately ask you what application you would like to place in the other remaining open sections of the screen. I use this functionality all the time when repositioning windows on my workstation—why not on servers?
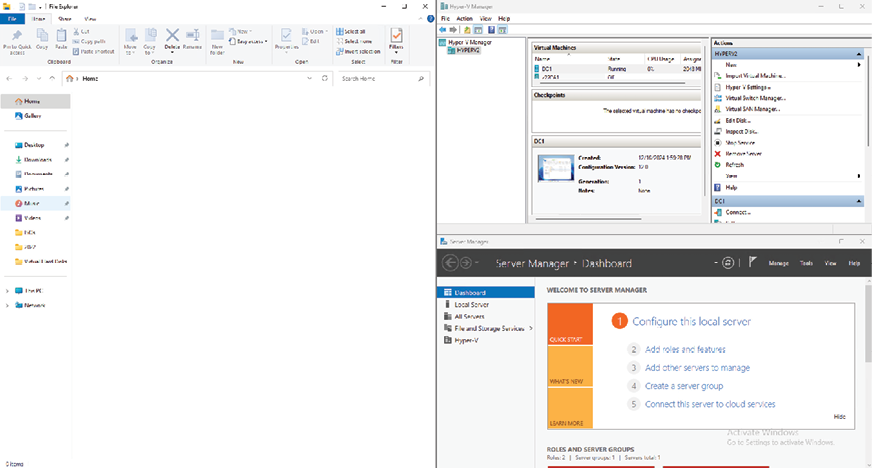
App snapping is fairly intuitive. As you can see in Figure 1.11, the top three options for File Explorer positioning have automatically given me options that will auto-position the other apps I currently have open on this server. Those apps are Server Manager and the Hyper-V Manager console, which are easily identifiable by their icons. Selecting one of those top options will immediately place File Explorer on the left, with the other applications displayed alongside it toward the right. In Figure 1.12, you can see that I selected the upper-right option, which laid File Explorer alongside both of the other open applications.
Figure 1.12: After snapping
Quick tip: Need to see a high-resolution version of this image? Open this book in the next-gen Packt Reader or view it in the PDF/ePub copy.
The next-gen Packt Reader is included for free with the purchase of this book. Scan the QR code OR go to https://packtpub.com/unlock, then use the search bar to find this book by name. Double-check the edition shown to make sure you get the right one.
One more tip related to this topic: If you know me at all, you know that I touch the mouse as little as possible, trying my best to live in a keyboard-only world. Your open applications and windows can also be snapped around your screen(s) with zero mouse interaction at all, by employing the following hotkeys:
WinKey + Left Arrow: Snap the active window to the left half of your current screen
WinKey + Right Arrow: Snap the active window to the right half of your current screen
WinKey + Up Arrow: Maximize the current window
WinKey + Down Arrow: Minimize the current window
WinKey + M: Minimize all open windows, which is pretty useful
When using multiple monitors, use these hotkeys:
WinKey + Shift + Left: Move the current window to the next monitor on your left
WinKey + Shift + Right: Move the current window to the next monitor on your right
That may seem like a lot of keyboard functions to keep in the human memory banks, but they will become muscle memory in no time. Trust me, the time savings are worth it!
Read this chapter and the full book FREE of cost - No Credit card required!
Plus access over 8,000 other expert tech books and videos just by signing up - No commitment!
CONTINUE READING
83
Tech Concepts
36
Programming languages
73
Tech Tools
Unlimited access to the largest independent learning library in tech of over 8,000 expert-authored tech books and videos.
Innovative learning tools, including AI book assistants, code context explainers, and text-to-speech.
50+ new titles added per month and exclusive early access to books as they are being written.


 Free Chapter


 Quick tip: Need to see a high-resolution version of this image? Open this book in the next-gen Packt Reader or view it in the PDF/ePub copy.
 The next-gen Packt Reader is included for free with the purchase of this book. Scan the QR code OR go to