

In this section, we will address how to set up your Canvas profile, adjust your general account settings, and personalize your notification settings. If you are using an institutional account, the ability to adjust your profile, settings, and notifications may be limited or different than described in this section. While your individual situation may vary, let's start by covering how to set up your Canvas profile, which other users will see as they interact with you on Canvas.
Your Canvas profile includes your profile picture, biography, and website links. To begin, perform the following steps:
Click on your name in the top-right menu of the dashboard.
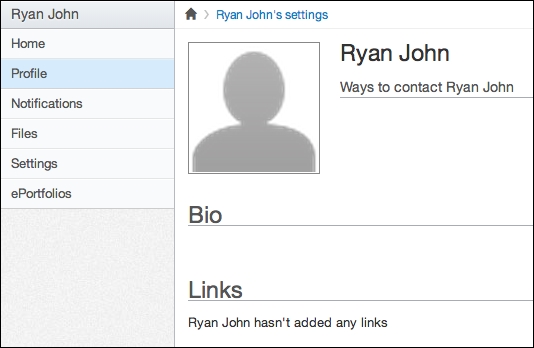
This will bring you to your profile page. Your profile page is a part of your account settings, which are laid out similarly to the way Canvas courses are laid out.
Your other account settings appear on the left-side menu as shown in the following screenshot, but for now, let's update your profile picture:
Including a photo of yourself makes your presence on Canvas immediately more relatable and inviting. When participants can see a photo of someone who is writing to them or is posting on discussion boards, the Canvas community becomes more vibrant, personalized, and engaging. To add or change your profile picture, perform the following steps:
Click on the gray outline of a person next to your name on your profile page. Notice that when you hover your mouse over this gray image, an icon appears in the bottom-right part of the image that looks like a pencil. This pencil icon is the symbol for editing something within Canvas, so in most situations, you can click on the pencil icon wherever you see it in order to edit what you're looking at. In the following screenshot, you see an example of the gray outline as well as the editing pencil icon seen throughout Canvas:

After you click on the pencil icon, a pop-up window will appear with three options along the top side: Upload a Picture, Take a Picture, and From Gravatar.
To upload a photo from your computer, click on Upload a Picture and then click on choose a picture below it.
From there, another pop-up window will appear, which will allow you to select the image you would like to use as your profile picture from your computer. Once you have found the picture on your computer, click on the file and then click on Open.
Next, you can crop the picture into a square using the cropping tools that appear. After you have cropped your photo, click on Save and your picture will be updated. The following screenshot displays the cropping tools as well as the Save button:

If you click on Take a Picture at the top of the pop-up window, your webcam will open and you will be able to take a new photo to use as your profile picture.
If you have a Gravatar account (a separate account from Canvas), you can click on From Gravatar to select your profile picture from your Gravatar account.
After you click on the Save button, the profile picture window will close and you will see that the image you selected has replaced the default gray outline profile picture as displayed in the following screenshot:

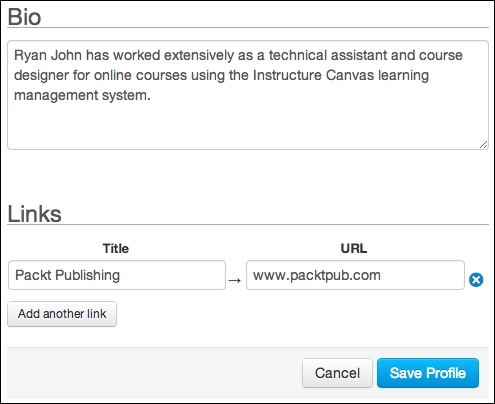
To edit what other Canvas users can see about you, you can adjust your name, title, and bio, as well as add links to your personal or professional websites. As with your profile picture, any information you add to your Canvas profile will help participants gain a better understanding of who you are as a person. Within a fully online learning environment, establishing personal connections with participants can be very important in building a productive and comfortable learning community. To add information to your profile, perform the following steps:
Begin on your profile page and click on Edit Profile on the right side of the screen.
This will open editing boxes for your Name, Title, Bio, and Links fields. You can click on each editing box to adjust or add content.
When you are finished editing, click on Save Profile at the bottom of the screen before moving on, as shown in the following screenshot:
Once you have saved your updates, they will be visible to other Canvas users when they view your profile. You may notice a message under the Ways to Contact Me section that mentions you have not registered any services. Next, we will learn how to adjust your account settings and add alternative forms of contact including e-mail addresses, cell phone numbers, or registered services such as Facebook, Twitter, Skype, or LinkedIn.
To adjust your account settings such as your display name, contact information, language, time zone, and integrated web services, click on the Settings link in the top-right menu:

You can also access your settings by clicking on the Settings link on the left-side menu of your profile page. Let's begin by adjusting your contact information so anything you receive from Canvas goes to an address, device, or program that you check frequently.
On your Settings page, the Ways to Contact section on the right-side menu includes the e-mail address with which you have registered and the option to add more e-mail addresses as well as more methods of contact. To add an e-mail address, perform the following steps:
Click on the Add Email Address link.
A pop-up window will appear that will let you add as many alternate e-mail addresses as you would like, with the option of signing in to Canvas with any of them.
If you would like to sign in to Canvas using a new e-mail, type in the new e-mail address, check the box next to I want to log in to Canvas using this email address, and then click on Register Email in the bottom-right corner of the pop-up window, as shown in the following screenshot:

Once you click on Register Email, the pop-up window will close and you can continue editing your contact information.
One of the unique features of Canvas is the ability to receive notifications from Canvas directly to your cell phone. Depending on your desired level of availability to participants and how frequently you would like to monitor activity with your courses, you may choose to add your cell phone number and receive notifications via SMS texts. For example, this feature might be a wise option if you consistently check your cell phone but rarely check your e-mail. To add your cell phone number in order to receive SMS text message notifications, perform the following steps:
Click on Add Contact Method under the Ways to Contact section on the right-side menu of the Settings page.
In the pop-up window, enter your cell phone number and select your provider. The SMS e-mail address should automatically appear once you select your provider. Note that Canvas SMS services are currently geared toward US providers.
Once you have entered your number and selected your provider, click on Register SMS in the bottom-right corner of the pop-up window, as shown in the following screenshot:

You will then see a new pop-up window (next screenshot) appear in your browser that asks for a confirmation code. You should receive an SMS text on your cell phone with the confirmation code, which you should then enter into the pop-up window on your screen and click on Confirm. If you do not receive an SMS text with a confirmation number and you entered your phone number correctly, click on the Re-Send Confirmation link in the pop-up window. If you entered your number incorrectly, close the pop-up window and begin the process again by clicking on Add Contact Method under the Ways to Contact section on the right-side menu of the Settings page:

Once you have confirmed your cell phone number, you will be able to receive notifications via text messages.
As with many other online services you may have encountered, configuring the general settings of your Canvas account is important for proper and accurate functioning of your account. Your general settings include your name, preferred language, current time zone, and password. Also found within the general settings menu are the options to receive Instructure informational e-mails and delete your account. To edit your general settings, perform the following steps:
Navigate to the main Settings page.
On the right-side menu, click on the Edit Settings button underneath the Ways to Contact menu as shown in the following screenshot:

You will see textboxes and drop-down menus appear in the center part of the screen. When adjusting the Full Name, Display Name, and Sortable Name fields for your account, each section includes a brief description of where that display name will appear. For example, if you are teaching a college course, you may want your name to be displayed with the title of
ProfessororDr.for discussion posts, messages, and comments. The following screenshot provides an example of each type of name:
Below your name settings, you can use the Language and Time Zone drop-down menus to adjust the language of your Canvas experience as well as the time zone in which you live. To adjust your time zone, click on the drop-down menu and select from the listed options.
You can check the box next to I want to receive information, news and tips from Instructure, as shown in the following screenshot, if you would like Instructure to e-mail you about certain features of Canvas. You will not receive informational product e-mails from Instructure if you do not check this box, though you will receive course notification e-mails based on your notification settings:

To change your password, check the box next to Change Password and a new menu will open below that checkbox.
Using the drop-down menu that appears, select the e-mail address you would like to change the password for, then enter your old password, your new password, and confirm your new password in the appropriate boxes as shown in the following screenshot:

When finished, click on the blue Update Settings box below your settings information.
The option to delete your account also appears within the menu to edit your general settings. To delete your account, perform the following steps:
Navigate to the the main Settings page and click on the Edit Settings button underneath the Ways to Contact menu.
Scroll down and click on the red Delete My Account link.
You will be taken to a new page that asks if you really want to delete your account. If you are positive you would like to delete your account, click on the button that says Delete [Your Name] and your account will be permanently deleted, as shown in the following screenshot:

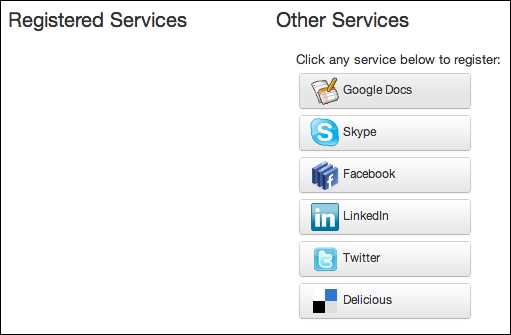
Moving on from your general account settings, let's explore some of the innovative connections you can configure between Canvas and other common online services, referred to as Registered Services.
Canvas allows you to link registered services to your Canvas account in order to better integrate Canvas into your life online. Utilizing Registered Services allows you to connect Canvas to other websites, programs, and networks you already use when you are online. Again, if you are using an institutional account, your options for external services may be limited or different compared to those discussed in this section. If you already have accounts with any of the services seen in the following screenshot, you can link your Canvas profile to your external accounts to utilize the features of those external services:
To connect the preceding services to your Canvas account as registered services, perform the following steps:
Click on the service you would like to link to your Canvas account.
Each service has slightly different instructions that appear, so follow the onscreen instructions carefully to link your Canvas account to your external service account.
Once you have linked Canvas to one of the listed services, that service will appear under the Registered Services heading, as shown in the following screenshot:

One of the most common reasons to register an external service with Canvas is to receive Canvas notifications while you are logged in to that external service. To adjust these options, let's now discuss how to customize your notification preferences.
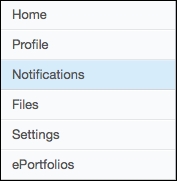
Your notification preferences are some of the most important things to know how to adjust when using Canvas. The same goes for your students, since not being notified of an announcement or a direct message could mean missing an online meeting or assignment if their notification preferences are not adjusted appropriately. The easiest way to access your notification settings is to click on Notifications on the left menu of your account Settings page. If you've just added a profile picture, updated your profile, and edited your general account settings, look to the left of your screen and click on Notifications, as shown in the following screenshot:
The Notifications page allows you to adjust the following:
When you open your Notification Preferences, you will see a spreadsheet-like grid, shown in the following screenshot, which lists the course activities you can be notified about in the left column and the method of notification along the top row:
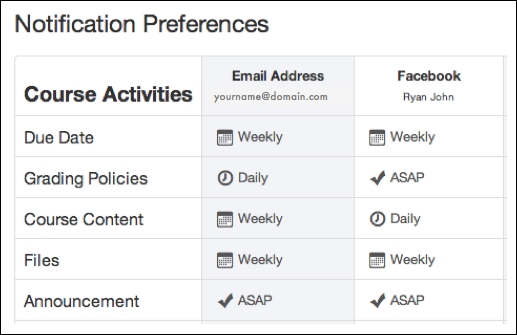
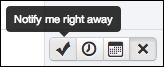
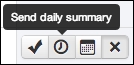
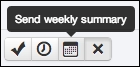
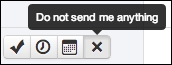
The methods of notification along the top come from the contact information and the registered services that you have configured in your general account settings. You will notice that in the center of the grid, you can hover your mouse over the cross sections of Course Activities and your chosen methods of contact. If you hover your mouse over any of these cross sections, you can select one of the four options for how frequently Canvas will notify you about the selected activity. The following screenshots show each option:
To adjust your notification preferences, perform the following steps:
Locate the course activity you would like to be notified about.
Then, find the method of contact through which you would like to be notified about that activity.
Within the Notification Preferences grid, click on one of the four notification frequency options to set the notification method and frequency. For example, the following screenshot displays the Send daily summary option to send a daily summary for any changes to Grading Policies:

Once you have selected the notification frequency, you will see an icon with the selected frequency show up on the grid.
Your notification preferences are automatically saved once you select them.
As you become more familiar with Canvas and begin participating in courses, you may decide to return to your notification settings once you have a better idea of your needs and preferences.
Now that we've covered all of the basics of setting up your profile, adjusting your settings, and customizing your notification preferences, let's get started with creating your course!