-
Book Overview & Buying
-
Table Of Contents

Moodle 2.0 First Look
Moodle 2.0 First Look
Overview of this book
Moodle is currently the world's most popular E-learning platform. The long-awaited second version of Moodle is now available and brings with it greatly improved functionality. If you are planning to upgrade your site to Moodle 2.0 and want to be up-to-date with the latest developments, then this book is for you.This book takes an in-depth look at all of the major new features in Moodle 2.0 and how it differs from previous Moodle versions. It highlights changes to the standard installation and explains the new features with clear screenshots, so you can quickly take full advantage of Moodle 2.0. It also assists you in upgrading your site to Moodle 2.0, and will give you the confidence to make the move up to Moodle 2.0, either as an administrator or a course teacher.With its step-by-step introduction to the new features of Moodle 2.0, this book will leave you confident and keen to get your own courses up and running on Moodle 2.0. It will take you on a journey from basic navigation to advanced administration, looking at the changes in resource management and activity setup along the way. It will show you new ways tutors and students can control the pace of their learning and introduce you to the numerous possibilities for global sharing and collaborating now available in Moodle 2.0
Table of Contents (14 chapters)
Moodle 2.0 First Look

Credits
About the Author
About the Reviewers
Preface
 Free Chapter
What's New in Moodle 2
Finding our way around (Navigation and Blocks)
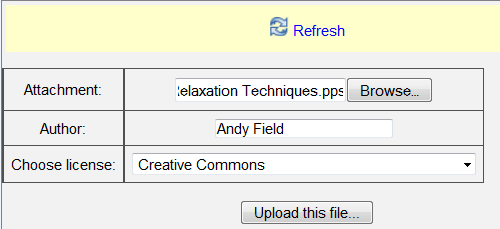
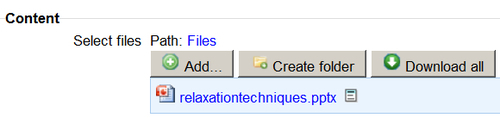
Editing Text and Managing Files
What's new in Add a Resource
What's new in Add an Activity
Managing the Learning Path
Having your say
Admin Issues
Index