
Breaking down the Krita UI
Now that your Krita installation is complete, it is time to open the program for the first time!
Once the installation is complete, find the Krita shortcut icon on your desktop, or locate Krita in the file location you chose during installation. Double-click on the shortcut and Krita should greet you with a loading/splash page to let you know the assets are loading (as shown in Figure 1.9):
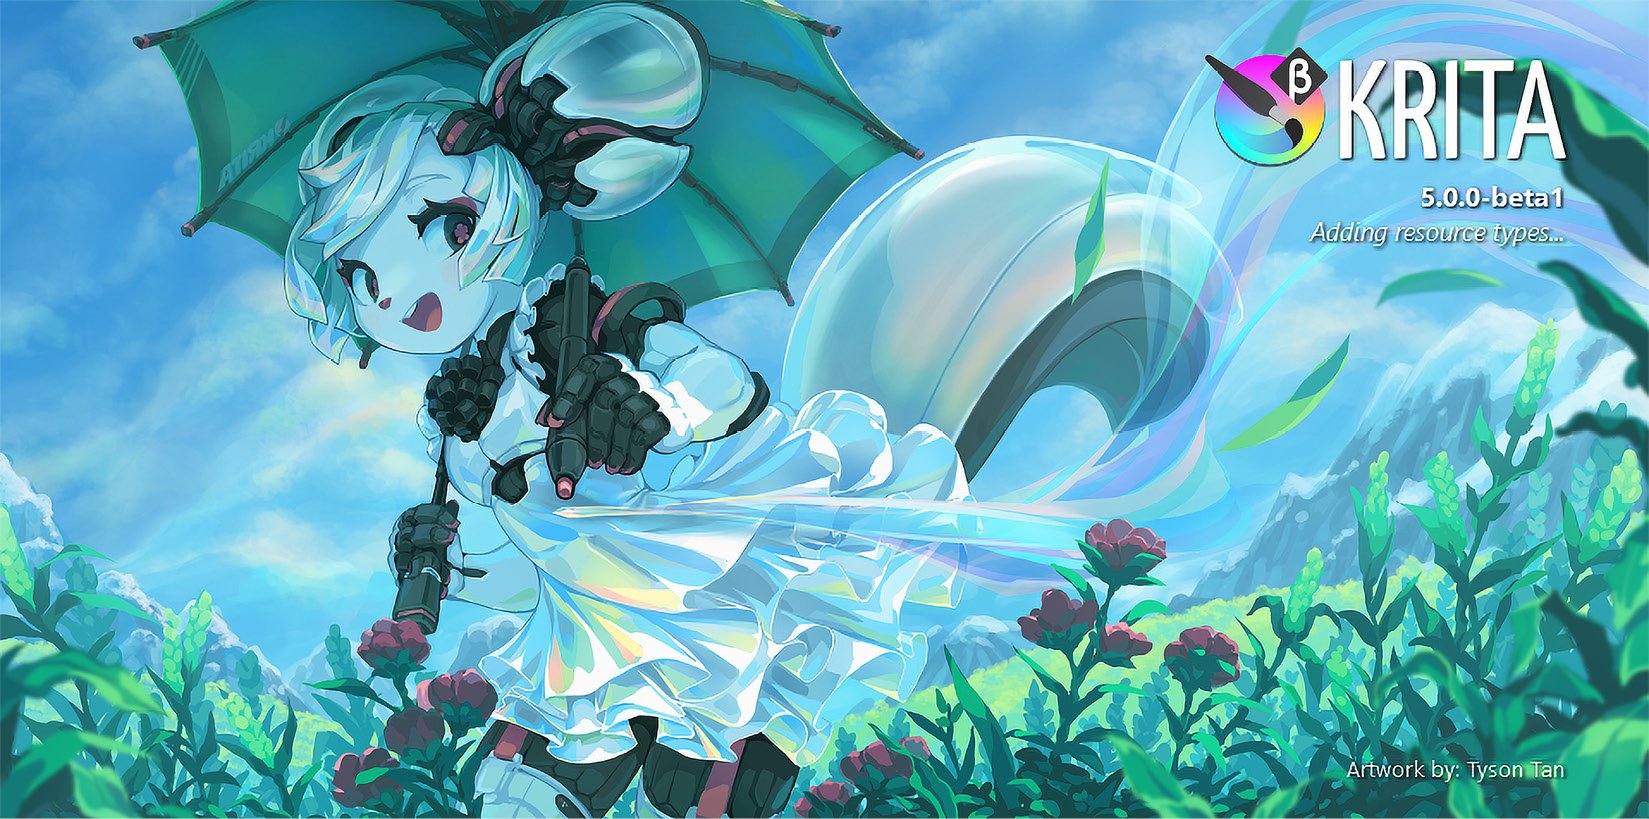
Figure 1.9 – The Krita loading or splash screen for Krita 5.0 (beta)
Your "New" Install
One thing to bear in mind is that your "splash screen" might look different from mine, and that is okay! One of the benefits of Krita being open source is that once you customize the software to your liking, a large amount of those UI changes will carry over to newer installations of the program on the same device (the tools and dockers might change slightly based upon updated features). Since I have used Krita for many years, each new version still has "my" layout, with my brushes and tools on the left-hand side, while the color wheel, sliders, and layer controls are on the right-hand side. Even if it has been years since your previous installation of Krita, you might be surprised to discover that certain tools are exactly where you left them when you load in from a fresh installation!
You will notice a fairly standard startup screen, and if you are familiar with digital art software, the layout might have some familiar features (as shown in Figure 1.10):
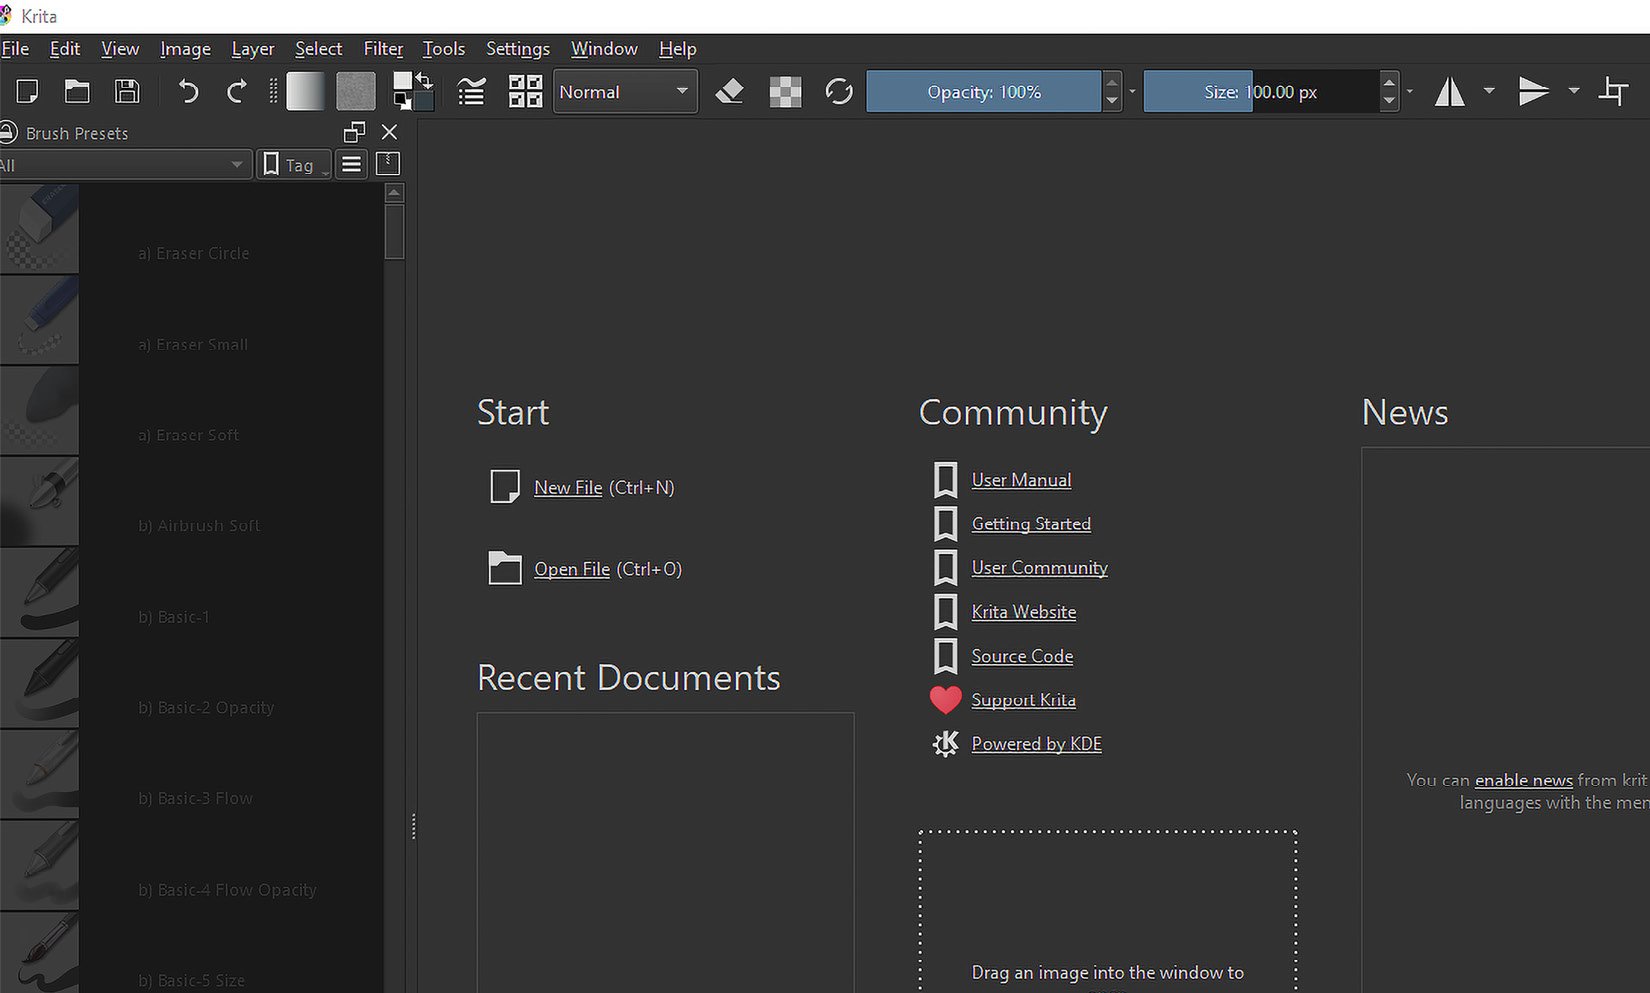
Figure 1.10 – My default Krita startup screen from a fresh installation (Krita 5.0 beta)
For the rest of the chapter, we will do a quick overview of the main components that make up Krita's basic layout and build up our comfort in terms of navigating the program. I know this part might appear basic, but as any good artist knows, the fundamentals are key to success!
While the initial startup screen might appear somewhat daunting when you first open the program, remember that everything you might need to get started on your masterpiece is at your fingertips. We are going to go line by line, in almost a "glossary" style of tour, and discuss what we are looking at.
Dockers and Tool Visibility
If something from these images is not automatically showing for you, a quick way to check the visibility of a given tool within Krita is under the Settings > Dockers menu command.
The file menu and toolbar
Starting from the upper-left corner of your screen, we will look at the traditional File menu (as shown in Figure 1.11):

Figure 1.11 – Krita's traditional File program menu
The File menu is your core functionality menu within Krita. Features such as creating new documents, loading, saving, program settings, and more can be accessed through this menu. Bear in mind that the File menu stays static (that is, it does not change) depending on the current tool you have selected or the project you have loaded into your workspace, so be sure to familiarize yourself with the functionality of each option, as they will always be available to you! We will be covering a large portion of what this entire menu has to offer throughout this book.
Next, directly under the File menu, we have the contextual Toolbar menu (as shown in Figure 1.12):

Figure 1.12 – The contextual Toolbar menu
I want to note that this Toolbar menu is contextual, as the options provided to you on this menu will change depending on the tool you have currently selected. For instance, the Toolbar menu will give different options if you have the brush tool selected, as opposed to the options it will provide when having the text tool selected. Each tool provides a myriad of options; later in the book, we will discuss how to customize your toolbar with options and sliders of your choosing!
The workspace
If we continue to use the layout, as shown in Figure 1.10, the next items we will look at will be my standard workspace (as shown in Figure 1.13):
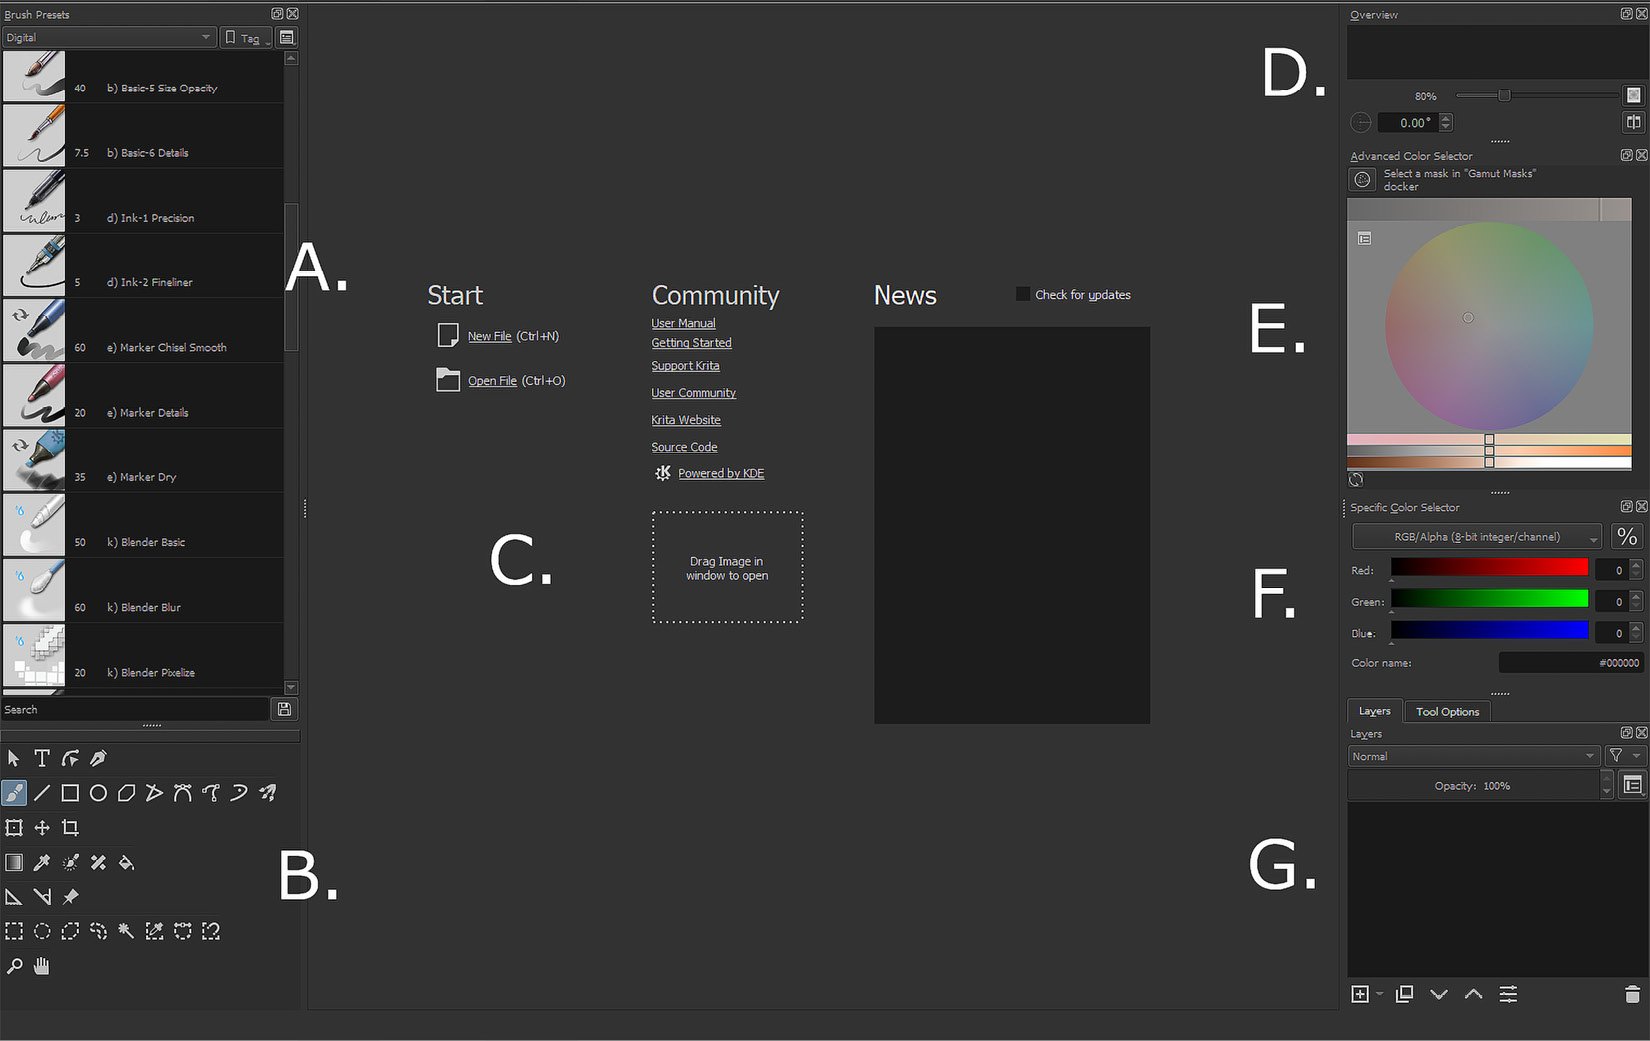
Figure 1.13 – A guided look at the main work area of Krita
Here is a quick breakdown of my standard setup within Krita, along with some notation regarding what each tool is. Remember, you can mimic this layout if you like or customize the sizes and locations of these (and other) tools based on your preferences:
- Brush Preset docker (A): This allows you to have your favorite brushes, erasers, and illustration tools quickly accessible at any time.
- Toolbox docker (B): Similar to the Brush Preset docker, the Toolbox docker allows you to quickly access a lot of important formatting, editing, selection, and warping tools so that you can manipulate your image in a variety of ways.
- Work area (C): The work area is the general area on which your canvas will be located. Within this area, you can zoom, rotate, scale, and flip your canvas with a variety of tools and keyboard shortcuts that we will review throughout the book.
- Overview (D): This is the area in which you'll see a "zoomed-out" version of your current project. This is a must-have for me, as I love to see the "readability" of my art as I work, even if I'm zoomed in and working on specific details!
- Advanced Color Selector (E): This is a tool that we will become much more familiar with in upcoming chapters. Some features of this tool include custom color wheels and various sliders for the hue, saturation, and brightness of your selected color.
- Specific Color Selector (F): This is slightly more specific than the Advanced Color Selector tool (hence its name!). It gives you more subtle customization of the tones, temperatures, and overall "mood" of your selected color. Once again, we'll do a deep dive into what this truly means throughout the rest of the book.
- Layers panel (G): Your Layers panel will definitely be a staple of your workflow. Controlling your layer organization is a very important skillset and one that we will review in great depth throughout the book. This area allows for adding layers, deleting layers, changing blending modes, grouping content, masking content, and more.
Additionally, we will be looking at a large number of these features and settings throughout this book. So, while I did a quick overview of each tool I use on a regular basis, note that we will be taking a far more comprehensive look at these tools throughout the remainder of this book. I am very much a person who likes to learn by doing, and I believe the best way to really get comfortable with using the tools of Krita is to use them in the context of creating artwork. Seeing another artist's Krita UI setup is always interesting, and I hope this quick rundown will help you to decide which dockers and settings you would like at your fingertips.
The pop-up palette
Speaking of having features at your fingertips, one very cool feature that Krita offers, which will be helpful during your art journey, is the Pop-Up Palette (as shown in Figure 1.14):
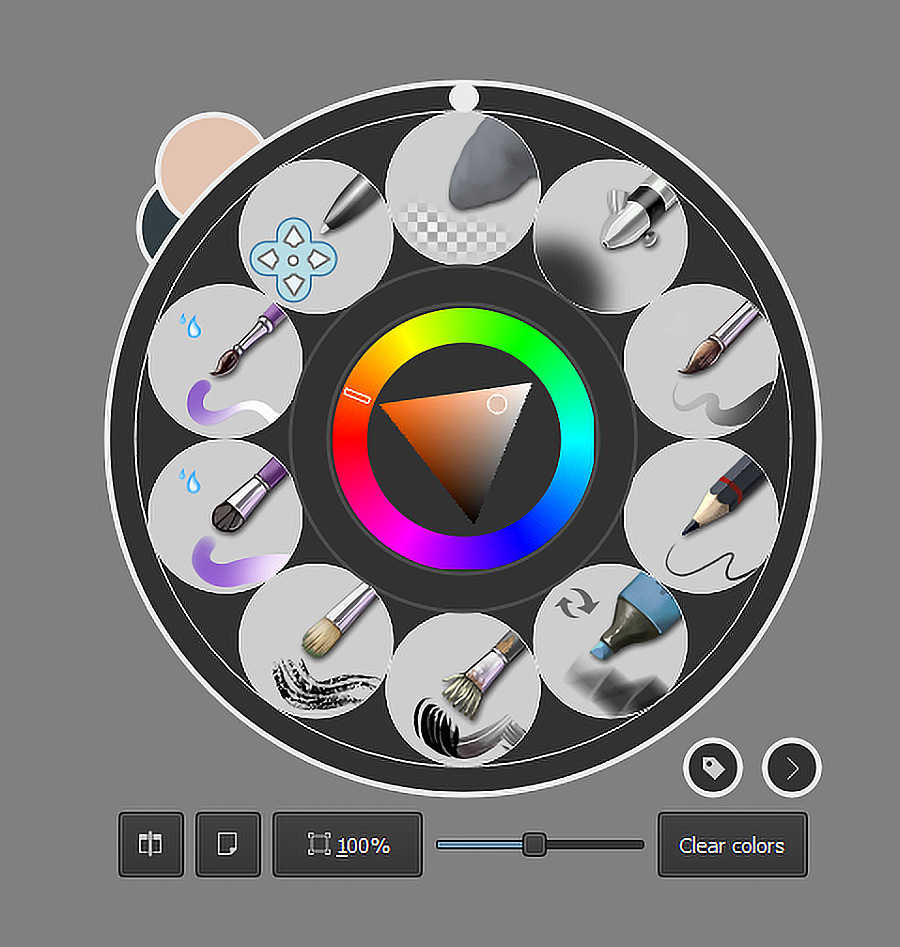
Figure 1.14 – The pop-up palette
This is a shortcut system within Krita that allows you to bring up your most used or favorite brushes within your workspace, without needing to fuss around with clicking on bulky menus or constantly changing your docker settings.
To bring up the Pop-Up Palette feature, you simply need to right-click when you are in your workspace area. The small tag in the lower-right corner of the pop-up palette will allow you to change your brush preset categories, which are displayed in the pop-up palette radial menu.
Additionally, note that there is a miniature color wheel in the middle of the radial menu, foreground and background color swatches in the upper-left corner of the radial menu, and various display options for tool customization and canvas visibility.
Customizing your workspace
Now that you are familiar with some basic terminology within Krita, the first order of business is to set up the program in a way that makes the most sense for you!
Every digital artist is going to have slightly different needs or have their own "go-to" features that they consider to be essential when creating the artwork they love. Krita uses a powerful system of Dockers (that is, windowed tools that can be locked or "docked" to each other and/or anchor points of the program itself). The full list of dockers is substantial (as shown in Figure 1.15) and allows for several options and workflows within Krita:
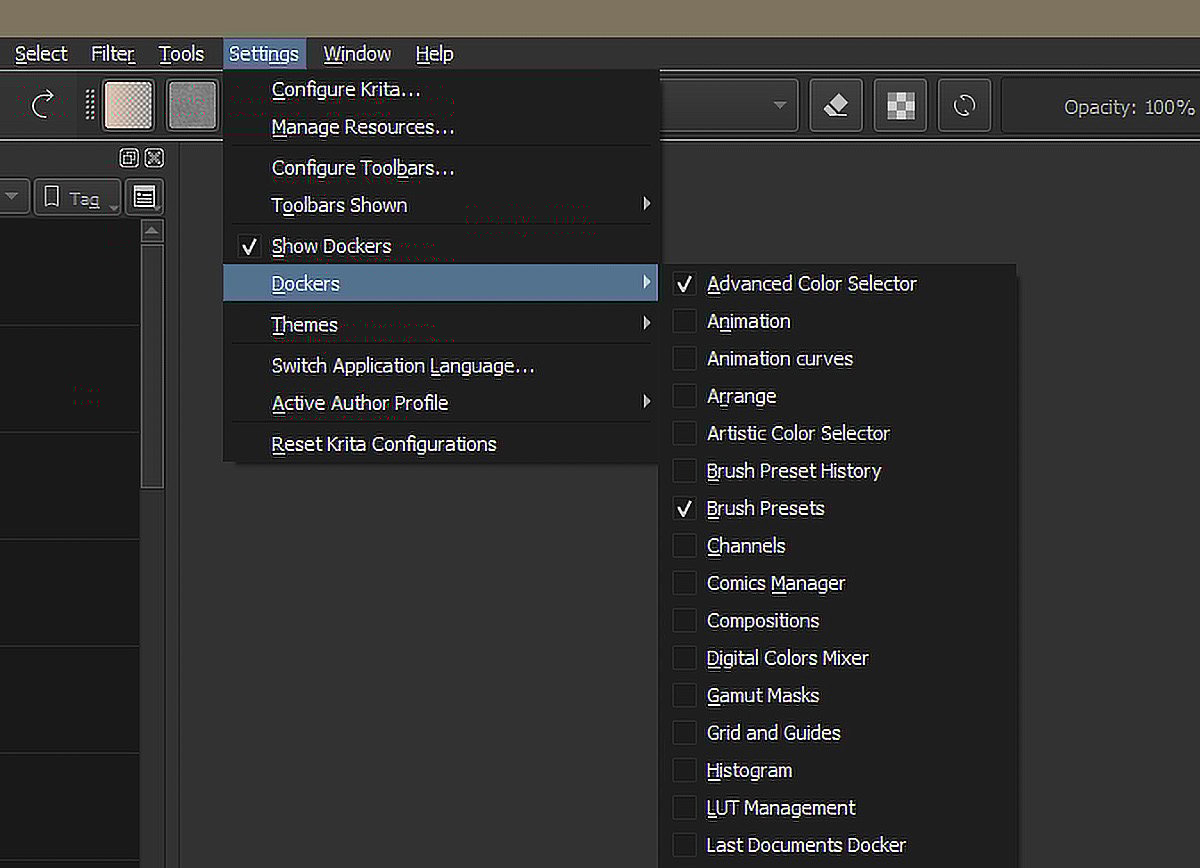
Figure 1.15 – The location of various docker options
As you can see from my setup, I only keep a small number of dockers activated at one time, as I enjoy keeping my work area free from clutter. Feel free to activate any docker that you think sounds interesting and give it a spin!
Experimenting and editing your docker locations and settings in your workspace is cool, but what if you want to have separate workspace setups depending on what type of project you are working on? Working with digital painting will require different "must-have" features as opposed to say photography, animation, or graphic design.
Krita makes having "custom loadouts" very easy, and the program already comes preloaded with some standard workspace loadouts that you can try for yourself:
- You can get to this menu by navigating to the Window > Workspace option in your File menu (as shown in Figure 1.16):
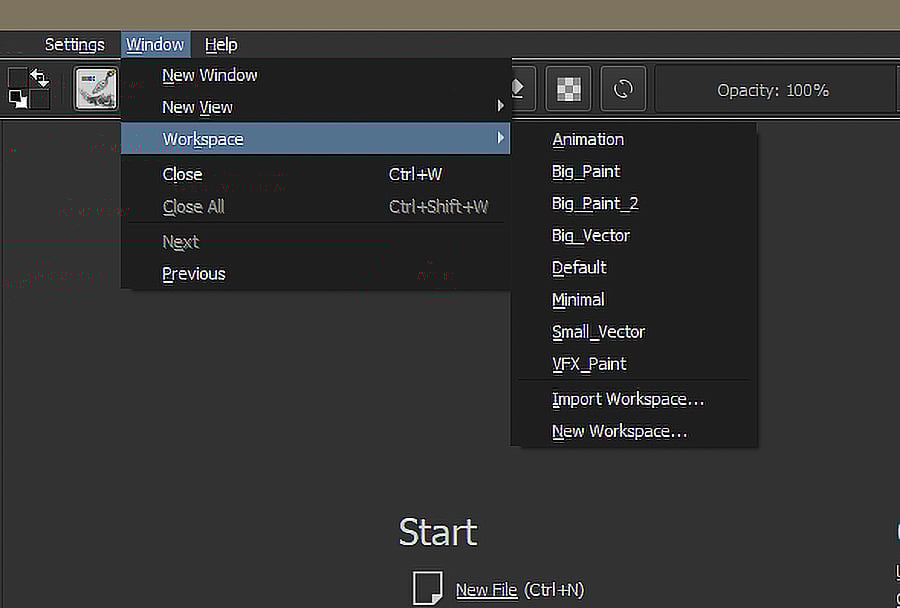
Figure 1.16 – Krita's workspace selection menu, showcasing various workspace layout options
- Once you have explored your docker windows and would like to save what you currently have, you can click on the Window > Workspace > New Workspace option.
- You will be prompted to enter a custom name for this Workspace (as shown in Figure 1.17).
- Once saved, your custom workspace will be added to the list of options found under the Window > Workspace menu in the File menu bar:

Figure 1.17 – The New Workspace prompt
Sharing Your Workspace
Krita has the ability to actually import the workspaces of other artists! Under the Window > Workspace window, you will see an option entitled Import Workspace. These are stored as Krita workspace files (.kws), and they will be located in the Krita > Share > Krita > Workspaces folder of your Krita installation directory. This is great for newer artists who are receiving training or even sharing workspaces in a studio environment to ensure everyone is using the same tools, leading to more consistent results!
Congratulations! You have now created your own custom workspace! This functionality might not seem like much at first, but it is a crucial asset that will serve you well. No matter the task at hand, you will be prepared with all of your favorite tools for the job, all at the click of a button due to your understanding of workspaces.
Configuring the toolbars
While we've touched on how to customize our workspace, note that Krita also allows you to make your own customized toolbar. The number of options available for toolbar customization is staggering, literally allowing you to browse through every single action that Krita can take and then add shortcuts to those actions. The number of options is easily in the thousands, ranging from text augmentation and canvas options to importing Python plugins and showing system information for bug reports.
However, for our needs, I will be adding the Reference Images Tool feature (as we will be using this feature in a later project!). Let's add that option to our custom toolbar next:
- Similar to getting the full list of dockers available in Figure 1.15, you will receive the Configuring Toolbars prompt by clicking on Settings > Configure Toolbars in the File menu at the top of Krita.
- Once you click on this option, the Configure Toolbars menu will be displayed (as shown in Figure 1.18):
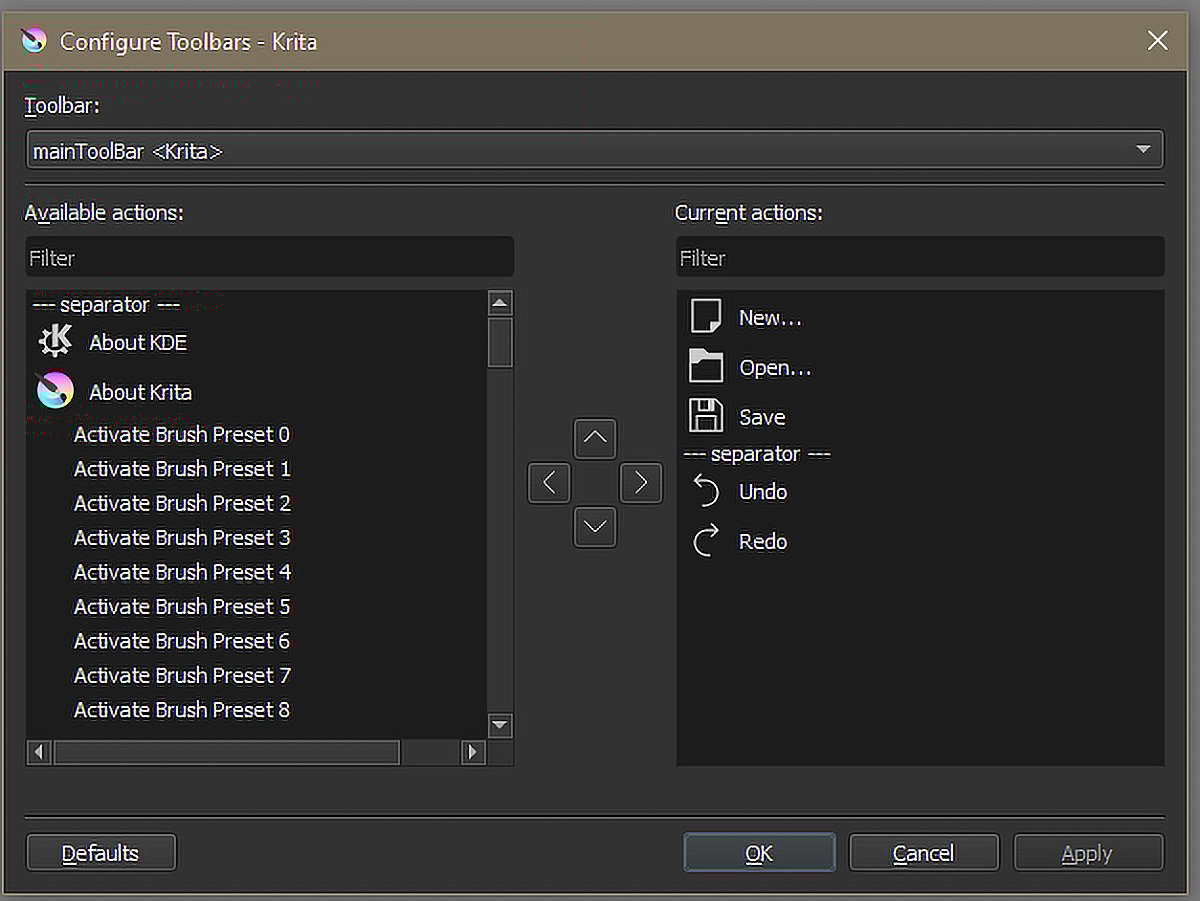
Figure 1.18 – The Configure Toolbars prompt
- Once the Configure Toolbars prompt has appeared on the screen, under the Available Actions filter, type in
Reference. You will notice a few options pop up, including one option entitled Reference Images Tool with a push-pin icon in the list. - Select the Reference Images Tool option (with the push-pin icon) and drag it to the right-hand side of the menu (as shown in Figure 1.19):
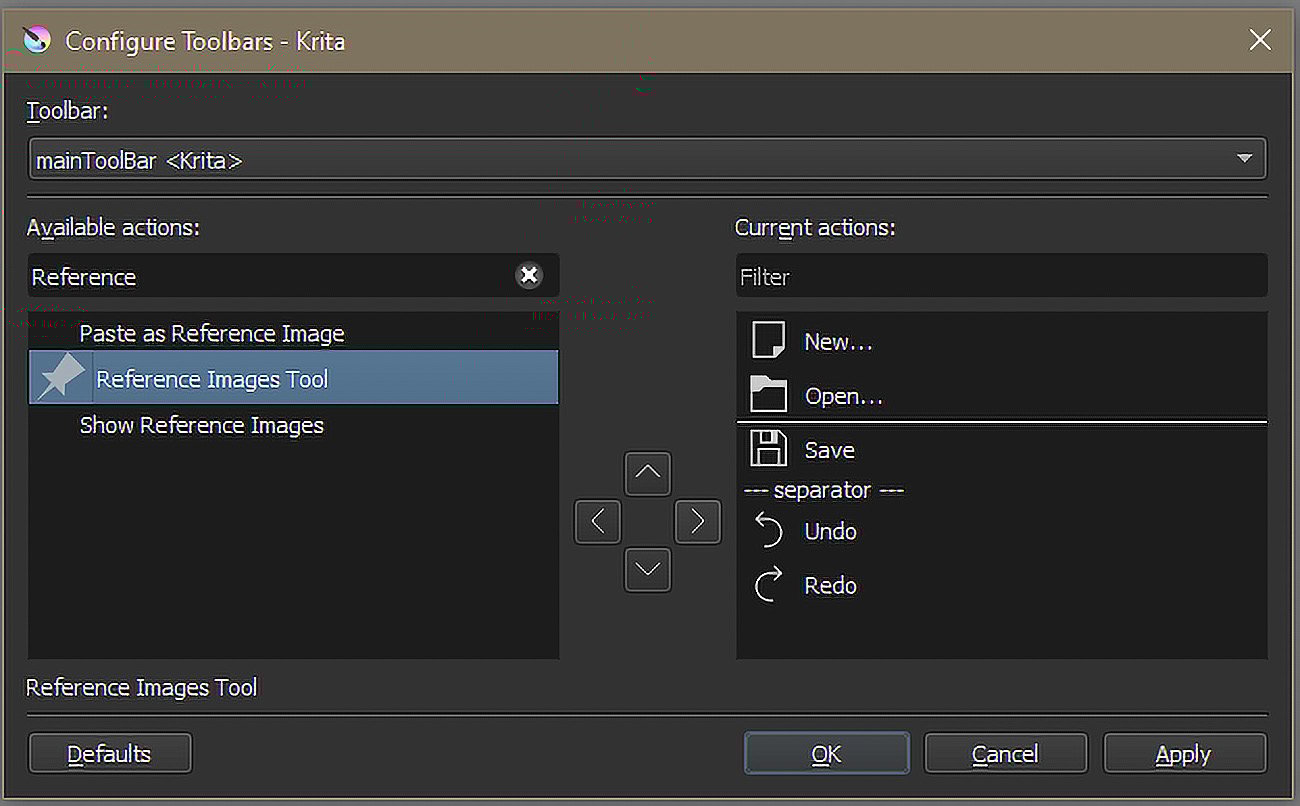
Figure 1.19 – Getting our Reference Images Tool shortcut configured in our custom toolbar
- Go ahead and select Apply once the shortcut appears in the list at the location you would like.
- Note that the change takes place immediately on your Toolbar section after selecting Apply.
- Continue adding any other shortcuts that you might find useful and apply the changes.
- Once you are done, click on OK.
There we have it! Your change has taken a global effect on Krita. That means every time you load the program, your customized toolbar should be available! Regarding your custom workspaces, Krita will usually default to the most recently used workspace. Saving your custom workspaces is highly recommended as swapping back and forth between them will be as easy as clicking on a button instead of having to memorize layouts that you liked in the past!
Returning to True Defaults
At any point, if you would like to return to either of the default toolbars or workspaces, you can use the Reset Krita Configurations option in the Settings menu.
Now that we have glanced at some docker and toolbar customizations, we can briefly discuss some interesting, advanced options in the overall configuration of Krita.
Configuring Krita (advanced)
To get to the more advanced software setup area of Krita, click on Settings > Configure Krita. You will see several options (such as Display, Canvas Inputs, Keyboard shortcuts, Tablet settings, and more). All of these can enhance your workflow within Krita tremendously. If you have specific shortcut keys that you like, custom Python scripts that you would like to run, want to set file handling options, or even change the way multiple projects being open will appear on screen, this is the area where you can tinker to your heart's content.
For this book, we will look at two main configuration areas: Author profiles and Color Selector Settings.
Setting your author information
Author information within Krita is a cool feature that allows every image you create in Krita to have metadata embedded into it! When an image you create in Krita is exported with the author information embedded, if a viewer right-clicks on your image, your information will appear in the image's description. The information allowed in the author information embed is varied and can include your name, website, email address, physical address, phone number, or fax number.
To set a customized Author Information feature within the Configure Krita prompt, perform the following steps:
- Click on the Author icon on the left-hand side of the Configure Krita prompt.
- To create a new author persona, click on the + button in the upper-right corner of the Author prompt.
- Create a new name for this author persona and begin filling out the information that you would like embedded in your Krita-exported images (an example is shown in Figure 1.20):
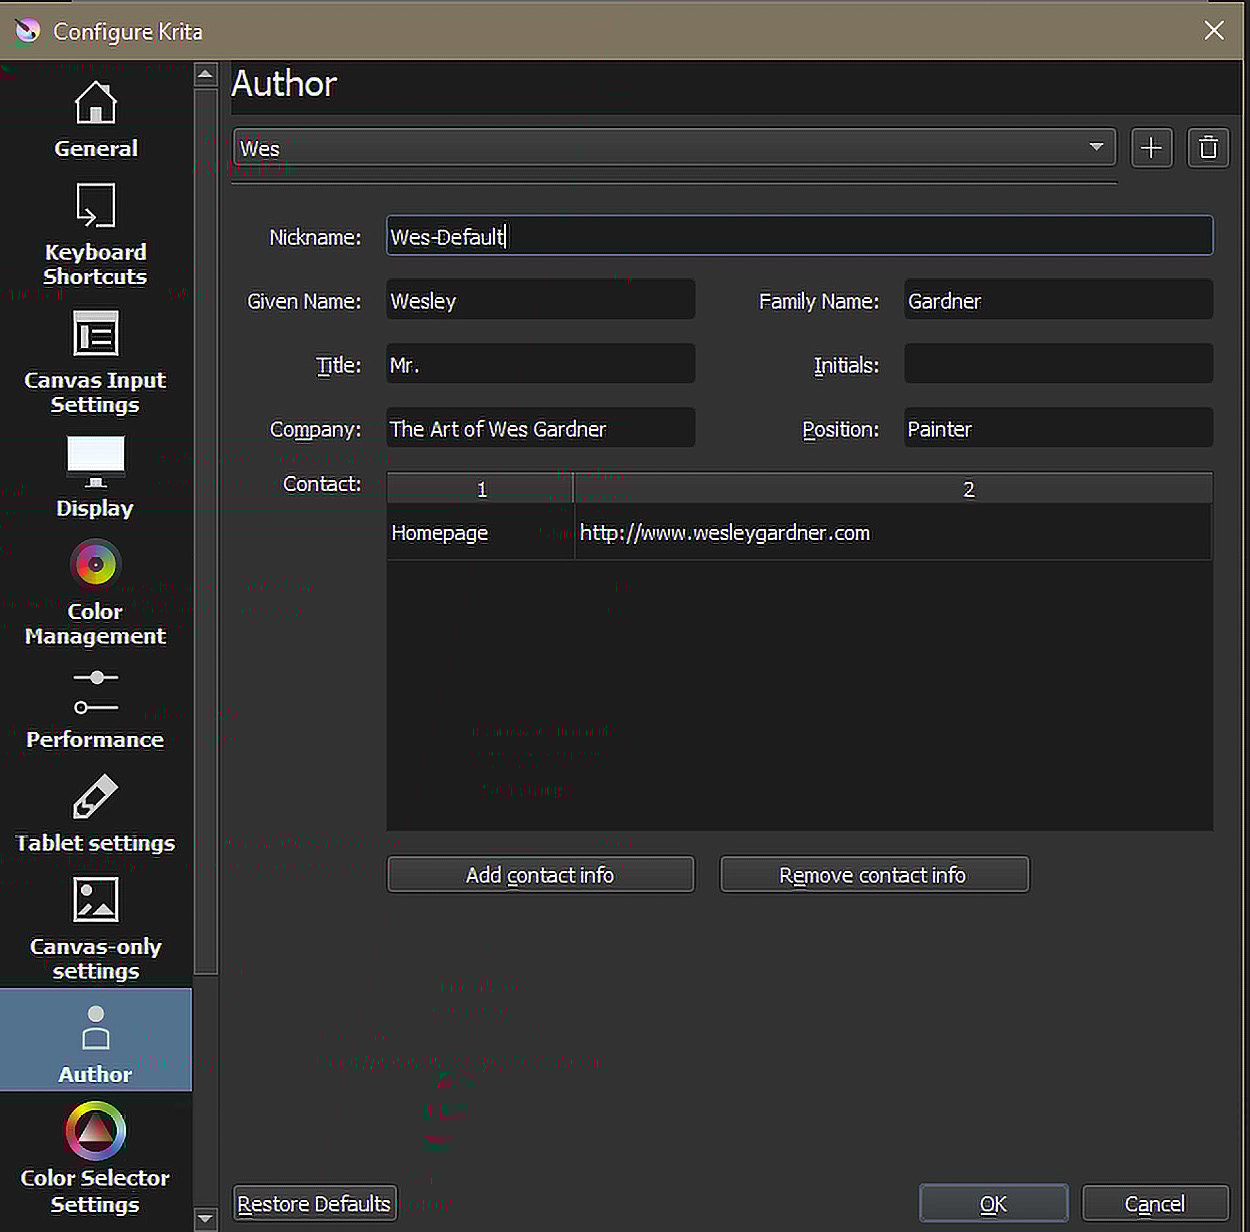
Figure 1.20 – The Author information panel
- After filling out the information that you would like to provide in your image's metadata, click on the OK button to save your changes.
Now, let's make sure that your new author profile has been enabled so that you can receive that sweet credit for your artwork online! To enable your newly created author profile, perform the following steps:
- Click on the Settings menu. Then, scroll to Active Author Profile near the bottom of the list.
- From here, you will see all of the author personas you have created (as shown in Figure 1.21):
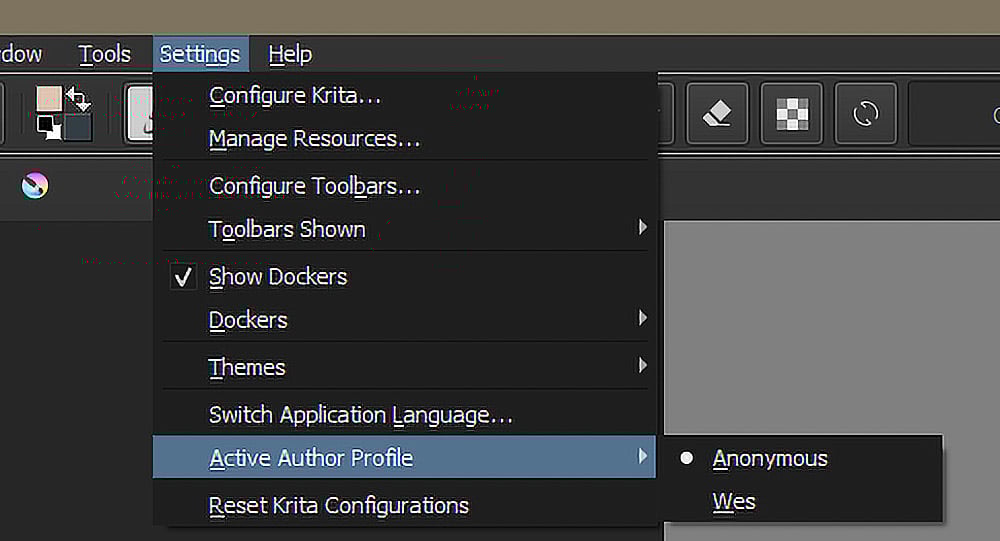
Figure 1.21 – Activating your custom author profile
Now you can make as many author personas as you wish!
Exporting Images with Author Information
To successfully export your images with your author metadata, make sure that the Sign with Author Data option is checked while exporting your image. Please note that only JPG and PNG exports allow the metadata to carry over and, initially, the export's metadata fields will only provide what you have listed as the Nickname value and the first entry of Contact information. In the example shown in Figure 1.20, my file would export with Wes-Default (http://www.wesleygardner.com) as my metadata.
Color selector settings
In the next chapter, we will be looking at a comprehensive guide on how to color in Krita (and, in general, digital art). To get us up to speed and set up for the upcoming chapter, let's look at a few of the Color Selector Settings options that Krita provides in the Configure Krita prompt (as shown in Figure 1.22):
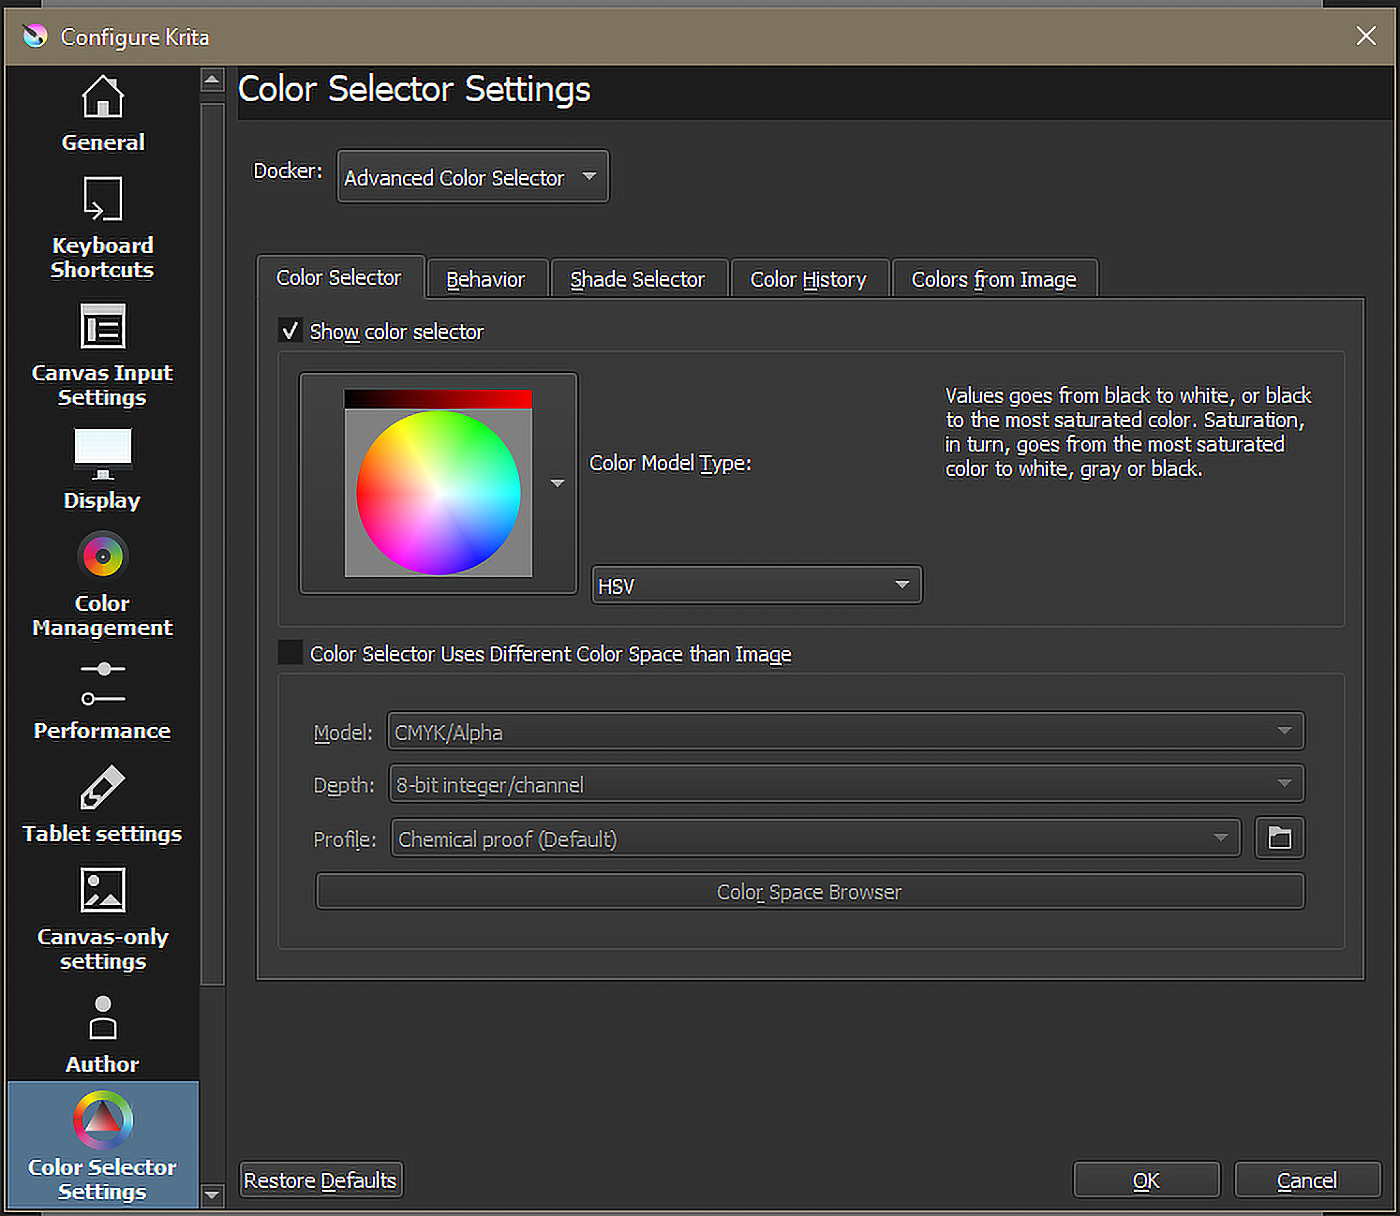
Figure 1.22 – The Color Selector Settings panel
As you can see, there are a variety of options available for color within this screen. For our setup, we will look at the Color Selector panel, customizing the look of our selector itself and the mode in which it displays information.
You have a variety of options for choosing your "color wheel" within Krita. To see the different options available, click on the down arrow next to the current Color Model Type graphic. A list of different graphics should be displayed (as shown in Figure 1.23):
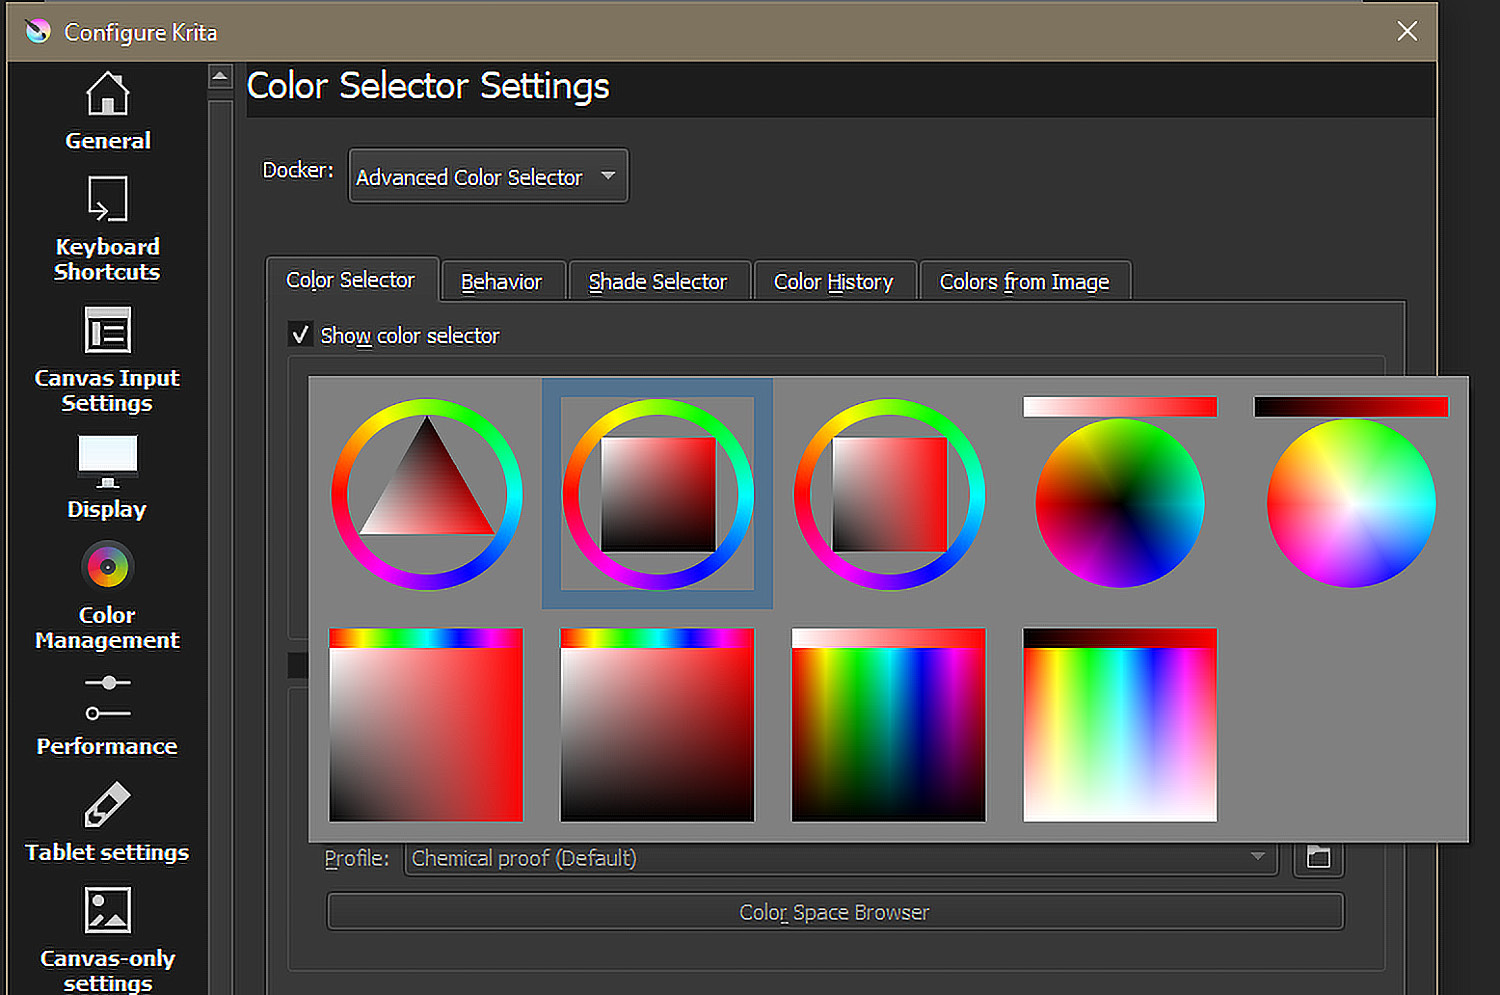
Figure 1.23 – The full range of color wheels available in Krita
Wow, there are so many options! Which one should you choose? My recommendation is to select the color wheel that makes the most sense to you. My usual color wheel is the rightmost option on the top row in Figure 1.23, and will be the one I recommend using if you want to follow directly along with the examples in this book. After selecting your preferred color selector, go ahead and change the mode in the drop-down menu to HSL (as shown in Figure 1.24):
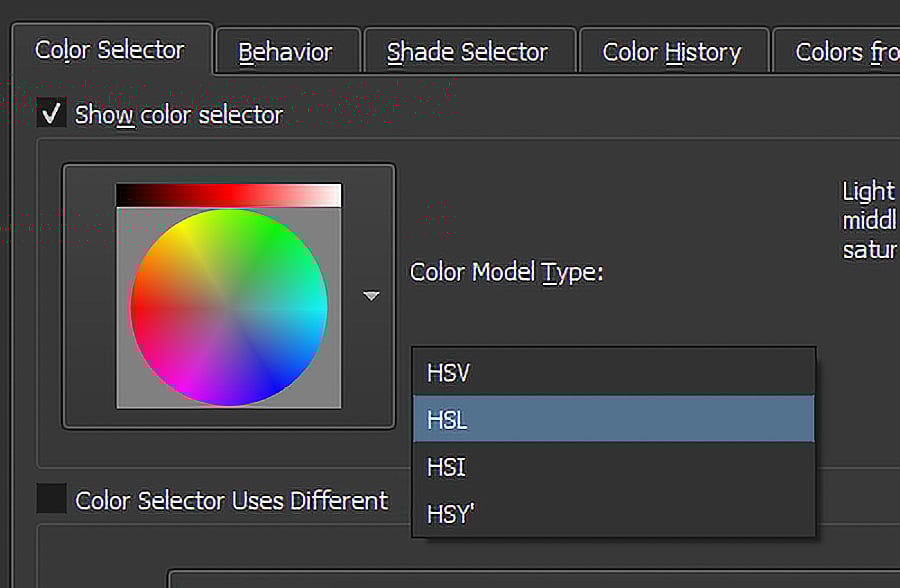
Figure 1.24 – The color mode hue/saturation format selector
Do not worry if you are not sure what the hue and saturation modes mean. We will cover that (and much more!) in the next chapter when we discuss color.
While we are moving forward through the book, we will keep discussing UI customizations and how slight tweaks could help your workflow become more refined, structured, and easier to handle.
The beauty of Krita's UI is in its flexibility, and the more you experiment with different setups and settings, the greater and more enriched your digital art experience will become.