

Understanding product types in supply chain management
Let’s start by explaining some definitions before creating our first product. In the realm of Dynamics 365 Supply Chain Management, products can be categorized into two distinct types:
- Item: Items are purchased products that can be used for consumption, distribution, reselling, or as components to produce other manufactured items (BOM). These products are crucial in supply chain operations, fulfilling various purposes and meeting customer demands.
- Service: Services are products that are utilized to quantify hourly services or other non-tangible offerings. These products differ from physical items as they represent intangible deliverables that are part of the service-oriented aspects of a business.
In Figure 2.2, we can identify the types we can utilize when we create a new release product:
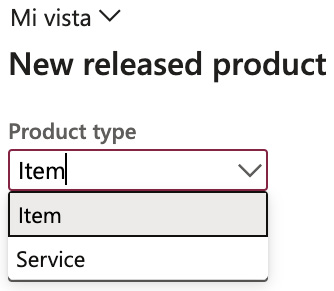
Figure 2.2 – Product types
After defining the product type, it is mandatory to define the product subtype. There are two distinct subtypes:
- Product: This refers to a uniquely distinguishable product that functions as the base model. It is characteristically unchangeable, meaning no additional product dimensions can be appended to its definition.
- Product Master: This comprehensive guide contains the definitions and regulations that outline how unique products are portrayed and operate within business procedures. From these foundational principles, unique products or product variants can be derived.
In Dynamics 365 Supply Chain Management, a Product Master is a crucial element that helps establish business rules and protocols. It is connected to a group of product characteristics and a configuration technology. These characteristics, such as color, size, style, and configuration, are used in Dynamics 365 Supply Chain Management to define and track how specific products behave. These characteristics make it easier for users to search for and identify products.
Think of a Product Master as a blueprint or prototype for different versions of a product. The different versions, also known as variants, can be pre-defined or created on the spot during sales situations using a product configurator. A Product Master is linked to one or more product characteristics, allowing for flexibility and customization:
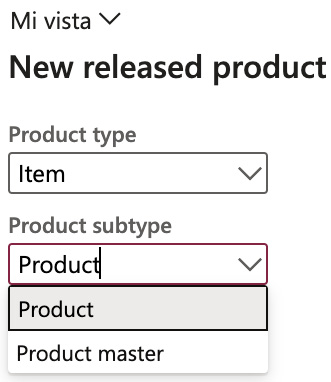
Figure 2.3 – Product subtype
Finally, as we’ve explained, if we define the product as Product Master, it is mandatory to define the product variants; let’s review what these are:
- Product variants: A product variant is determined by the selected configuration technology. This variant can either be pre-established using the product dimensions of its parent product, the Master Product, or be configured with the assistance of a product configuration tool.
- Product creation: Let’s review the most important steps to follow during the product creation process; formulating a new product entails the subsequent steps:
- Design and detail the product.
- Launch the product to legal entities.
- Specify data particular to the legal entity.
When generating a new product definition, the primary attributes to include are the type and subtype.
To create released products, navigate to Product Information Management > Products > Released Products.
Product Type discerns whether a product is a tangible object (item) or an intangible service, while the subtype further classifies the product.
When we create a new release product, this will be the first field we must select based on the aforementioned criteria:
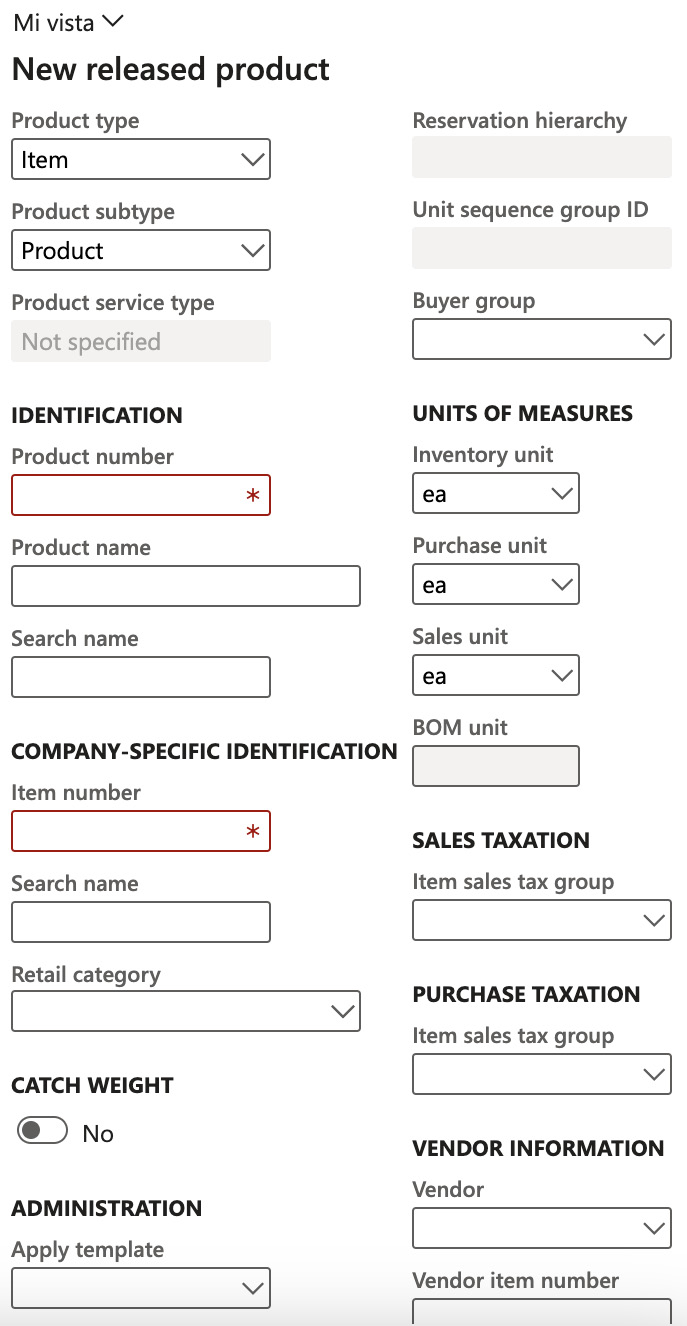
Figure 2.4 – The New released product dialogue
Product translation
The Translation feature allows for multilingual product descriptions. You can input product names and descriptions in numerous languages in this section. It’s important to note that only the product number is mandatory, while the product name and description are voluntary. To access the Translation section, click the Translation button in the action pane of any product-related page or list.
Product translations primarily serve the purpose of being utilized in external documents. In contrast, the data values are always displayed in the system’s default language when viewing product-associated pages and lists:

Figure 2.5 – Product translations
For external documents, the product name will appear in the company’s chosen language or the customer’s or vendor’s preferred language.
Now that we’ve covered the product definition, let’s discuss using a product in more than one legal entity.
Product setup authorization within a legal entity
Before you can use a Master Product in a transaction such as a sales or purchase order, you need to make sure the Master Product and at least one of its versions are available in the relevant parts of the company. This is especially important when the configuration technology is used to predefine versions. When it’s time to release the product, there are many different combinations you can choose from to distribute to one or more parts of the company:
- You can release individual products or groups of products
- You can release a single version of a product or multiple versions
- You can release the product to one legal entity or several
The product release process allows users in the company to share product definitions with different parts of the organization. By releasing a product or a Master Product, you’re connecting it to a specific part of the company and permitting it to be used in that area.
To proceed, navigate to Product Information Management > Products > All Products and Master Products. Upon clicking the Release Products button, select one or multiple products that you aim to authorize for one or more legal entities. This will allow you to utilize the product in processes such as inventory management, purchasing, sales, and production:
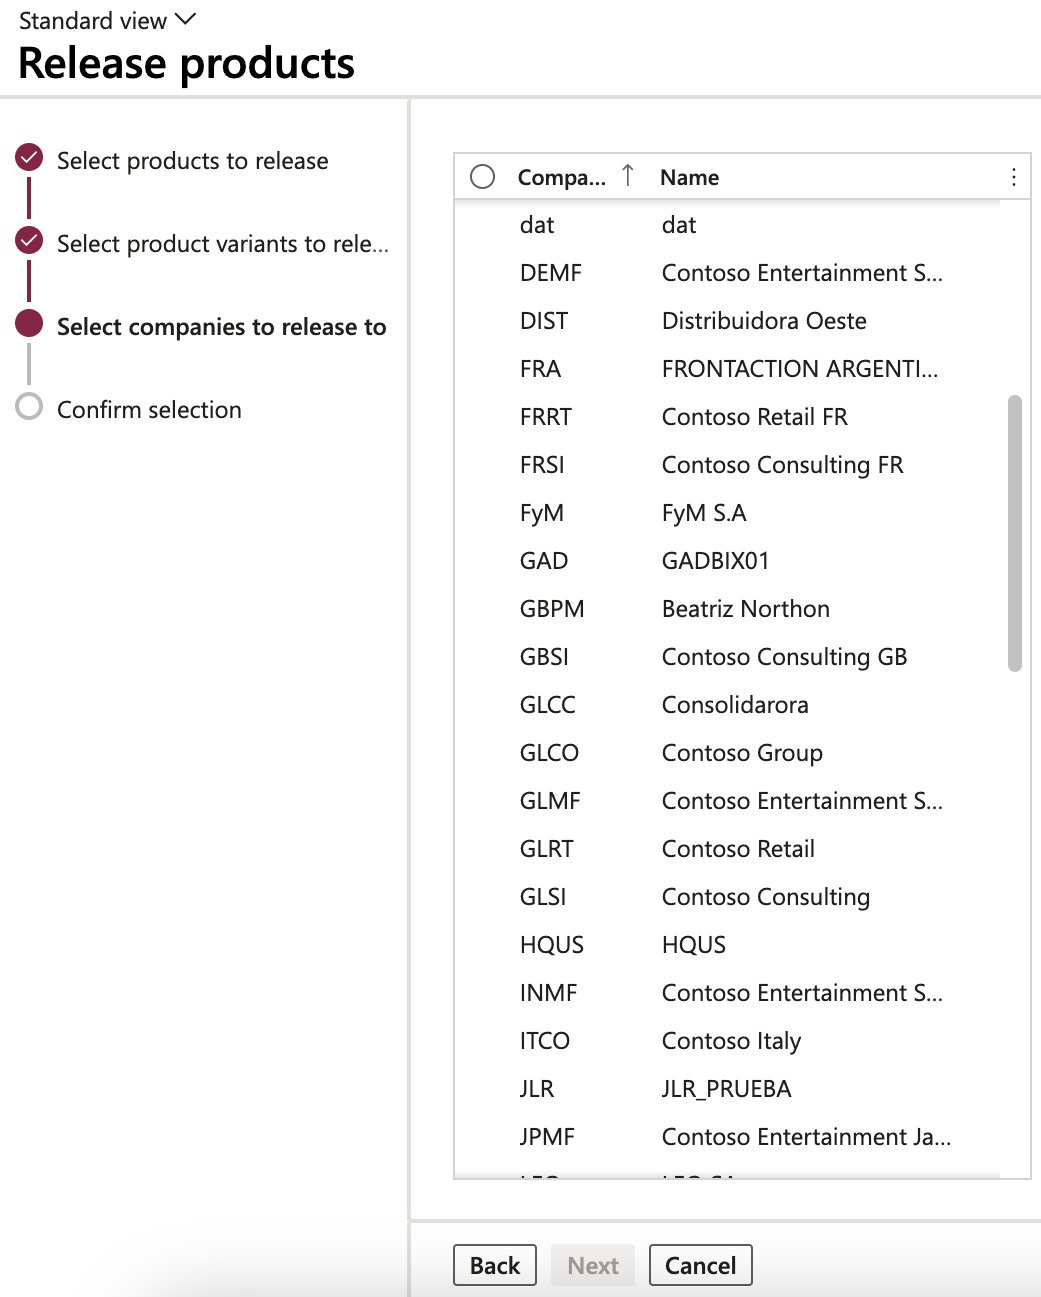
Figure 2.6 – Releasing a product to legal entities
Once a product has been released, we can finish by setting its final details.
Finalizing released products
After a product’s release to a legal entity, finalizing its definition is paramount before it can be incorporated into transactions such as sales orders or purchase orders. The product definition needs to be fully completed in every legal entity to which it has been released. You can click on the Validate button in the product’s action pane to check the finalization status of the product.
To complete a product, you need to provide some important information. You can fill in these fields by entering the details manually or using a pre-designed template.
The four main setups for a product to be set up are as follows:
- Item model groups: This defines how the item will be processed. Here, we set up whether the item is a stocked product or not and how to manage its costs by defining the inventory model.
This setup is critical in terms of definitions; once you have defined it, it can’t be changed if any transactions with the item exist:
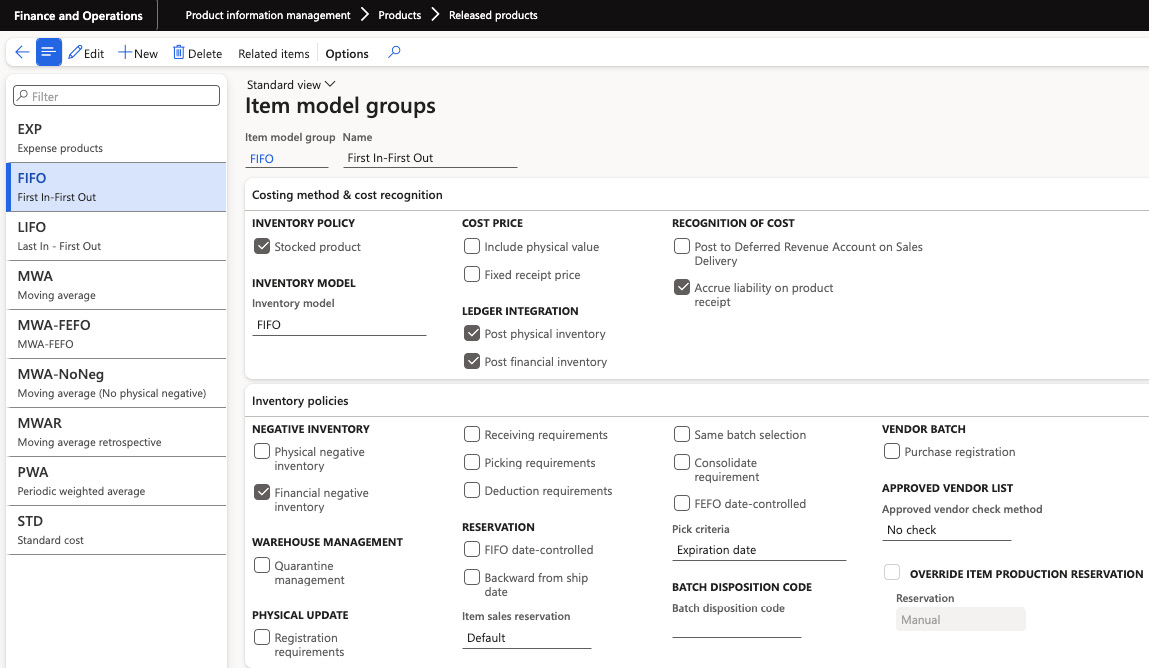
Figure 2.7 – Item model groups setup
- Item groups: This groups the item and defines its accounting on each transaction of every model – for example, which accounts will be used when the item is sold:
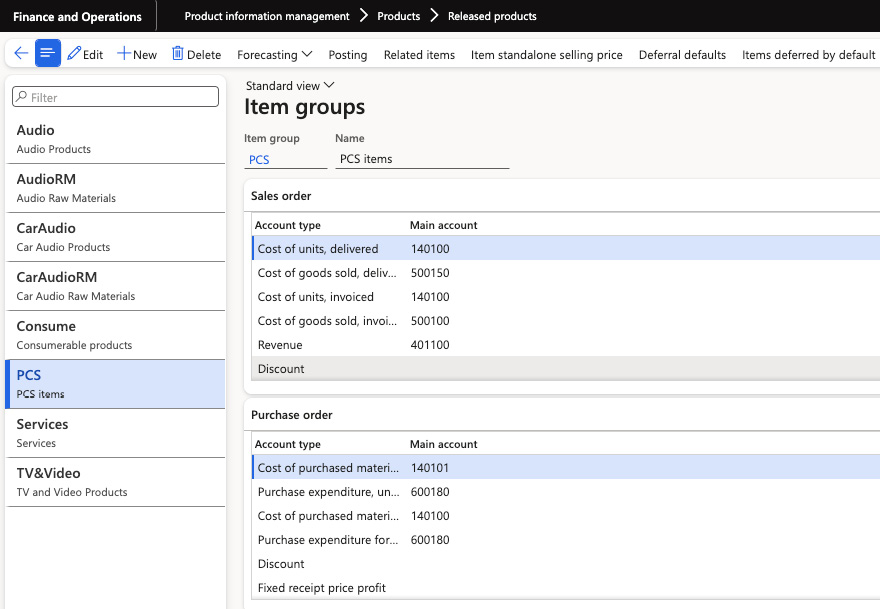
Figure 2.8 – Item groups setup
Storage dimension groups (if not already specified): Specify the dimensions related to storing the product, such as location or shelf. Also, one of the key setups here is if the items contained under this storage dimension group use a warehouse management process.
Deciding if the item will use WMS or will be a standard item is another decision to make before performing transactions with the items:
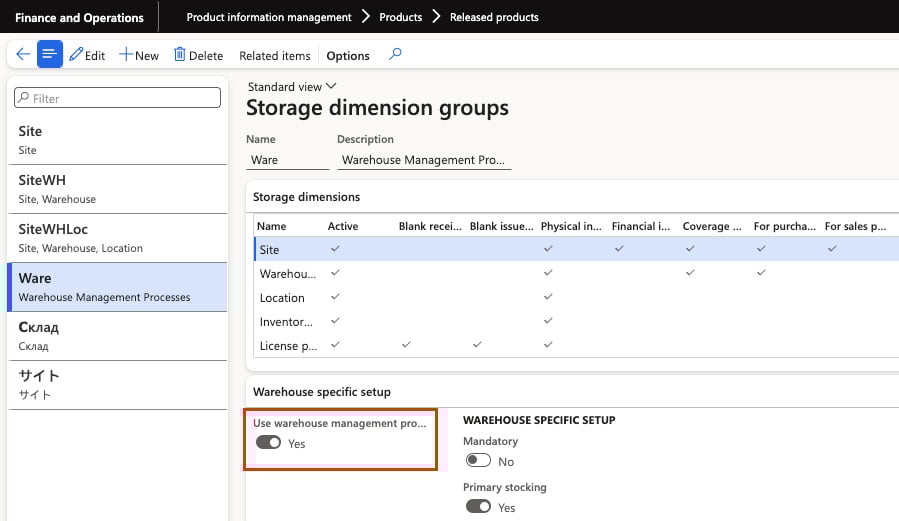
Figure 2.9 – Storage dimension groups setup
- Tracking dimension groups (if not already specified): Define the dimensions used for tracking the product, such as serial number or batch.
Defining the tracking dimension group is another fundamental decision that must be made before any transactions with the item occur:
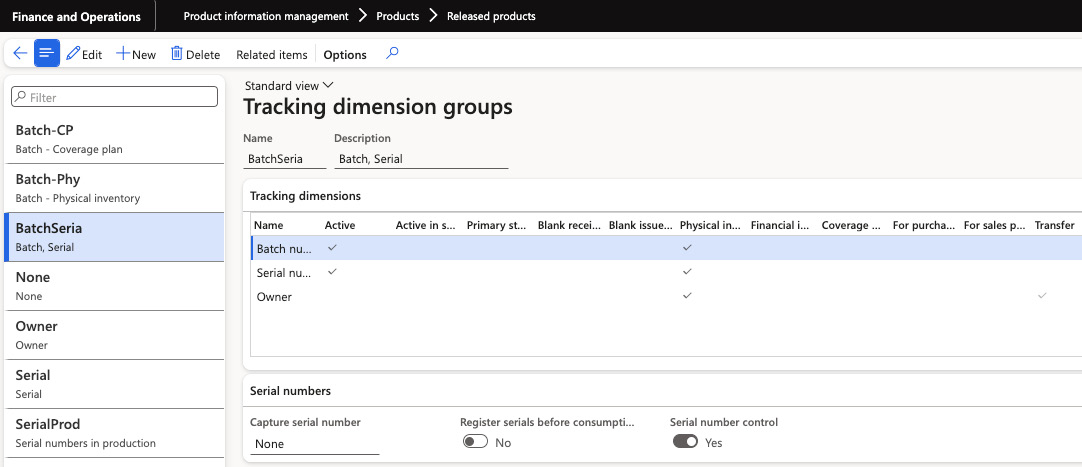
Figure 2.10 – Tracking dimension groups setup
The following are some other important setups:
- Sales, purchase, inventory, bill of materials (BOM) units: Determine the units of measurement used for sales, purchases, inventory management, and creating the bill of materials
- Reservation hierarchy (if using warehouse management procedures): Set up the hierarchy to manage inventory reservations effectively
- Unit sequence group ID (if using warehouse management procedures): Define the sequence group for units to maintain proper order in the warehouse
On the Product Details page, you’ll find various tabs where you can enter specific information about each module and customize their settings:
- In the General tab, we can add or review any additional data related to the product.
- The Purchase tab lets us define details about the procurement process, such as pricing, and discounts on the purchase orders.
- The Promote tab controls whether the product can be linked to a coupon in commerce functions.
- The Deliver tab works with features such as Direct Delivery and applies specific rules for packaging the product.
- The Sell tab lets us define details about the sales process, such as pricing, and discounts on the sales orders.
- The Manage Inventory tabs let us define details about physical dimensions, handling and packaging requirements, and how the item is processed in the inventory management module.
- The Engineer tab contains all the detailed information about the manufacturing process, such as the item’s production type, manufacturing measurements, and production specification.
- The Plan tab lets us associate the product with a coverage group that will be handled by the master planning module.
- The Manage Projects tab lets us associate the product with a project category that will be tracked by the project management and accounting module.
- The Manage Cost tab reviews all the cost-related information, such as cost price and cost group, and defines the ABC classification.
- The Financial Dimensions tab defines the default item financial dimensions that will be used when this product is accounted.
- The Warehouse tab relates to the warehouse management module and lets us set up the parameters specifically for products stored in warehouses managed by the Warehouse Management module.
- The Retail tab enables and sets values for the product’s use within the Retail module.
- The Transportation tab relates to the Transportation Management module to enable this process for the product.
- The Product Variants tab is only applicable to Product Masters. You can specify default values for product dimensions such as size, color, style, and configuration, making it easier to manage different product versions.
Note
Once you’ve defined the unit of measure for an item, this can’t be changed after you perform transactions in the system with the item. Defining the correct unit of measure is a crucial decision and needs to be planned carefully.
Country of origin classification
For enterprises that operate internationally, it’s often necessary to provide details about the origin of the products they deal with. A specific field is available in the Released Products table to indicate the country of origin. You can find this under Product Information Management > Products > Released Products in the Foreign trade FastTab:
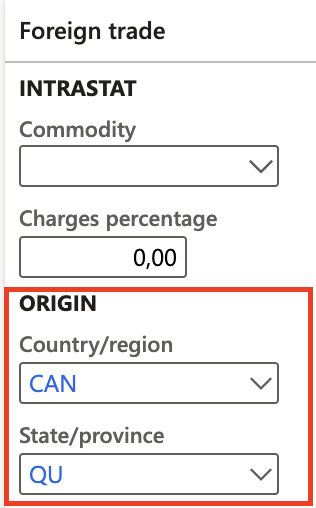
Figure 2.11 – Country of origin classification
Figure 2.6 demonstrates a rule that designates a specific product’s destination and origin countries. This rule can be accessed via Product Information Management > Setup > Product Compliance > Country of Origin > Country of Origin Rules.
Occasionally, vendors supply a certificate (with an expiry date and certificate number) to their clientele. Armed with this documented information, customers can generate the requisite shipping documentation. Moreover, this data enables the customer to coordinate with suppliers when a certificate nears expiration.
Additionally, this data can assist a seller in verifying any specific details about a product headed to a country with requirements or tariffs, before concluding a sale.