
In this section, we will discuss various ideas for maintaining the data in your TMs.
To modify the content of a TM, you must first open it in the Translation Memories view. In the Translation Memories view, choose Open Translation Memory, navigate to the TM that you want to open, and open it. The TM opens in a list at the top of the Navigation pane, as shown in the following screenshot:

To view information such as the file location, creation date and number of translation units (TUs) in the TM, right-click the name of the TM and choose Settings. The central pane of the Translation Memories view displays the first segments of the TM that you have opened (and any others that you have opened already will be visible via their tabs).
You can search and/or replace text in the Translation Memories view using a technique similar to that used on text in bilingual SDLXLIFF files.
To bring up the standard Find or Find and Replace window, in the Home tab, click the Find (Ctrl + F) or Replace (Ctrl + H) button.

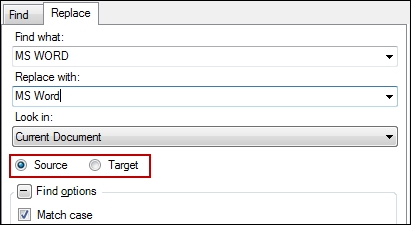
The Find and Replace window is shown in the following screenshot. Notice that you can replace text in the source as well as in the target in the TUs inside the TM.
When you have run the replace operation, the background color of any TU whose content has been replaced changes to indicate that the TU has been edited, as shown in the following screenshot:

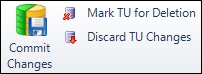
The changes you make are pending until you confirm them with Commit Changes, or discard them with Discard TU Changes, shown in the following screenshot:
If the Discard TU Changes button is grayed out, you may be able to access it by right-clicking on the TU in the side-by-side pane instead. Once confirmed, these changes cannot be reversed, so it is wise to make a backup copy of your TM before you make such changes to your TM.
The search window at the top of the Translation Memories view allows you to run more complex searches as well as the basic find and replace operations described in the preceding section using the standard Find and Replace function. To run a basic search for TUs containing certain text strings, in the Search Details pane, shown in the following screenshot, type the search string in either or both of the Source Text or Target Text fields and press Enter or click Perform Search. Segments containing the search string are displayed in the side-by-side view.
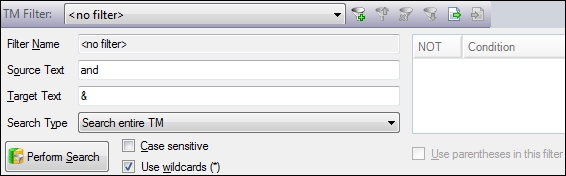
By searching for text in both source and target, you can find TUs that simultaneously match different conditions in both. In our example, we search for and in the source and & in the target to find TUs in which and has been translated as &. This example finds TUs like that shown in the following screenshot:

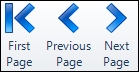
Only the number of TUs set in File | Options | Translation Memories View | Number of translation units per page are displayed in each page. To move from page to page, use the buttons in the Home view, shown in the following screenshot:
To redisplay all of the TUs, clear the Source Text or Target Text fields and click Perform Search again.
The search window at the top of the Translation Memories view also allows you to run several find and replace operations at once. To do this, from the Home tab, in the Tasks group, click the Batch Edit toolbar button shown in the following screenshot:

In the Batch Edit dialog box, click Add and choose Find and Replace Text. Type the text strings, specify whether to search in the source or target and match the case, and click OK. The action is added to a list of actions to be run. Repeat this process for the other text strings that you want to find and replace. In the example shown in the following screenshot, we are replacing all instances of & in the target with et (the French word for and), and all instances of None in the source with N/A:

To run the find and replace operation on all of the actions that you have added to the list in this way, click Finish and then Close.
Note
The search window at the top of the Translation Memories view makes the changes to the affected TUs as soon as you click Finish. You are not asked to confirm the changes, and once you replace text in the TM in this way, the changes cannot be undone. It is therefore wise to make a backup copy of your TM before you proceed.
Filters are used to isolate TUs with certain characteristics so that you can edit, delete, or view them together in a single operation. For example, you could specify TUs that were added by a certain user, before a certain date, or that contain a particular piece of text, or that match all of these conditions. Filters can also be used to import and export matching data from TMs.
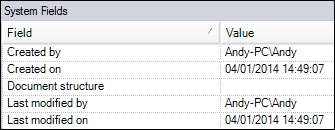
The System Fields pane on the right of the side-by-side view shows various information about the selected TU, such as when and by whom it was created and last modified, as shown in the following screenshot:
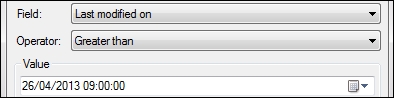
The following example assumes that we want to specify all TUs modified after a certain date.
To create the filter, in the Search Details pane, click the Add Filter icon, shown on the left of the following screenshot along with the Save Filter and Delete Filter icons:

Under Filter Name, type a name for the filter. On the lower right-hand side of the Search Details pane, click the Add button to open the Add Condition dialog box and set the options shown in the following screenshot:
To create filters with multiple conditions, click Add to add a further condition. In the AND/OR column, choose AND to specify that both conditions must be satisfied, or choose OR to specify that either condition will suffice.
Note
With dates, the operators Smaller than and Greater than signify earlier than and later than. With text content fields such as Source segment, the operators Equal to and Contains mean that the TU includes either only the specified text and at least the specified text, respectively.
Click the Save Filter button. The following screenshot shows the configured filter:

To find text with a filter, in the Search Details window, in the TM Filter list, select the filter, type any text that you want to search for, and click Perform Search. To search for all TUs that match the filter criteria, leave the Source Text and Target Text fields blank. In the case of the filter shown in the preceding screenshot, this approach could be used to find TUs that contain certain text strings and were modified after a certain date.
To apply filters to batch edit operations, described earlier in this chapter, click the Batch Edit toolbar button. Under Filter, select the filter, then search and replace as described earlier in this appendix.
You can modify the content of the TUs displayed in the side-by-side pane of the Translation Memories view by using the find and replace methods described earlier in this appendix. Alternatively, you can click inside individual TUs and edit them directly.
To edit TUs directly, the following actions are available:
To edit a TU: To edit a TU displayed in the side-by-side pane of the Translation Memories view, simply click in the source or target and add or delete the text as normally. As soon as you type, the background color of the TU changes to indicate that it has been edited, as shown in the following screenshot:

The changes you make are pending until you confirm them with Commit Changes, or discard them with Discard TU Changes, as described earlier in this appendix in the section titled Finding and replacing text in a TM.
To delete a TU: To delete a TU, you must first mark it for deletion with Mark TU for Deletion (shown in the screenshot in the earlier section titled Standard find and replace operations) and then confirm the deletion. Deleted TUs cannot be restored.
To mark a TU for deletion, right-click in the TU and choose Mark TU for Deletion (Ctrl + D). The background color of the TU changes as shown in the following screenshot:

To delete any TUs marked for deletion, choose Commit Changes. To discard the changes, choose Discard TU Changes.
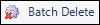
To delete all TUs matching certain conditions: Click the Batch Delete button (shown in the following screenshot) to open the Batch Delete window, select the relevant filter, and click Finish:
Importing and exporting TM data is useful in a number of situations. For example, you can merge data from one TM into another as a way to combine TMs with different sublanguages, such as U.S. and U.K. English, so that you can get matches from TUs that were originally created with a different sublanguage from the one in your TM. You can also exchange data with TM tools other than SDL Trados Studio, for example if you want to share TM data with another translator who does not have access to SDL Trados Studio.
To import and export TM data, the TM must be visible in the Navigation pane of the Translation Memories view. To open the TM in this way, click Open Translation Memory (Alt + Shift + O) and select the TM as described earlier in this appendix under the Opening a TM section.
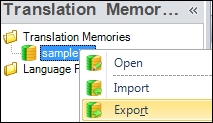
SDL Trados Studio uses the .tmx format to export TMs. In the Navigation pane, right-click the name of the TM and choose Export, as shown in the following screenshot:
Under Export to, navigate to the location where you want the exported .tmx memory to go (if you do not do so, you may not be able to find your exported file later), and type a name for the exported TM. To export only TUs matching certain criteria, click Edit and add a filter as described earlier in this appendix. Click Finish to export the TUs.
You can import data into a TM that is empty or already contains TUs, from .tmx or the bilingual file formats .sdlxliff, .ttx, or .itd (or a mixture of these formats). To import data into a TM, perform the following steps:
In the Navigation pane, right-click the name of the TM into which you want to import data and choose Import.
In the Import Files screen, choose Add Files and select the import file(s).
In the TMX Import Options and Bilingual Document Import Options screens (which of these screens appears depends on the import format), add a filter if desired. For information on the various
.tmximport scenarios, see the SDL help files at http://tinyurl.com/trados-import-scenarios. Otherwise, leave the default options and click Next.In the General Import Options screen, the most often used options are:
Import translation units as plain text: This option removes any formatting tags from the imported TUs (useful if you think that the formatting and tags in the imported TUs will negatively affect the match levels from the TM later). This applies mostly to TMs created in tools working in MS Word.
Overwrite existing translation units: If this option is selected, existing TUs in the TM with the same source but a different target segment to the imported TU are replaced with the target segment of the imported TU. If not, the TU is added to the TM as an alternative translation for the same source segment.
For more detail, see http://tinyurl.com/trados-import-options.
To import TUs with different sublanguages to that of the TM into which you are importing, under General Import Options in the Import Wizard, leave the Exclude language variants option unselected. To merge two TMs, for example, with the source languages French (France) and French (Canada) respectively, export one of the memories to .tmx and then import it into the other.
TM fields are labels that you can add to the TUs in the TM as you store each segment during translation, or by editing TUs in the Translation Memories view. For example, you could create a predefined Subject picklist with possible values IT, Law, and EU, or a text field in which you can type any desired text (such as by adding a job ID each time you start a new assignment). You can then assign one or more of these values to each TU as you translate. When using the TM subsequently, you can then create a filter to impose a penalty that will alert you to matches that do not correspond to one or more of these values. For example, if you have set up a field to identify whether a document concerns Microsoft or Apple products, you could use it to flag segments that come from Apple documents when translating a document about Microsoft. You can also use fields to filter the TUs during import and export operations.
To make use of TM fields during translation, perform the following steps:
To create a field: Open the TM in the Translation Memories view. You cannot add new fields to the TM if it is open in the side-by-side pane, so close it by clicking the Close Document (X) icon on the right-hand side of the side-by-side pane. Now right-click on the name of the TM in the Navigation pane, and choose Settings | Fields and Settings.
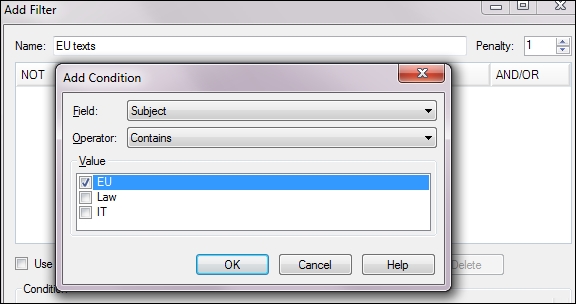
Type a Name for the field, and choose the Type. If you are creating a list, click under Picklist and add the options to choose from, one by one. Select the Allow Multiple Values checkbox if you want to be able to assign more than one list value per TU. For example, if you were translating a contract relating to computers, the subject fields IT and Law would both apply. The following screenshot shows a completed field setting:

You can add fields and values at any time by returning to these settings.
To apply fields during translation: Once you have created fields in your TM, you can use them to label the TUs that you add to the TM as you translate. For example, if you use the same TM for work from different clients, you could add a "Client" field so that each TU in the TM would carry an indication of which client it applies to.
With a document open in the Editor view, choose Project | Project Settings | Language Pairs | All Language Pairs | Translation Memory and Automated Translation, then choose Update and select the previously added Field Values to apply to the TUs in the TM with which you are working. Field values in matched TUs appear on the right of the Translation Memory Results window, as in the following screenshot:

Updating existing TUs: If the field allows multiple values, values not already assigned to the TU are added to those already assigned. If the field does not allow multiple values, values already assigned are replaced. To add the segment to the TM as an alternative translation with different field values, press Ctrl + Shift + U.
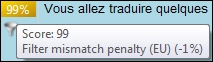
In this example, we add a filter using the Subject field from the preceding section to impose a 1% penalty on matches from the TM that do not have the Subject value EU. This may be because we are doing a translation for the EU and want to be alerted if the TM gives us matches that do not have that subject, in case the proposed translation is unsuitable for an EU text.
To add a filter to a TM in use for a translation, in the Editor view, choose Project Settings. Under Translation Memory and Automated Translation, choose Filters, and then click Add and type a name for the filter. Click Add again. In the Add Condition dialog box, choose Subject and Contains, and select EU in the Value list. This situation is shown in the following screenshot:
Click OK twice to exit.
As you translate in the Editor, if there is a match whose Subject value does not include EU, the Translation Memory Results window shows that the filter penalty has been applied, as in the following screenshot:
You may sometimes need to modify the fields that are assigned to TUs in an existing TM. For example, you may want to add field values to TUs that have not yet been assigned any values, or to change the value assigned to TUs containing certain terms. When you add, replace, or remove fields and values in a TM, you will often want to apply the changes to certain TUs only rather than the entire TM. In this case, you must first create a filter to specify which TUs you want to update, otherwise all of the TUs in the TM will be affected.
In this example, we want to ensure that all TUs in the TM that contain both the source words contract and computer are updated to have the Subject labels IT and Law. We have created a picklist field Subject that allows multiple values to be selected from IT, Law, and EU. We will now create a filter (see the earlier section Filtering text to find and replace) to allow us to specify that only segments containing both the source words contract and computer will be updated. The filter will therefore contain two conditions, one for each of these words. To create this filter, perform the following steps:
Click Add Filter and under Filter Name type a name for the filter, such as Contains "contract" and "computer".
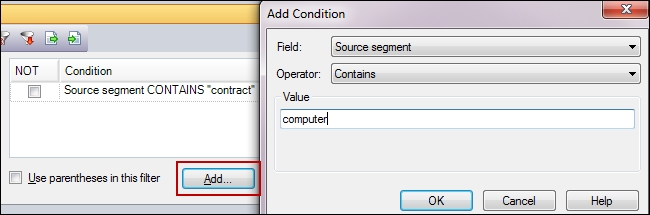
To add the first condition, we then click the Add button highlighted in the following screenshot. In the Add Condition window, we specify that the Field is Source segment, the Operator is Contains, and then under Value we type the word
contract, and click OK.To add the second condition, we then click the Add button again and select the same settings but under Value type the word
computerand click OK. The following screenshot shows the situation when we have added the first condition and are ready to add the second condition by clicking OK.Click Save Filter.
This results in a filter with two conditions, as shown in the following screenshot:

In the Translation Memories view, with the relevant TM open in the side-by-side pane, click the Batch Edit toolbar button. Under Filter, select the relevant filter. Click Add | Change Field Value. In the Edit Action dialog box, select the following settings:

In the Change mode list, you can choose Replace to replace field values in TUs matching the filter with the selected values, Add to add the selected values to the existing ones, or Remove to remove the selected values. In this example, we are going to use the Replace action to ensure that the field values for any matching TUs get updated with the new values. Click OK and then Finish to update the fields. A window appears indicating how many TUs have been edited.
In our example, the Subject value for all TUs containing the source words contract and computer is now replaced with two values, IT and Law.