
Alignment is the process of adding material to a TM from existing pairs of documents (source and translation) that were translated without using a TM tool. By aligning these files, you can recycle their content into a TM to use when you subsequently translate similar material in SDL Trados Studio or another TM tool.
Alignment can be time consuming, especially with large files in which the source and target documents have different segmentation (for example, if sentences in the source document have been split up into smaller sentences in the target document). In these situations, it is often worth spending time to prepare the documents themselves to ensure that their structures are similar before you align them. For example, identical structures created by keeping whole sentences together will improve alignment results.
Tip
The new alignment tool in SDL Trados Studio 2014 is particularly useful if you want to do a quick and dirty alignment in the knowledge that you are unlikely to re-use all of the aligned TUs anyway. It is therefore a good idea to import the alignment results into a separate TM used for reference purposes only in order to not contaminate your main TM(s) with incorrect alignments.
In SDL Trados Studio 2014, files are aligned into a SDL Trados Studio TM (.sdltm). Unlike with WinAlign, the alignment tool in previous versions, there is at the time of writing no dedicated post-alignment editor for correcting misaligned segments. Once you have aligned the segments, however, you can modify them by dragging and dropping text from one TU to another, spot-edit the source and target cells in the Translation Memories view, and remove erroneously paired segments.
In the Welcome or Translation Memories view, from the Home tab, click the Align Documents button, shown in the following screenshot:

To align your source and target files, perform the following steps:
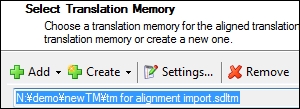
In the Select Translation Memory window, shown in the following screenshot, choose to add an existing TM or create a new one, as described in Chapter 2, Creating and Using Translation Memories. You can import the aligned segments into an existing TM that already contains translation pairs or create a new, empty TM to import into.
To add TM fields to the TM that you have added or created, you can optionally choose Settings | Fields and Settings at this point. To illustrate the usefulness of this, in our example, we will take the optional step of creating a text field called Origin, as shown in the following screenshot, which will allow us to later identify all of the segments that have been added to the TM by the alignment.

Back in the Align Documents wizard, click Next.
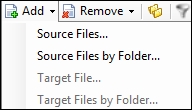
In the Documents for Alignment screen, part of which is shown in the following screenshot, click Add to add the source and target files. Files can be added individually or by selecting a folder. If you select a folder, all of the files in the folder and any subfolders it contains will be added. You must add the source files first and then the target files.
If you have added the files by folder rather than individually, you may need to click the relevant folder name on the left to display the files in the Source File and Target File panes on the right, as shown in the following screenshot:

Click Add again and add the target files in the same way. If you add files by folder, files with matching filenames, including those in subfolders, will be paired up automatically. In our example, the digits 9/9 after the name of the source files folder on the left of the screenshot tell us that all nine source files have been paired with a target file.
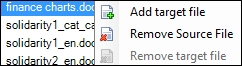
To remove an incorrect target file and add the correct one, or to add a target file for a source file for which no partner was found automatically, in the Target file list, select the file and from the right-click menu, choose Add target file or Remove target file, as shown in the following screenshot:
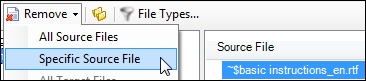
To remove incorrectly added files, select the file(s) and choose Remove and the appropriate option from the list. In the following screenshot, we manually remove a temporary file that was left in the source folder and mistakenly picked up for alignment. When the filenames are paired up correctly, click Next.
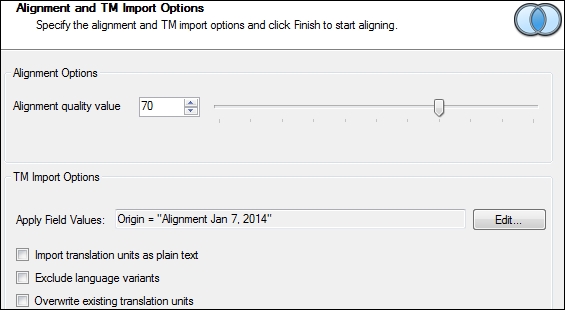
The Alignment and TM Import Options screen, shown in the following screenshot, offers the same options as when importing a TM described earlier in this appendix. In this example, under Apply Field Values, we have clicked Edit on the right and added a value (Alignment Jan 7, 2014) to the Origin field that we created earlier to identify the origin of the aligned segments.
The Alignment quality value is derived from a mechanism used by SDL Trados Studio to determine the reliability of the segment pairings (that is, the assumed probability that the pairing will be correct). For example, the default setting of 70% means that any segments given a reliability factor of less than 70% will not be aligned. It is worth experimenting with various values to obtain the best results. For more details on the logic behind this, see the SDL help pages at http://tinyurl.com/align-quality.
Click Finish. The Aligning Documents window lists the number of segments aligned for each source document, as shown in the following screenshot:

Click Close. The Translation Memories view now opens with the imported segments visible (if no segments are showing, press F5 to refresh the view). The column on the right of the side-by-side view shows the Origin field that we created, along with default fields showing the source and target documents from which the aligned segment was generated. The Field Values pane on the right shows further meta-information for aligned segments, including the alignment Quality value (which in our example indicates a high reliability level of 93%).

To check the results of the alignment, you can now review, spot-edit, and delete segments in the Translation Memories view, as described earlier in this appendix. You can also select text in one TU and either copy and paste or drag-and-drop it into another TU. This effectively allows you to split and merge segments. In the example in the following screenshot, we are merging two segments by dragging and dropping the text from the TU below to the one above:

If this leaves you with an empty cell in the TU (whether in the source, target, or both), you will not be able to confirm the change, as indicated by the red cross icon shown on the left side of the following screenshot (in which we have also merged the text in the target cells of the two TUs):

Assuming that you are happy to delete the TU from the TM, you can get round this problem by marking the TU with the empty cell(s) for deletion, via Mark TU for Deletion, as described earlier in this appendix. It will then be deleted when you confirm the other changes that you have made during this editing process (via Commit Changes). Alternatively, you can cancel the pending changes via Discard TU Changes.
Tip
To help you check segments of lower quality, you can create a filter on the Quality field to display only those segments in the side-by-side view, as shown in the following screenshot. In this example, we have set the field Quality to be Smaller than or equal to a value of 90.

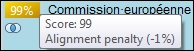
When you translate a document in the Editor using the aligned TM, an alignment penalty of 1% is applied to any matches produced by alignment, as shown in the following screenshot. This is to alert you to the need to double-check matches from segments produced by alignment, which will in many cases of course be less reliable than those that you have added to a TM by translating a text in the Editor. Note that this can result in high levels of 99% matches in the Analyze Files report. To adjust the alignment penalty, under Project Settings, choose Translation Memory and Automated Translation | Penalties.