
Understanding Docker
This book was created with the assumption that you have some basic knowledge of Docker and container concepts. We realize that not everyone may have played with Docker or containers in the past, so we wanted to present a crash course on container concepts and using Docker.
Important Note
If you are new to containers, we suggest reading the documentation that can be found on Docker's website for additional information: https://docs.docker.com/.
Containers are ephemeral
The first topic to understand is that container images are ephemeral.
For those of you who are new to Docker, the term ephemeral means short-lived. By design, a container can be destroyed at any time and brought back up with no interaction from a user. In the preceding example, someone interactively added files to a web server. These added files are only temporary since the base image does not have these files included in it.
This means that once a container is created and running, any changes that are made to the image will not be saved once the container is removed, or destroyed, from the Docker host. Let's look at an example:
- You start a container running a web server using NGINX on your host without any base HTML pages.
- Using a Docker command, you execute a
copycommand to copy some web files into the container's filesystem. - To test that the copy was successful, you browse to the website and confirm that it is serving the correct web pages.
- Happy with the results, you stop the container and remove it from the host. Later that day, you want to show a co-worker the website and you start your NGINX container. You browse to the website again, but when the site opens, you receive a 404 error (page not found error).
What happened to the files you uploaded before you stopped and removed the container from the host?
The reason your web pages cannot be found after the container was restarted is because all containers are ephemeral.
Whatever is in the base container image is all that will be included each time the container is initially started. Any changes that you make inside a container are short-lived.
If you needed to add permanent files to the existing image, you would need to rebuild the image with the files included or, as we will explain in the Persistent data section later in this chapter, you could mount a Docker volume in your container. At this point, the main concept to understand is that containers are ephemeral.
But wait! You may be wondering, "If containers are ephemeral, how did I add web pages to the server?". Ephemeral just means that changes will not be saved; it doesn't stop you from making changes to a running container.
Any changes made to a running container will be written to a temporary layer, called the container layer, which is a directory on the local host filesystem. The Docker storage driver is in charge of handling requests that use the container layer. This location will store any changes in the container's filesystem so that when you added the HTML pages to the container, they will be stored on the local host. The container layer is tied to the container ID of the running image and it will remain on the host system until the container is removed from Docker, either by using the CLI or by running a Docker prune job.
If a container is ephemeral and the image cannot be written to, how can you modify data in the container? Docker uses image layering to create multiple linked layers that appear as a single filesystem.
Docker images
At a high level, a Docker image is a collection of image layers, each with a JSON file that contains metadata for the layer. These are all combined to create the running application that you interact with when a container image is started.
You can read more about the contents of an image on Docker's GitHub at https://github.com/moby/moby/blob/master/image/spec/v1.md.
Image layers
As we mentioned in the previous section, a running container uses a container layer that is "on top" of the base image layer, as shown in the following diagram:
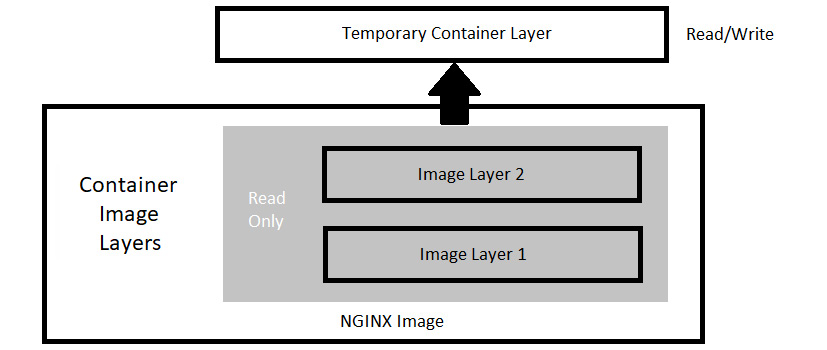
Figure 1.1 – Docker image layers
The image layers cannot be written to since they are in a read-only state, but the temporary container layer is in a writeable state. Any data that you add to the container is stored in this layer and will be retained as long as the container is running.
To deal with multiple layers efficiently, Docker implements copy-on-write, which means that if a file already exists, it will not be created. However, if a file is required that does not exist in the current image, it will be written. In the container world, if a file exists in a lower layer, the layers above it do not need to include it. For example, if layer 1 had a file called /opt/nginx/index.html in it, layer 2 does not need the same file in its layer.
This explains how the system handles files that either exist or do not exist, but what about a file that has been modified? There will be times where you'll need to "replace" a file that is in a lower layer. You may need to do this when you are building an image or as a temporary fix to a running container issue. The copy-on-write system knows how to deal with these issues. Since images read from the top down, the container uses only the highest layer file. If your system had a /opt/nginx/index.html file in layer 1 and you modified and saved the file, the running container would store the new file in the container layer. Since the container layer is the topmost layer, the new copy of index.html would always be read before the older version in the image layer.
Persistent data
We will talk about how to use persistent disks in Chapter 2, Working with Docker Data. For now, we will just provide a brief introduction.
Being limited to ephemeral-only containers would severely limit the use cases for Docker. It is very likely that you will have some use cases that will require persistent storage, or data that will remain if you stop a container.
This may seem like we are contradicting our earlier statement that containers are ephemeral, but that is still true. When you store data in the container image layer, the base image does not change. When the container is removed from the host, the container layer is also removed. If the same image is used to start a new container, a new container image layer is also created. So, the container is ephemeral, but by adding a Docker volume to the container, you can store data outside of the container, thus gaining data persistency.
Docker provides persistency through a few methods, which we will discuss in more detail in Chapter 2, Working with Docker Data, but for now, know that Docker does provide a method to persist your data.
Accessing services running in containers
We will talk about how to expose containers in Chapter 3, Understanding Docker Networking. For now, we will just provide a brief introduction.
Unlike a physical machine or a virtual machine, containers do not connect to a network directly. When a container needs to send or receive traffic, it goes through the Docker host system using a bridged NAT network connection. This means that when you run a container and you want to receive incoming traffic requests, you need to expose the ports for each of the containers that you wish to receive traffic on. On a Linux-based system, iptables has rules to forward traffic to the Docker daemon, which will service the assigned ports for each container.
That completes the introduction to base containers and Docker. In the next section, we will explain how to install Docker on a host.