With your compute instance VM created, you can use it to write code in either R or Python. Specifically, you can code in Jupyter, JupyterLab, Visual Studio Code (VSCode), or a terminal. Both Jupyter and JupyterLab are examples of IDEs for writing Python code. VS Code is Microsoft’s recommended IDE that allows you to script in either R or Python, among many other languages.
In this section, you will begin by opening a Jupyter notebook and using it to connect to your AMLS workspace. Similarly, you will do the same thing with JupyterLab. Finally, you will learn how to use AML notebooks in order to develop code.
Developing Python code with Jupyter Notebook
Perhaps the most common way for data scientists to write code within the AMLS is through Jupyter Notebook, the most popularly used Python IDE. Jupyter Notebook does, however, come with many limitations; it lacks a lot of the most basic features of your traditional IDE, such as linting and code analysis to flag errors before you try running your code. Still, many data scientists prefer it for its streamlined, easy-to-use interface. In order to open Jupyter and create a notebook, follow these steps:
- Go to the AML workspace UI.
- Click on Compute in the left-hand navigation menu under the Manage section of the menu.
The following screenshot shows us the list of all computes created:
Figure 1.31 – List of compute instances
- From the list, select your compute instance and click on Start (if it has not already started). Once the compute instance has started, a link to Applications will appear.
- Click on the JupyterLab or Jupyter link to open the Jupyter notebook for further development.
- To access the AMLS workspace notebook in the left-hand menu, go to the Notebooks section.
- On the next screen, you should see the folders in the left-hand pane. Each user in an AMLS workspace will have a folder created for them by default. Inside your user folder, you can select a notebook to work on. Options to create folders and new notebooks are also available, as shown in Figure 1.15.
Now that you know how to use Jupyter Notebook within the AMLS, we will explore how to leverage an AML notebook.
Developing using an AML notebook
AML notebooks are similar to Jupyter notebooks and provide you with another option for developing code. Whether you choose to develop using Jupyter, JupyterLab, or AML notebooks is largely a matter of personal preference. Please try all three to determine which suits you best. In order to start developing with AML notebooks, follow the following steps:
- Go to the AMLS workspace UI.
- Click on Notebooks on the left-hand navigation menu under the Author section.
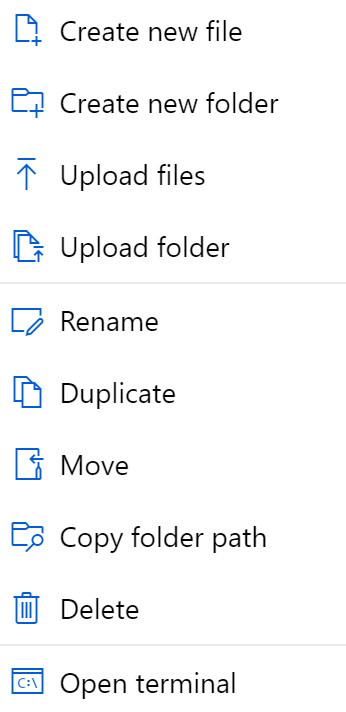
- Expand the folder and select your notebook or create a new notebook:
Figure 1.32 – File menu options
- Click on Create new file.
- Name the notebook file
amlbookchapter1.ipynb.
- Once you click on Create, the page in Figure 1.33 should pop up. The preceding process will create a new notebook for us to start development:
Figure 1.33 – New notebook
In your notebook, you will see the IDE default to the Python 3.10 - SDK V2 environment. Each cell will allow you to execute code on your running compute instance.
There are two main ways to develop code within the AMLS: Jupyter and AML notebooks. However, a far more powerful IDE exists, which contains many features to improve your productivity – VS Code. In the next section, you will download VS Code and connect it to the AMLS.


 Free Chapter


