
Unity makes the game production process simple by giving you a set of logical steps to build any conceivable game scenario. Renowned for being non-game-type specific, Unity offers you a blank canvas and a set of consistent procedures to let your imagination be the limit of your creativity. By establishing its use of the GameObject concept, you are able to break down parts of your game into easily manageable objects, which are made of many individual Component parts. By making individual objects within the game—introducing functionality to them with each component you add, you are able to infinitely expand your game in a logical progressive manner.
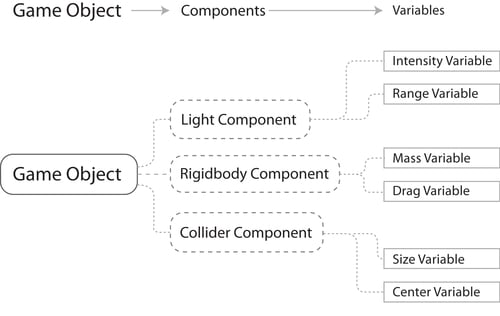
Component parts in turn have Variables—essentially properties of the component, or settings to control them with. By adjusting these variables, you'll have complete control over the effect that Component has on your object. The following diagram illustrates this:
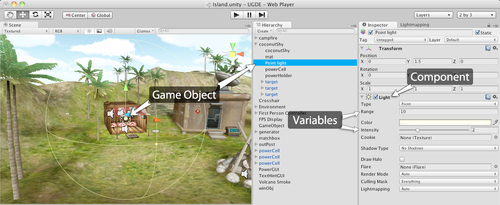
In the following image we can see a Game Object with a Light Component, as seen in the Unity interface:
Now let's look at how this approach would be used in a simple gameplay context.
If we wished to have a bouncing ball as part of a game, then we would begin with a sphere. This can quickly be created from the Unity menus, and will give you a new GameObject with a Sphere mesh (the 3D shape itself). Unity will automatically add a Renderer component to make it visible. Having created this, we can then add a Rigidbody component. A Rigidbody (Unity refers to most two-word phrases as a single word term) is a component which tells Unity to apply its physics engine to an object. With this comes properties such as mass, gravity, drag, and also the ability to apply forces to the object, either when the player commands it or simply when it collides with another object.
Our sphere will now fall to the ground when the game runs, but how do we make it bounce? This is simple! The collider component has a variable called Physic Material—this is a setting for the physics engine, defining how it will react to other objects' surfaces. Here we can select Bouncy—a ready-made Physic material provided by Unity as part of an importable package and voila! Our bouncing ball is complete in only a few clicks.
This streamlined approach for the most basic of tasks, such as the previous example, seems pedestrian at first. However, you'll soon find that by applying this approach to more complex tasks, they become very simple to achieve. Here is an overview of some further key Unity concepts you'll need to know as you get started.
These are the building blocks of all Unity projects. From textures in the form of image files, through 3D models for meshes, and sound files for effects, Unity refers to the files you'll use to create your game as assets. This is why in any Unity project folder all files used are stored in a child folder named Assets. This Assets folder is mirrored in the Project panel of the Unity interface; see The
interface section in this chapter.
In Unity, you should think of scenes as individual levels, or areas of game content—though some developers create entire games in a single scene, such as, puzzle games, by dynamically loading content through code. By constructing your game with many scenes, you'll be able to distribute loading times and test different parts of your game individually. New scenes are often used separately to a game scene you may be working on, in order to prototype or test a piece of potential gameplay.
Any currently open scene is what you are working on, as no two scenes can be worked on simultaneously. Scenes can be manipulated and constructed by using the Hierarchy and Scene views.
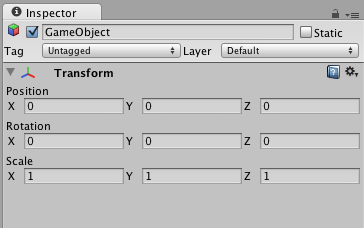
Any active object in the currently open scene is called a GameObject . Certain assets taken from the Project panel such as models and prefabs become game objects when placed (or 'instantiated') into the current scene. Other objects such as particle systems and primitives can be placed into the scene by using the Create button on the Hierarchy or by using the GameObject menu at the top of the interface. All GameObjects contain at least one component to begin with, that is, the Transform component. Transform simply tells the Unity engine the position, rotation, and scale of an object—all described in X, Y, Z coordinate (or in the case of scale, dimensional) order. In turn, the component can then be addressed in scripting in order to set an object's position, rotation, or scale. From this initial component, you will build upon GameObjects with further components, adding required functionality to build every part of any game scenario you can imagine.
In the following image, you can see the most basic form of a Game Object, as shown in the Inspector panel:
GameObjects can also be nested in the Hierarchy, in order to create the parent-child relationships mentioned previously.
Components come in various forms. They can be for creating behavior, defining appearance, and influencing other aspects of an object's function in the game. By attaching components to an object, you can immediately apply new parts of the game engine to your object. Common components of game production come built-in with Unity, such as the Rigidbody component mentioned earlier, down to simpler elements such as lights, cameras, particle emitters, and more. To build further interactive elements of the game, you'll write scripts, which are also treated as components in Unity. Try to think of a script as something that extends or modifies the existing functionality available in Unity or creates behavior with the Unity scripting classes provided.
While being considered by Unity to be components, scripts are an essential part of game production, and deserve a mention as a key concept. In this book, we will write our scripts in both C Sharp (More often written as 'C#') and Javascript. You should also be aware that Unity offers you the opportunity to write in Boo (a derivative of the Python language).We have chosen to primarily focus on C# and Javascript as these are the main two languages used by Unity developers, and Boo is not supported for scripting on mobile devices; for this reason it is not advised to begin learning Unity scripting with Boo.
Unity does not require you to learn how the coding of its own engine works or how to modify it, but you will be utilizing scripting in almost every game scenario you develop. The beauty of using Unity scripting is that any script you write for your game will be straightforward enough after a few examples, as Unity has its own built-in Behavior class called Monobehaviour—a set of scripting instructions for you to call upon. For many new developers, getting to grips with scripting can be a daunting prospect, and one that threatens to put off new Unity users who are more accustomed to design. If this is your first attempt at getting into game development, or you have no experience in writing code, do not worry. We will introduce scripting one step at a time, with a mind to showing you not only the importance, but also the power of effective scripting for your Unity games.
To write scripts, you'll use Unity's standalone script editor, Monodevelop. This separate application can be found in the Unity application folder on your PC or Mac and will be launched any time you edit a new script or an existing one. Amending and saving scripts in the script editor will immediately update the script in Unity as soon as you switch back to Unity. You may also designate your own script editor in the Unity preferences if you wish to, such as Visual Studio. Monodevelop is recommended however, as it offers auto-completion of code as you type and is natively developed and updated by Unity Technologies.
Unity's development approach hinges around the GameObject concept, but it also has a clever way to store objects as assets to be reused in different parts of your game, and then instantiated (also known as 'spawning' or 'cloning') at any time. By creating complex objects with various components and settings, you'll be effectively building a template for something you may want to spawn multiple instances of (hence 'instantiate'), with each instance then being individually modifiable.
Consider a crate as an example—you may have given the object in the game a mass, and written scripted behaviors for its destruction, and chances are you'll want to use this object more than once in a game, and perhaps even in games other than the one it was designed for.
Prefabs allow you to store the object, complete with components and current configuration. Comparable to the MovieClip concept in Adobe Flash, think of prefabs simply as empty containers that you can fill with objects to form a data template you'll likely recycle.