
ESP-IDF
ESP-IDF is the official framework by Espressif Systems. It comes with all the necessary tools and an SDK to develop ESP32-based products. After installing ESP-IDF, we will have:
- An SDK for ESP32 development: ESP-IDF v4.4.4 supports the ESP32, ESP32-S2, ESP32-S3, and ESP32-C3 families of chips.
- GCC-based toolchains for the Xtensa and RISC-V architectures.
- GNU debugger (GDB).
- Toolchain for the ESP32 Ultra Low Power (ULP) coprocessor.
- cmake and ninja build systems.
- OpenOCD for ESP32.
- Python utilities: The most notable one is idf.py and is the one we will use throughout the book. It collects all the development tasks in the same Python script.
The installation of ESP-IDF differs from platform to platform, so make sure to follow the steps as described in the official documentation for your target development machine. The documentation is provided at this link: https://docs.espressif.com/projects/esp-idf/en/latest/esp32/get-started/#installation
My personal choice of development environment is VSCode on Canonical Ubuntu 22.04 LTS. However, you can install ESP-IDF on any platform without any problem if you follow the guidance in the official documentation. The other IDE option is to use ESP-IDF through it.
On top of ESP-IDF, Espressif offers a VSCode extension in the Visual Studio Marketplace to manage ESP32 projects in a similar fashion to the command-line tools. It makes development in the VSCode environment easier but its capabilities are limited compared to the command-line tools. Its installation is explained here: https://github.com/espressif/vscode-esp-idf-extension. We will use this extension with VSCode to develop the very first ESP32 application.
The first application
In this example, we will simply print 'Hello World' on the serial output of ESP32 – surprise! Let’s do it step by step:
- Make sure you have installed ESP-IDF v4.4.4. Follow the steps as described in the documentation (https://docs.espressif.com/projects/esp-idf/en/latest/esp32/get-started/#installation).
- Make sure you have installed VSCode and the Espressif IDF extension (https://github.com/espressif/vscode-esp-idf-extension).
- Plug ESP32-S3-BOX-Lite into a USB port of your development machine and observe that it is shown on the device list (the following command is on a Linux terminal but you can choose any relevant relevant tool on your development machine):
$ lsusb | grep -i espressif Bus 001 Device 025: ID 303a:1001 Espressif USB JTAG/serial debug unit - Run VSCode and enable the ESP-IDF extension if it is not already enabled.

Figure 2.1: Espressif IDF in VSCode
- Create an ESP32 project. There are two ways to do that. You can either select View | Command Palette | ESP-IDF: New Project or press the Ctrl + E + N key combination to open the New Project dialog. Fill in the input boxes as shown in the following screenshot (don’t use any whitespace in the project path, and select ESP32-S3 and the serial port that the devkit is connected to). Then click on the Choose Template button.

Figure 2.2: New project
- On the next screen, select ESP-IDF from the drop-down box and sample_project from the list. Complete this step by clicking on the Create project using template sample_project button. On the bottom right of the screen, a pop-up window will show up asking to open the project in a new window. Answer Yes and a new VSCode window will appear with the new project.

Figure 2.3: Select sample_project
- In the new VSCode window, you now have the environment for the ESP32 project. You can see the file names in Explorer on the left side of the window.
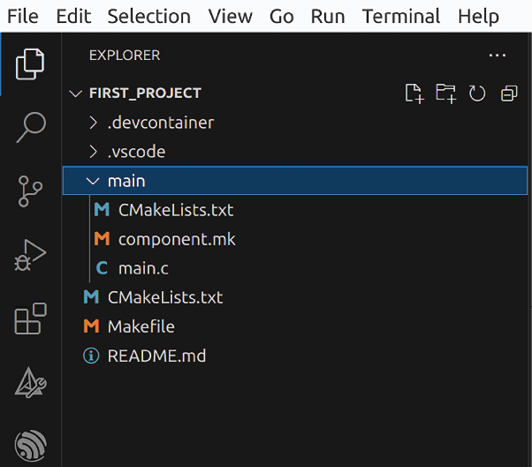
Figure 2.4: Explorer with VSCode files
- Rename
main/main.ctomain/main.cppand edit the content with the following simple and famous code:#include <iostream> extern "C" void app_main(void) { std::cout << "Hello world!\n"; } - To compile, flash, and monitor the application, we can simply press the Ctrl + E + D key combination (there are other ways to the same thing: we can click on the fire icon in the bottom menu or we can select the same CP in the command palette in VSCode). The ESP-IDF extension will ask you to specify the flash method. There are three options: JTAG, UART and DFU. We select UART.

Figure 2.5: Selecting the flash method
- Then the next step is to select the project – we only have
first_example. VSCode will open a terminal tab where you can see the compilation output. If everything goes well, it will connect to the serial monitor and all the logs will be displayed as follows.
Figure 2.6: The serial monitor output
- We have compiled the application, flashed it to the devkit, and can see its output in the serial monitor. To close the serial monitor, press Ctrl + ].
Let’s go back to the application code in step 8 and discuss it briefly. In the first line, we include the C++ iostream header file to be able to use the standard output (stdout) to print text on the screen:
#include <iostream>
In the next line, we define the application entry point:
extern "C" void app_main(void)
{
extern "C" means that we will next add some C code and the C++ compiler will not mangle the symbol name that comes after this. It is app_main here. The app_main function is the entry point of ESP32 applications, so we will have this function in every ESP32 application that we develop. We only print "Hello world!\n" on the standard output in app_main:
    std::cout << "Hello world!\n";
} // end of app_main
The standard output is redirected to the serial console by default, thus we see Hello world! printed on the screen in step 10 when we monitor ESP32 by connecting its serial port. We’ve completed our first ESP32 application. We can use these steps as a blueprint when starting a new project. Let’s discuss more about the internal workings of ESP-IDF and other files in a typical ESP32 project.
ESP-IDF uses cmake as its build configuration system. Therefore, we see the CMakeLists.txt files in various places. The one in the root defines the ESP-IDF project:
cmake_minimum_required(VERSION 3.5)
include($ENV{IDF_PATH}/tools/cmake/project.cmake)
project(first_project)
The other one is main/CMakeLists.txt. It registers the application component by providing the source code files and include directories. In our case, it is only main.cpp and the current directory of main.cpp where it will look for any header files:
idf_component_register(SRCS "main.cpp"
                    INCLUDE_DIRS ".")
We frequently edit this file to add new source code files and include directories in our projects.
If you are not familiar with the cmake tool, you can visit its documentation at this link: https://cmake.org/cmake/help/latest/. We will discuss the CMakeLists.txt files in the example projects but if you want a preview of how to configure an ESP-IDF component, the documentation is here: https://docs.espressif.com/projects/esp-idf/en/latest/esp32/api-guides/build-system.html#minimal-component-cmakelists
You may have noticed that when we compiled the application, new additions appeared in the project root as can be seen in the following figure:
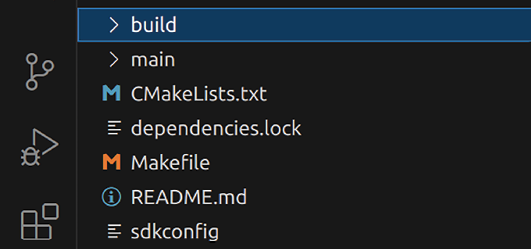
Figure 2.7: The files and directories after compilation
We can see a new directory, build, and a file, sdkconfig. As the name implies, all the artifacts from the build process are located under the build directory. The tools used during the build process generate their files in there. The most interesting files are probably the JSON files. Let’s list them:
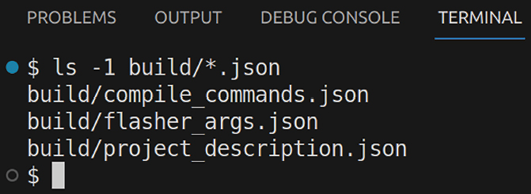
Figure 2.8: JSON files in the build directory
The names of these files are self-explanatory regarding their content so I don’t want to repeat them. However, I suggest you check their content after building the project since they can be very helpful for troubleshooting purposes and understanding the build system in general.
sdkconfig in the project root is important. It is generated by ESP-IDF automatically during the build if there is none. This file contains the entire configuration of the application and defines the default behavior of the system. The editor is menuconfig, which is accessible from View | Command Palette | ESP-IDF: SDK Configuration editor (menuconfig) or simply Ctrl + E + G:
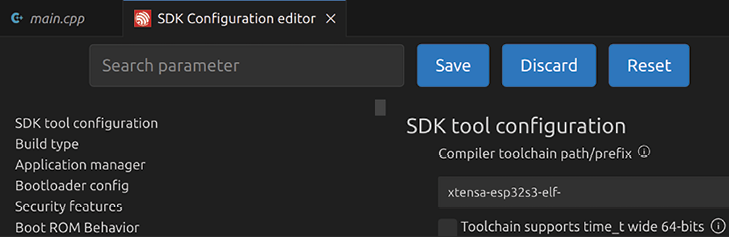
Figure 2.9: SDK configuration (sdkconfig)
We will use menuconfig often to configure our projects, and even provide our custom configuration items to be included in sdkconfig (menuconfig is a part of the Linux configuration system, Kconfig, and adapted in ESP-IDF to configure ESP32 applications).
ESP-IDF Terminal
One last thing worth noting with the ESP-IDF extension is the ESP-IDF Terminal. It provides command-line access to the underlying Python scripts that come with the ESP-IDF installation. To open a terminal, we can select View | Command Palette | ESP-IDF: Open ESP-IDF Terminal or press the key combination of Ctrl + E + T. It opens an integrated command-line terminal. The two powerful and popular tools are idf.py and esptool.py. We can manage the entire development environment and build process by only using idf.py and we will use this tool a lot throughout the book. Just go ahead and write idf.py in the terminal to see all the options. As a quick example:
$ idf.py clean flash monitor
Executing action: clean
Running ninja in directory <your_directory>/ch2/first_project/build
Executing "ninja clean"...
[0/1] Re-running CMake...
-- Project is not inside a git repository, or git repository has no commits; will not use 'git describe' to determine PROJECT_VER.
-- Building ESP-IDF components for target esp32s3
-- Project sdkconfig file <your_directory>/ch2/first_project/sdkconfig
-- App "first_project" version: 1
<The rest of the build and flashing logs. Next comes the application output.>
I (0) cpu_start: Starting scheduler on APP CPU.
Hello world!
This simple command cleans the project (removes the previous build output if any), compiles the application, flashes the generated firmware to the devkit, and finally starts the serial monitor to show the application output.
Similarly, you can see what esptool.py can do by writing its name and pressing Enter in the terminal. The main purpose of this tool is to provide direct access to the ESP32 memory and low-level application image management. As an example, we can use esptool.py to flash the application binary:
$ esptool.py --chip esp32s3 write_flash -z 0x10000 build/first_project.bin
esptool.py v3.2
Found 1 serial ports
Serial port /dev/ttyACM0
Connecting...
Chip is ESP32-S3
Features: WiFi, BLE
Crystal is 40MHz
MAC: 7c:df:a1:e8:20:30
Uploading stub...
Running stub...
Stub running...
Configuring flash size...
Flash will be erased from 0x00010000 to 0x00079fff...
Compressed 430672 bytes to 205105...
Wrote 430672 bytes (205105 compressed) at 0x00010000 in 4.5 seconds (effective 769.1 kbit/s)...
Hash of data verified.
Leaving...
Hard resetting via RTS pin…
The esptool.py tool is especially useful for production. It directly communicates with the ROM bootloader of Espressif SoCs and is independently available on PyPI so we can install it on any machine for firmware binary management with a simple command, without using the entire ESP-IDF:
$ pip install esptool
The Python installation adds two other tools:
- espefuse.py for reading/writing eFuses of ESP32
- espsecure.py for managing secure boot and flash encryption
We will not use esptool.py and the other two that come with the installation in the examples but you will probably need them in production to flash the firmware images on your IoT devices and enable security features. The official documentation for these tools can be found at this link: https://docs.espressif.com/projects/esptool/en/latest/esp32/index.html
With this overview under your belt, you are now ready to start using VSCode and the ESP-IDF extension together to develop ESP32 projects. The next tool is PlatformIO.