
FreeRTOS
There are different flavors of FreeRTOS. FreeRTOS was originally designed for single-core architectures. However, ESP32 has two cores, and therefore the Espressif port of FreeRTOS is designed to handle dual-core systems. Most of the differences between vanilla FreeRTOS and ESP-IDF FreeRTOS stem from this. The following list shows some of those differences:
- Creating a new task: There is a new function in ESP-IDF FreeRTOS where we can specify on which core to run a new task; it is
xTaskCreatePinnedToCore. This function takes a parameter to set the task affinity to the specified core. If a task is created by the originalxTaskCreate, it doesn’t belong to any core, and any core can choose to run it at the next tick interrupt. - Scheduler suspension: The
vTaskSuspendAllfunction call only suspends the scheduler on the core on which it is called. The other core continues its operation. Therefore, it is not the right way to suspend the scheduler and protect shared resources. - Critical sections: Entering a critical section stops the scheduler and interrupts only on the calling core. The other core continues its operation. However, the critical section is still protected by a mutex, preventing the other core from running the critical section until the first core exits. We can use the
taskENTER_CRITICAL(mux)andtaskEXIT_CRITICAL(mux)macros for this purpose.
Another flavor of FreeRTOS is Amazon FreeRTOS, which adds more features. On top of the basic kernel functionality, with Amazon FreeRTOS developers also get common IoT libraries, such as coreHTTP, coreJSON, coreMQTT, and Secure Sockets, for connectivity. Amazon FreeRTOS aims to allow any embedded devices to be connected to the AWS IoT platform easily and securely. We will talk about Amazon FreeRTOS in more detail later in the book. For now, let’s stick to ESP-IDF FreeRTOS and see a classic example of the producer-consumer pattern.
Creating the producer-consumer project
In this example, we will simply implement the producer-consumer pattern to show some functionality of Espressif FreeRTOS. There will be a single producer and two consumer FreeRTOS tasks, one on each core of ESP32. As you might guess, the devkit is ESP32-S3-BOX-Lite (ESP32-C3 has a single RISC-V core). The producer task will generate numbers and push them to the tail of a queue. The consumers will pop numbers from the head. The following figure depicts what we will develop in this example:
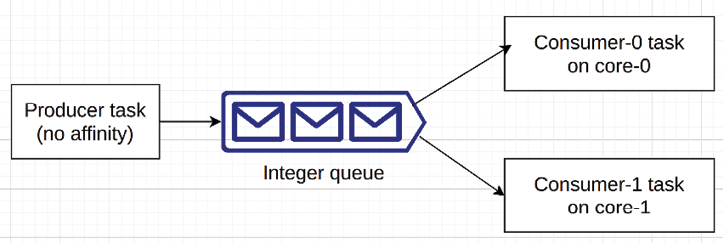
Figure 2.20: Producer-consumer pattern
The producer task will have no affinity, meaning that the FreeRTOS scheduler will assign it to a core at runtime. We will pin a consumer task to each core. There will be a FreeRTOS queue to pass integer values between the producer and the consumers. FreeRTOS queues are thread-safe, so we don’t need to think about protecting the queue against reading/writing by multiple tasks. We will simply push values to the back of the queue and pop from the front (there is a good article here about how FreeRTOS queues work: https://www.freertos.org/Embedded-RTOS-Queues.html).
Let’s prepare the project in steps:
- Plug the devkit in a USB of your development machine and start a new PlatformIO project with the following parameters:
- Name:
espidf_freertos_ex - Board: Espressif ESP32-S3-Box
- Framework: Espressif IoT Development Framework
- Name:
- Edit
platformio.iniand append the following lines (the last two lines will provide a nice, colorful output on the serial monitor):monitor_speed=115200 monitor_rts = 0 monitor_dtr = 0 monitor_filters=colorize monitor_raw=yes - Rename
src/main.ctosrc/main.cppand edit it by adding the following temporary code:#include <iostream> extern "C" void app_main() { std::cout << "hi\n"; } - Run
menuconfigby selecting PLATFORMIO | PROJECT TASKS | esp32s3box | Platform | Run Menuconfig.
Figure 2.21: Running menuconfig
- This is the first time we run
menuconfigto configure ESP-IDF. We need to change a configuration value in order to enable a FreeRTOS function that lists the FreeRTOS tasks in an application. Whenmenuconfigstarts, navigate to (Top) Component config FreeRTOS Kernel and check the following options (the latter two are dependent on the first one, and will become visible when the first is enabled):
- Enable FreeRTOS trace utility
- Enable FreeRTOS stats formatting functions
- Enable display of
xCoreIDinvTaskList

Figure 2.22: Configuring FreeRTOS in menuconfig
- Build the project (PLATFORMIO | PROJECT TASKS | esp32s3box | General | Build).
- Flash and monitor the application to see the
hitext on the serial monitor (PLATFORMIO/PROJECT TASKS | esp32s3box | General | Upload and Monitor).
Figure 2.23: The serial monitor output when the application is configured successfully
Now that we have the project configured, we can develop the application, next.
Coding application
So far, so good. Now, we can implement the producer-consumer pattern in the src/main.cpp file. First, we clear the temporary code inside the file and then add the following headers:
#include <freertos/FreeRTOS.h>
#include <freertos/task.h>
#include <freertos/queue.h>
#include <esp_log.h>
The freertos/FreeRTOS.h header file contains the backbone definitions based on the configuration. When we need a FreeRTOS function, we first include this header file, then the specific header where the needed function is declared. In our example, we will create tasks and a queue for the producer-consumer pattern; thus, we include freertos/task.h and freertos/queue.h respectively. The last header file, esp_log.h, is for printing log messages on the serial console. Instead of direct access to the serial output via iostream, we will use the ESP-IDF logging macros in this application. Then we can define the global variables in the file scope:
namespace
{
    QueueHandle_t m_number_queue{xQueueCreate(5, sizeof(int))};
    const constexpr int MAX_COUNT{10};
    const constexpr char *TAG{"app"};
    void producer(void *p);
    void consumer(void *p);
} // end of namespace
In the anonymous namespace, we define a FreeRTOS queue, m_number_queue. This will be the medium in which to exchange data between the producer and consumers. The xQueueCreate function (in fact, it is a macro) creates a queue to hold 5 integers. The producer will generate integers to push into the queue. The MAX_COUNT constant shows the maximum number of integers to be generated by the producer. TAG is required by the logging macros. We will use it as a parameter when we want to log something. A logging macro prints the provided tag before any message. producer and consumer are the functions to be passed to the FreeRTOS tasks. We will see how to do this next:
extern "C" void app_main()
{
    ESP_LOGI(TAG, "application started");
    xTaskCreate(producer, "producer", 4096, nullptr, 5, nullptr);
Now, we’re implementing the app_main function. Remember that this is the application entry point. The first statement is the ESP_LOGI macro call with TAG and a message. application started will be printed on the serial monitor when the application starts. There are other macros in the logging family, such as ESP_LOGE for errors and ESP_LOGW for warnings. In the next line after printing the log message, we create our first FreeRTOS task by calling xTaskCreate. It has the following syntax in the freertos/task.h header file:
xTaskCreate(task_function, task_name, stack_depth,
    function_parameters, priority, task_handle_address)
Looking at this prototype, xTaskCreate will create a FreeRTOS task that runs the producer function that we declared earlier. The task name will be producer with a stack size of 4096 bytes. We don’t pass any parameters to the task. The task priority is 5, and finally, we don’t provide any address for the task handle since we don’t need it in this example. The FreeRTOS scheduler will create the producer task with these parameters.
Then, we need the consumers:
    xTaskCreatePinnedToCore(consumer, "consumer-0", 4096, (void *)0,
                            5, nullptr, 0);
    xTaskCreatePinnedToCore(consumer, "consumer-1", 4096, (void *)1,
                            5, nullptr, 1);
We will have two consumers. For this, we use the xTaskCreatePinnedToCore function this time. It is very similar to xTaskCreate. Its prototype is:
xTaskCreatePinnedToCore(task_function, task_name, stack_depth,
    function_parameters, priority, task_handle_address, task_affinity)
In addition to the parameters that xCreateTask uses, xTaskCreatePinnedToCore needs a task affinity defined – i.e., on which core to run the task. In our example, the first consumer task will run on cpu-0, and the second one will run on cpu-1. This function is specific to ESP-IDF FreeRTOS in order to support dual-core processors as we mentioned earlier.
We have now created all the tasks. Let’s see the list of the FreeRTOS tasks that we have in this application with the following lines of code:
    char buffer[256]{0};
    vTaskList(buffer);
    ESP_LOGI(TAG, "\n%s", buffer);
} // end of app_main
To list the tasks, we call vTaskList with a buffer parameter. It fills the buffer with the task information and we print the buffer on the serial output. vTaskList has been enabled by a menuconfig entry during the project initialization phase. This completes the app_main function. Next, we will implement the producer task function in the anonymous namespace:
namespace
{
    void producer(void *p)
    {
        int cnt{0};
        vTaskDelay(pdMS_TO_TICKS(500));
In the producer function, we define a variable, cnt, to count the numbers that we push into the queue. Then, we implement a 500 ms delay in the task execution. We add a loop for enqueueing the numbers as follows:
        while (++cnt <= MAX_COUNT)
        {
            xQueueSendToBack(m_number_queue, &cnt, portMAX_DELAY);
            ESP_LOGI(TAG, "p:%d", cnt);
        }
In the loop, we use the xQueueSendToBack function of FreeRTOS to send the numbers into the queue. The xQueueSendToBack function takes the queue reference, a pointer to the value to be pushed into the queue, and the maximum time for which to block the task if the queue is full. The number that is passed to the queue is the value of the cnt variable itself. Therefore, we will see the numbers starting from 1 up to 10 in the queue. We finish the producer task function as follows:
        vTaskDelete(nullptr);
    } // end of producer
A FreeRTOS task cannot return, else the result would be an application crash. When we are done with a task and we don’t need it anymore, we simply delete it by calling the vTaskDelete function. This function takes the task handle as a parameter, and passing nullptr means that the current task is the one to be deleted. Since there is no task after that point, we can safely return from the producer function. Then we implement the consumer function:
    void consumer(void *p)
    {
        int num;
The consumer function will run on both cores of ESP32-S3. When we defined two consumer tasks in the app_main function, we passed the consumer function as the task function and the core number as the parameter to be passed to the consumer function. Therefore, the p argument of the function shows the core number. In the consumer function body, we first define a variable, num, to hold the values that come from the queue. Next comes the task loop:
        while (true)
        {
            xQueueReceive(m_number_queue, &num, portMAX_DELAY);
            ESP_LOGI(TAG, "c%d:%d", (int)p, num);
            vTaskDelay(2);
        }
    } // end of consumer
} // end of namespace
The task loop is an infinite loop, so the function will never return as it should be. The xQueueReceive function takes the same parameters as with the xQueueSendToBack function that we used in the producer function. However, the xQueueReceive function pops the value at the front of the queue. When all values in the queue are consumed, it will block the task until a new value arrives. If no value comes, then the xQueueReceive function will block forever since we passed portMAX_DELAY as its third argument. The application is ready to run on the devkit, let’s do it next.
Running the application
We can upload and monitor it by clicking on the Upload and Monitor project task of the PlatformIO IDE. Let’s discuss the output briefly:
<Previous logs are removed ...>
I (280) cpu_start: Starting scheduler on PRO CPU.
I (0) cpu_start: Starting scheduler on APP CPU.
I (301) app: application started
After the start of the FreeRTOS schedulers on both CPUs, our application prints its first log as application started. Then we see the vTaskList output as follows:
I (301) app:
consumer-1      R   5       3580        9       1
main               X   1       1936        4       0
IDLE                R   0       892        6       1
IDLE                R   0       1012        5       0
producer           B   5       3500        7       -1
esp_timer           S   22     3432        3       0
ipc1                B   24      884         2       1
consumer-0      B 5       3412        8       0
ipc0                B   24      892         1       0
The columns in this table are:
- Task name
- Task state
- Priority
- Used stack in bytes
- The order in which the tasks are created
- Core ID
We can see our tasks in the list in addition to other default tasks. They are (in the order of creation) as follows:
- The Inter-Processor Call (IPC) tasks (
ipc0andipc1) for triggering execution on the other CPU esp_timerfor RTOS tick period- The
maintask that calls theapp_mainfunction (entry point) of the application - The
IDLEtasks of FreeRTOS
After the default FreeRTOS tasks, our tasks start. When you look at the last column of the table, consumer-0 has started on cpu0, consumer-1 has started on cpu1, and for producer, the core ID value is displayed as -1, which means it can run on both CPUs.
The logs from the tasks come next on the serial output:
I (801) app: p:1
I (801) app: p:2
I (801) app: c1:1
I (801) app: p:3
I (801) app: c0:2
I (801) app: p:4
I (801) app: p:5
I (801) app: p:6
I (801) app: p:7
I (821) app: c1:3
I (821) app: p:8
I (831) app: c0:4
I (831) app: p:9
I (841) app: c1:5
I (841) app: p:10
I (851) app: c0:6
I (861) app: c1:7
I (871) app: c0:8
I (881) app: c1:9
I (891) app: c0:10
Because of the delays in the consumer tasks, the producer fills up the queue faster than the consumers remove numbers and the producer has to wait for the consumers to make some space so it can insert a new number. When consumer-1 removes 3 from the queue, then the producer can enqueue 8. It stops pushing new numbers when it gets to 10 as we coded. The rest of the job is only for the consumers to dequeue all numbers remaining in the queue.
This example demonstrated how to utilize FreeRTOS for a simple producer-consumer problem and the basic usage of the ESP32 cores with different tasks. We will continue to employ FreeRTOS in the examples of the upcoming chapters and learn about more of its features. The official ESP-IDF FreeRTOS API documentation is here: https://docs.espressif.com/projects/esp-idf/en/latest/esp32/api-reference/system/freertos.html.
In the next topic, we will discuss how we can debug our applications.