
Unit testing
Whether you prefer Test-Driven Development (TDD) or just write unit tests as a safety net against regression, it is always wise to include them in the plans of any type of software project. Although the adopted testing strategy for a project depends on the project type and company policies, well-designed unit tests are the basic safeguard of any serious product. The time and effort you put into unit tests always pay off in every stage of the product life cycle, from the beginning of the development to the maintenance and upgrades.
For ESP32 projects, we have several unit-testing framework options. ESP-IDF supports the Unity framework but we can also use GoogleTest in our projects. We can configure PlatformIO to use any of them and run tests on a target device, such as an ESP32 devkit, and/or on the local development machine. Therefore, it is really easy to select different strategies for unit testing. For example, if the library that you are working on doesn’t need to use hardware peripherals, then it can be tested on the local machine and you can instruct PlatformIO to do this by simply adding some definitions to the platformio.ini file of the project.
We will create a sample project to see how unit testing is done in an ESP32 project next.
Creating a project
Let’s assume that we want to develop a simple light control class that sets a GPIO pin of ESP32-C3-DevKitM-1 to high/low in order to turn on and off the light that is connected to the GPIO pin. In this example, we will develop that class and write tests for it with the GoogleTest framework. We will also configure PlatformIO to run the tests on the devkit so that we know that the class works as intended on the real hardware. Let’s create the project as in the following steps:
- Start a new PlatformIO project with the following parameters:
- Name:
unit_testing_ex - Board: Espressif ESP32-C3-DevKitM-1
- Framework: Espressif IoT Development Framework
- Name:
- Open the
platformio.inifile and set its content as follows:[env:esp32-c3-devkitm-1] platform = espressif32@6.2.0 board = esp32-c3-devkitm-1 framework = espidf build_flags = -std=gnu++11 -Wno-unused-result monitor_speed = 115200 monitor_rts = 0 monitor_dtr = 0 monitor_filters = colorize lib_deps = google/googletest@1.12.1 test_framework = googletest - Build the project (PLATFORMIO | PROJECT TASKS | esp32-c3-devkitm-1 | General | Build).
The project is now configured and ready for development. However, before moving on, I want to briefly discuss the library management mechanism of PlatformIO. We have several options to add external libraries to our projects. The easiest one is probably just by referring to the PlatformIO registry. You can search the registry by navigating to PlatformIO Home/Libraries and typing the name of the library that you are looking for. When the library is listed, you select it and PlatformIO shows its detailed information. At this point, you can click on the Add to Project button to include the library in the project.
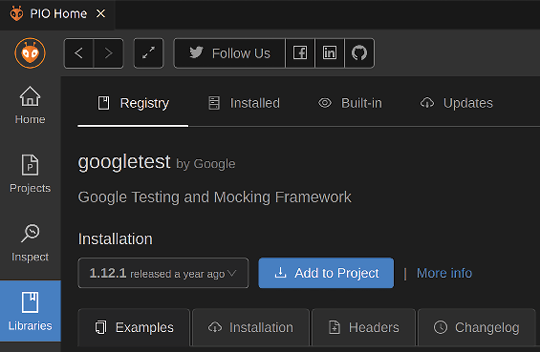
Figure 2.27: PlatformIO Registry
In our example, I preferred to specify googletest directly as in the following configuration line without using the graphical interface:
lib_deps = google/googletest@1.12.1
This line points to the PlatformIO registry. The format is <provider>/<library>@<version>. In this way, it is possible to add many other libraries consecutively in a project. With the lib_deps configuration parameter, we can also refer to other online repositories by providing their URLs.
The other popular option is to add local directories with lib_extra_dirs in platformio.ini. Any ESP-IDF-compatible library in these directories can be included in projects. I will talk about what compatible means in this context later in the book.
You can learn more about the PlatformIO Library Manager at this link: https://docs.platformio.org/en/latest/librarymanager/index.html.
You may have noticed that we can also set the platform version:
platform = espressif32@6.2.0
With this configuration, we set the platform version to a fixed value so that no matter when we compile the project, we know that it will compile without any compatibility issues with all other versioned libraries and of course with our code.
After this brief overview of library management, we can continue with the application.
Coding the application
Let’s begin with adding a header file, named src/AppLight.hpp, for the light control class and add the required header for GPIO control:
#pragma once
#include "driver/gpio.h"
#define GPIO_SEL_4 (1<<4)
Then we define the class as follows:
namespace app
{
    class AppLight
    {
    private:
        bool m_initialized;
In the private section of the class, we define a member variable, m_initialized, which shows if the class is initialized. The public section comes next:
    public:
        AppLight() : m_initialized(false) {}
        void initialize()
        {
            if (!m_initialized)
            {
                gpio_config_t config_pin4{
                  GPIO_SEL_4,
                  GPIO_MODE_INPUT_OUTPUT,
                  GPIO_PULLUP_DISABLE,
                  GPIO_PULLDOWN_DISABLE,
                  GPIO_INTR_DISABLE
                };
                gpio_config(&config_pin4);
                m_initialized = true;
            }
            off();
        }
After the constructor, we implement the initialize function. Its job is to configure the GPIO-4 pin of the devkit if it is not initialized yet and set its initial state to off. We use the gpio_config function to configure a GPIO pin as defined in the configuration structure that is provided as input. Here, it is config_pin4. The gpio_config function and the gpio_config_t structure are declared in the driver/gpio.h header file.
The off function is another member function of the class to be implemented next:
       void off()
        {
            gpio_set_level(GPIO_NUM_4, 0);
        }
        void on()
        {
            gpio_set_level(GPIO_NUM_4, 1);
        }
    };
} // namespace app
In the off member function, we call gpio_set_level with the parameters of GPIO_NUM_4 as the pin number and 0 as the pin level. Again, the gpio_set_level function is declared in the driver/gpio.h header file. Similarly, we add another function, on, in order to set the pin level to 1, or high.
The AppLight class is ready and we can write the test code for it next.
Adding unit tests
We create another source file, test/test_main.cpp, and add the header files that are needed for the unit tests:
#include "gtest/gtest.h"
#include "AppLight.hpp"
#include "driver/gpio.h"
For the AppLight testing, it would be a good idea to create a test fixture:
namespace app
{
    class LightTest : public ::testing::Test
    {
    protected:
        static AppLight light;
        LightTest()
        {
            light.initialize();
        }
    };
    AppLight LightTest::light;
The name of the test fixture is LightTest and it is derived from the ::testing::Test base class. In its protected area, we declare a static AppLight object and initialize it in the constructor of the fixture. With the fixture ready, we can now write a test as follows:
    TEST_F(LightTest, turns_on_light)
    {
        light.on();
        ASSERT_GT(gpio_get_level(GPIO_NUM_4), 0);
    }
The TEST_F macro defines a test on a test fixture. The first parameter shows the fixture name and the second parameter is the test name. In the test, we turn the light on, and assert whether it is really turned on. The ASSERT_GT macro checks whether the first parameter is greater than the second one.
Another test checks whether the off function is working properly or not. It is very similar to the previous test:
    TEST_F(LightTest, turns_off_light)
    {
        light.off();
        ASSERT_EQ(gpio_get_level(GPIO_NUM_4), 0);
    }
} // namespace app
This time, we turn the light off, and check whether it is actually turned off by using the ASSERT_EQ macro.
For each new test, a new fixture object will be created. That is why we defined the light object as static since we don’t want it to be initialized every time a new fixture is created. For more information about GoogleTest, see its documentation here:https://google.github.io/googletest/primer.html.
We still need an app_main function as usual. Here it comes:
extern "C" void app_main()
{
    ::testing::InitGoogleTest();
    RUN_ALL_TESTS();
}
The two lines in the app_main function initialize and run all of the test cases. This finalizes the test coding. Let’s run it on the devkit and see the test results.
Running unit tests
We can run the test application on the devkit and see the unit test results as in the following steps:
- Plug the devkit into one of the USB ports of your development machine.
- Navigate to PLATFORMIO | PROJECT TASKS | esp32-c3-devkitm-1 | Advanced and click on the Test option there.

Figure 2.28: PlatformIO unit testing
- PlatformIO will compile the test application, upload it, and then run the tests. You can see the result on the terminal that popped up when you clicked on the Test option.

Figure 2.29: Terminal output
The terminal lists the tests and the results. When a test fails, you can go back to the code, debug it, and run the tests again until they all pass.
With this topic, we conclude the chapter. However, I strongly suggest you don’t limit yourself to the explanations here and try other tools from both PlatformIO and ESP-IDF. I will continue to talk about them throughout the book and use them within the examples to help you get familiar with the tools and their features as much as possible.