
PlatformIO
PlatformIO supports many different platforms, architectures, and frameworks with modern development capabilities. It comes as an extension in VSCode and so is very easy to install and configure with just a few clicks. After launching VSCode, go to the VSCode Extensions screen (Ctrl+Shift+X) and search for platformio in the marketplace. It appears in the first place in the match list. Click on the Install button, and that is it:
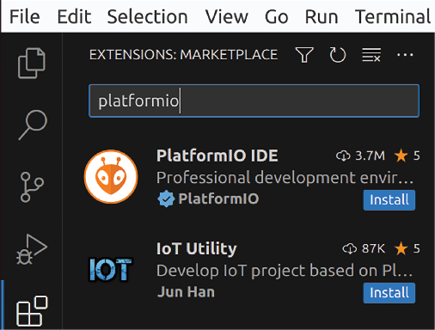
Figure 2.10: Installing PlatformIO
After a few minutes, the installation completes and we have PlatformIO installed in the VSCode IDE. PlatformIO has some unique features. The most notable one is probably the declarative development environment. With PlatformIO, we only need to specify what we’re going to use in our project, including the chip type (not limited to Espressif products), which framework and which version of that framework, other libraries with version constraints, and any combination of them. We’ll see what all these things mean and how to configure a project shortly. Apart from that, PlatformIO has all the utilities that you would need when developing an embedded project, such as debugging, unit testing, static code analysis, and firmware memory inspection. When I used PlatformIO for the first time roughly 8 years ago, the debug feature was not available in the free version. It is now a free and open-source project with all features at our disposal. Thank you, guys! Enough talking, let’s develop the same application with PlatformIO.
Hello world with PlatformIO
Now, we’re going to use PlatformIO. Here are the steps to develop the application:
- Go to the PlatformIO Home screen.

Figure 2.11: PlatformIO Home
- Click on the New Project button on the right of the same screen.

Figure 2.12: Quick access buttons on the PlatformIO Home screen
- A pop-up window appears. Set the project name, select Espressif ESP32-S3-Box for the board, and specify the framework as Espressif IoT Development Framework. You can choose a directory for the project or leave it at the PlatformIO default. Click on Finish to let PlatformIO do its job.

Figure 2.13: PlatformIO Project Wizard
- When the project is created, we have the following directory structure.

Figure 2.14: Project directory structure
- Rename
src/main.ctosrc/main.cppand copy-paste the same code that we have already developed with the ESP-IDF extension.#include <iostream> extern "C" void app_main() { std::cout << "Hello World!\n"; } - Edit the
platformio.inifile to have the following configuration settings.[env:esp32s3box] platform = espressif32 board = esp32s3box framework = espidf monitor_speed=115200 monitor_rts = 0 monitor_dtr = 0 - On the PlatformIO tasks list, you will see the Upload and Monitor task under the PROJECT TASKS | esp32s3box | General menu. It will build, flash, and monitor the application.

Figure 2.15: PlatformIO project tasks
- You can observe the application output in the integrated terminal.

Figure 2.16: Application output in the terminal
As you might have already noticed, we didn’t download or install anything except PlatformIO. It handled all these low-level configuration and installation tasks for us. PlatformIO uses the platformio.ini file for this purpose. Let’s investigate its content.
The first line defines the environment. The name of the environment is esp32s3box. We can write anything as the environment name:
[env:esp32s3box]
The second line shows the platform – espressif32:
platform = espressif32
As of writing this chapter, PlatformIO supports 48 different platforms. espressif32 is one of them. We can specify the platform version if needed and PlatformIO will find and download it for us. If none is specified, it will assume the latest version of the platform. Then the board that we use in the project is listed:
board = esp32s3box
The board in the project is esp32s3box. There are 11,420 different boards supported by PlatformIO, 162 of which are in the espressif32 platform. Next, we see the framework:
framework = espidf
The framework is espidf. This category contains 24 more frameworks in the PlatformIO registry.
The platform, board, and framework settings were added automatically in step 3 with the PlatformIO project wizard. PlatformIO collected them as user inputs at the project definition stage and set the initial content of platformio.ini with these values.
Then, we added the next three lines manually to define the serial monitor behavior:
monitor_speed=115200
monitor_rts = 0
monitor_dtr = 0
We set the serial baud rate to 115,200bps, and RTS and DTR to 0 in order to reset the chip when the serial monitor connects so that we can see the entire serial output of the application.
You can browse the PlatformIO registry at this link to see all platforms, boards, frameworks, libraries, and tools: https://registry.platformio.org/search.
Before moving on, let’s include our other board, ESP32-C3-DevKitM-1, in the project and see how easy it is to update the configuration of the project for different boards. To do that, just append the following lines at the end of platformio.ini and save the file:
[env:esp32c3kit]
platform = espressif32
board = esp32-c3-devkitm-1
framework = espidf
monitor_speed=115200
monitor_rts = 0
monitor_dtr = 0
When you save the file, PlatformIO will detect this and create another entry in the project tasks for the new environment as can be seen in the following figure:
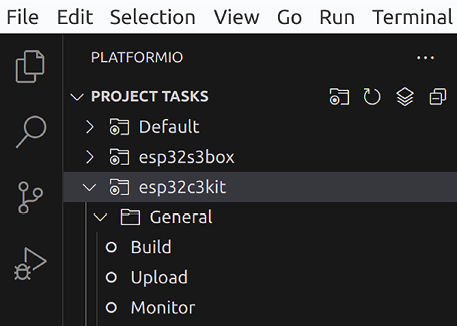
Figure 2.17: New environment under PROJECT TASKS
After plugging the new devkit, you can upload and monitor the same application without making any other modifications in the project. Again, we didn’t manually download or install anything for ESP32-C3-DevKitM-1; it was all handled by PlatformIO. If you’re wondering where those downloads go, you can find them in the $HOME/.platformio/platforms/ directory of your development machine. The PlatformIO documentation provides complete information about what can be configured in platformio.ini with examples: https://docs.platformio.org/en/latest/projectconf/index.html.
PlatformIO Terminal
In addition to the GUI features, PlatformIO also provides a command-line tool – pio – which is accessible through PlatformIO Terminal. It can be quite useful in some cases, especially if you enjoy command-line tools in general. To start PlatformIO Terminal, you can click on the PlatformIO: New Terminal button in the bottom toolbar of VSCode.

Figure 2.18: VSCode bottom toolbar
This toolbar also has other quick-access buttons for the frequently used features, such as compilation, upload, monitor, etc. When you click on the Terminal button (the labels appear when you hover the mouse pointer over the buttons), it will redirect you to a command-line terminal where you can enter pio commands. Write pio and press the Enter key to display the pio options.
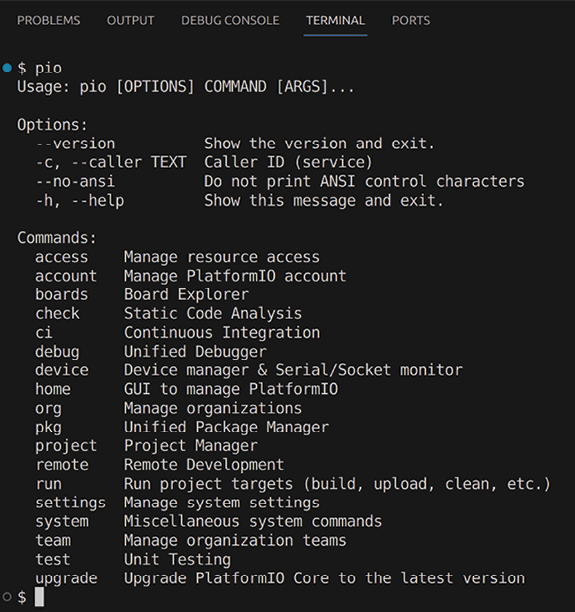
Figure 2.19: PlatformIO Terminal and the pio command-line tool
We can flash ESP32-C3-DevKitM-1 by using pio as the following:
$ pio run -t upload -e esp32c3kit
Processing esp32c3kit (platform: espressif32; board: esp32-c3-devkitm-1; framework: espidf)
----------------------------------------------
Verbose mode can be enabled via `-v, --verbose` option
CONFIGURATION: https://docs.platformio.org/page/boards/espressif32/esp32-c3-devkitm-1.html
PLATFORM: Espressif 32 (5.1.1) > Espressif ESP32-C3-DevKitM-1
HARDWARE: ESP32C3 160MHz, 320KB RAM, 4MB Flash
…
Leaving...
Hard resetting via RTS pin...
============ [SUCCESS] Took 24.90 seconds =================
Environment    Status    Duration
-------------  --------  ------------
esp32c3kit     SUCCESS   00:00:24.902
=======================================
And we can monitor the serial output with the following command:
$ pio device monitor -e esp32c3kit
--- forcing DTR inactive
--- forcing RTS inactive
--- Terminal on /dev/ttyUSB0 | 115200 8-N-1
<removed>
ESC[0;32mI (324) cpu_start: Starting scheduler.ESC[0m
Hello World!
The pio tool has all the functions that you can do with the GUI. To see how to use any other command, just append the -h option after the command’s name. The online documentation provides more detailed information about the commands: https://docs.platformio.org/en/latest/core/userguide/index.html#commands.
This completes the introduction to PlatformIO. In the next topic, we will discuss FreeRTOS, the official Real-Time Operating System (RTOS) supported by ESP-IDF.