Book Image

iOS 14 Programming for Beginners - Fifth Edition

By : Ahmad Sahar
Book Image

iOS 14 Programming for Beginners - Fifth Edition

By: Ahmad Sahar

Overview of this book

If you're looking to work and experiment with powerful iOS 14 features such as widgets and App Clips to create your own apps, this iOS programming guide is for you. The book offers a comprehensive introduction for experienced programmers who are new to iOS, taking you through the entire process of learning the Swift language, writing your own apps, and publishing them on the App Store. Fully updated to cover the new iOS 14 features, along with Xcode 12 and Swift 5.3, this fifth edition of iOS 14 Programming for Beginners starts with an introduction to the Swift programming language and shows you how to accomplish common programming tasks with it. You'll then start building the user interface (UI) of a complete real-world app using the storyboards feature in the latest version of Xcode and implement the code for views, view controllers, data managers, and other aspects of mobile apps. The book will also help you apply iOS 14 features to existing apps and introduce you to SwiftUI, a new way to build apps for all Apple devices. Finally, you’ll set up testers for your app and understand what you need to do to publish your app on the App Store. By the end of this book, you'll not only be well versed in writing and publishing applications, but you’ll also be able to apply your iOS development skills to enhance existing apps.
Table of Contents (31 chapters)
1
Section 1: Swift
10
Section 2:Design
15
Section 3:Code
24
Section 4:Features

Understanding the Xcode user interface

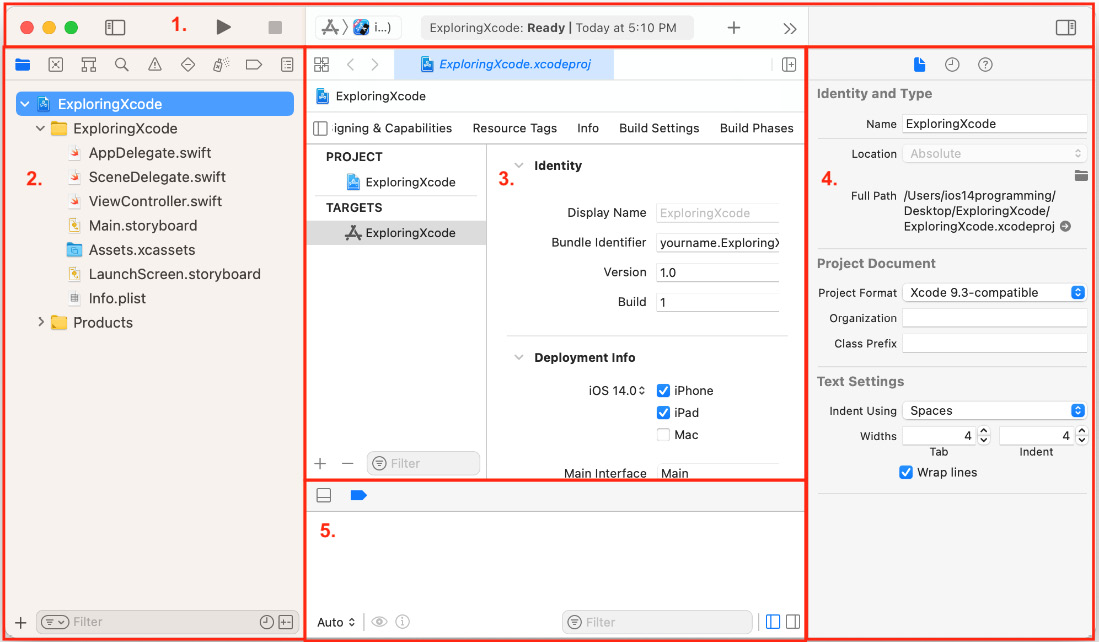
You've just created your first Xcode project! As you can see, the Xcode user interface is divided into several distinct parts, as shown:

Figure 1.7 – Xcode user interface

Figure 1.7 – Xcode user interface

Let's look at each part in more detail. The following description corresponds to the numbers shown in the preceding screenshot:

  1. Toolbar: Used to build and run your apps, and view the progress of running tasks. The left side of the toolbar contains the Navigator button (1), the Play button (2), the Stop button (3), the Scheme menu (4), and the Activity View (5):
    Figure 1.8 – Xcode toolbar (left side)

    Figure 1.8 – Xcode toolbar (left side)

    • The Navigator button toggles the Navigator area on and off.
    • The Play button is used to build and run your app.
    • The Stop button stops any currently running apps.
    • The Scheme menu shows the specific target to be built (Exploring Xcode), and the destination (simulator or device) to run the target on (iOS simulator). Schemes and destinations are distinct. Schemes specify the settings for building, running, testing, profiling, analyzing, and archiving your project. Destinations specify installation locations for your app. Typically, a scheme exists for each target in your project. Destinations exist for physical devices and simulators.
    • The Activity View displays the progress of running tasks.

      The right side of the toolbar contains the Library button (1), the Code Review button (2), and the Inspector button (3):

Figure 1.9 – Xcode toolbar (right side)

Figure 1.9 – Xcode toolbar (right side)

  • The Library button displays user interface elements, code snippets, and other resources.
  • The Code Review button allows you to view past versions of the file you're currently editing.
  • The Inspector button toggles the Inspector area on and off.
  1. Navigator area: Provides quick access to the various parts of your project. Project navigator is displayed by default.
  2. Editor area: Allows you to edit source code, user interfaces, and other resources.
  3. Inspector area: Allows you to view and edit information about items selected in Navigator area or the Editor area.
  4. Debug area: Toggled by typing Shift + Command + Y. Contains the debug bar, the variables view, and Console.

Don't be overwhelmed by all the different parts, as you'll learn about them in more detail in later chapters. Now that you are familiar with the Xcode interface, you will run the app you just created in the iOS simulator, which displays a representation of your iOS device.