Creating a relationship class
Relationships describe how the spatial/nonspatial objects are linked. In a geodatabase, the relationships are stored in relationship classes. In a relationship class, you can relate only two classes (table/feature class) from a geodatabase. Just as with a feature class, a relationship class can be created at the root level of a geodatabase or within a feature dataset.
In a relationship class, you have to decide the followings properties:
- Name of the relationship class
- Origin table and destination table
- Type of relationship, which can be as follows:
- Simple: The objects can exist independently of each other and can have any type of cardinality.
- Composite: The objects from a destination table/feature class (child) cannot exist without the objects from an origin table/feature class (parent); define the feature following and cascade, deleting behaviors (if an origin object is moved, rotated, or deleted, the destination object suffers the same actions); it can have only one-to-one or one-to-many cardinality.
- Label for origin and destination
- Message propagation (controls relationship behavior) with specific effects on composite relationships:
- Forward: This includes cascade delete, feature following, and annotation update
- Backward: This includes cascade delete and no feature following
- Both: This includes cascade delete, feature following, and annotation update
- None: This includes cascade delete and no feature following
- Cardinality (one-to-one, one-to-many, and many-to-many)
- Add an attribute in a relationship class to describe the relationship between objects
- The origin primary key (PK) and the destination foreign key (FK)
- The primary key and foreign key columns must have the same data type.
For more information about annotation concepts in the geodatabase context, please refer to Chapter 6, Building Better Maps.
Note
You cannot modify the properties of an existing relationship class. You can delete and define it once again. If you delete one class (table/feature class) that participates in a relationship class, the relationship class will be deleted too.
A table/feature class can be involved in more than one relationship class. Those multiple relationships for a table/feature class work well as long as they are coherently defined and don't generate contradictory behaviors. The last step in creating a relationship class is to define rules in order to refine the cardinality based on the subtypes of the feature classes/tables. All types of cardinality support the relationship rules. A relationship rule is a property of the relationship class.
In this section, you will create two simple relationship classes and one composite relationship class between the LandUse feature class, BuildingsR feature class, and Owners table. Those relationships compose a stacked relationship because they link three classes in an open loop, as shown in the following screenshot:
When you define the cardinality, remember that term one can mean zero. For example, in the schema shown in the preceding screenshot, the Buildings (origin) are related to Owners (destination). The cardinality is many-to-many. The relationship allows the following situations:
- Building with no owner (1..0)
- Building with different owners (1..*)
- Owner with no building (0..1)
- Owner with any number of buildings (*..1)
Follow these steps to create two simple, many-to-many relationship classes:
- Start ArcCatalog. In Catalog Tree, navigate to
...\Data\DesigningGeodatabase\Topo5k.gdb\LandUse. - Right-click on the
LandUse feature dataset, and select New | Relationship Class. For Name of the relationship class, type LandUseToOwners. For Origin table/feature class, select the plus sign on the left-hand side of the LandUse feature dataset to see the LandUse feature class. Select the LandUse feature class. For Destination table/feature class, select the Owners table. Click on Next. - Select Simple (peer to peer) relationship, and click on Next. For the first relationship label, type
ToOwners. For the second relationship label, type ToLandUse. Select the None (no messages propagated) option, and click on Next. Select the cardinality M-N (many-to-many) and click on Next. Select Yes, I would like to add attributes to this relationship class, and click on Next. - For FieldName, type
OwnerProcent in the first empty row. Select Long Integer from the drop-down list. Select Yes for the Allow NULL values option, in the Field Properties section. As the primary key for the origin table, choose OBJECTID from the drop-down list, and as the foreign key, type LandUseID. As the primary key for the origin table, choose OBJECTID, and for foreign key, type OwnerID. - Click on Next to see a summary of your options, and select Finish to close the New Relationship Class wizard.
- Right-click on the
Buildings feature dataset, and select the New | Relationship Class. For Name of the relationship class, type BuildingsRToOwners. Repeat the previous steps, and set the relationship according to the following table:Follow these steps to create a composite one-to-many relationship class between LandUse (as parent objects) and BuildingsR (as child objects):
- Right-click on the
LandUse feature dataset, and select New | Relationship Class. For Name of the relationship class, type LandUseToBuildings. For Origin table/feature class, select the LandUse feature class. For Destination table/feature class, select the plus sign on the left-hand side of the Buildings feature dataset, and select the BuildingsR feature class. - Click on Next. Select Composite relationship (peer to peer) relationship and click on Next.
- For the first relationship label, type
ToBuildingsR. For the second relationship label, type ToLandUse. Select the Forward (origin to destination) option and click on Next. Select the cardinality 1-M (one-to-many), and click on Next. - Select NO, I do not want to add attributes to this relationship class and click on Next.
- As the primary key, choose OBJECTID from the drop-down list, and as the foreign key, choose
LandUseID. - Click on Next to see a summary of your options, and select Finish to close the New Relationship Class wizard.
Follow these steps to add rules for the LandUseToBuildings relationship class:
- In ArcCatalog, double-click on the
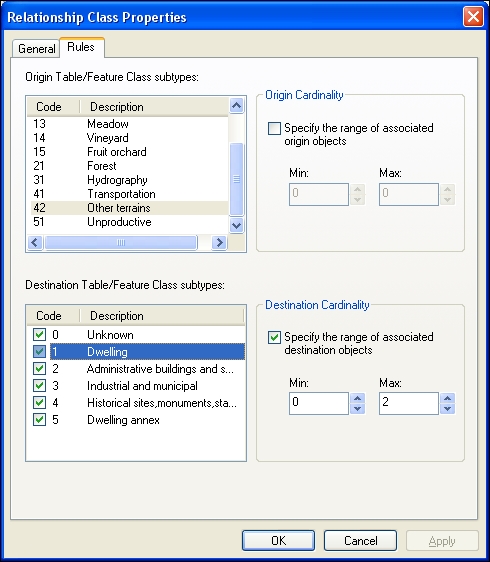
LandUseToBuildings relationship class to open a Relationship Class Properties dialog box. Select the Rules tab to see the subtypes for the LandUse and BuildingsR feature classes. You will define relationship rules, as shown in the following table: - For Origin Table/Feature class subtypes, select
Other terrains. For Destination Table/Feature class subtypes, click on the Code checkbox on the left-hand side of the Unknown subtype. Click on Unknown to select the subtype and to enable the Origin Cardinality and Destination Cardinality sections. - In the Destination Cardinality section, check the Specify the range of associated destination objects option. First, set the Max value by typing
10. Leave the Min value at 0. - For Destination Table/Feature class subtypes, click on the Code checkbox to the left of the
Dwelling subtype. Click on Dwelling to select subtype and to enable the Origin Cardinality and Destination Cardinality sections. - In the Destination Cardinality section, check the Specify the range of associated destination objects option. First, set the Max value by typing
2. Leave the Min value at 0 according to the previous table. The first rule says that an Other terrains parcel subtype can have a maximum of two dwellings. You should see something similar to the following screenshot: - Select the Administrative buildings subtype, and check the Specify the range of associated destination objects option. For the Max value, type
3. For the Min value, type 0. This rule says that there must be between zero and three administrative buildings in a parcel (Other terrains). - Continue to define the rules in Destination Table/Feature class subtypes for all building subtypes. For Origin Table/Feature class subtypes, select
Unproductive. Leave unchecked the Unknown subtypes in the Destination Table/Feature class subtypes section to allow an unlimited number of Unknown buildings. - You will permit a maximum of two
Industrial and municipal buildings and one Dwelling annex per Unproductive parcel. Select those subtypes from the Destination Table/Feature class subtypes section, and set the maximum value according to the previous table. - Finally, you will not permit a relationship with the rest of building types, such as
Dwelling, Administrative buildings, and Historical sites. Select all those subtypes from the Destination Table/Feature class subtypes section, check the Specify the range of associated destination objects option, and set the maximum values to 0. - For the rest of the
LandUse subtypes from Origin Table/Feature class subtypes, set the Max and Min values to 0. This will not permit BuildingsR to associate with parcel subtypes, such as Arable, Pasture, Meadow, Vineyard, Fruit orchard, Forest, Hydrography, and Transportation. - Click on Apply and on OK to save and close the Relationship Class Properties wizard.
You can find the final geodatabase schema at ...\Data\DesigningGeodatabase\ MyGeodatabaseResults\Topo5k.gdb.
In the previous exercise, you used OBJECTID as the origin primary key field. But you could define your own primary key. The OBJECTID field guarantees a unique value for each record because it is managed by ArcGIS. You can't modify the OBJECTID values, and this can be inconvenient to maintaining the relationships when you are modifying feature geometry (for example: split, merge) or import features to another feature class.
Note
For more details about the advantages and inconvenience of using the OBJECTID field as the primary key, please refer to Geodata/Data types/Relationships and related objects/Relationship class properties from ArcGIS Help (10.2) online.
There is a performance cost when you are working with relationship classes. The relationship classes will slow down the edit process because they must maintain the referential integrity in the geodatabase. A relationship class will assure that all changes you have made in the origin feature class/table will be reflected in the destination feature class/table according to the type and rules of the relationship.
At step 3, you created a many-to-many, simple relationship class between the BuildingsR feature class and the Owners table. A many-to-many relationship class requires an intermediary table that contains two key fields: origin primary key and destination foreign key. Both fields have a foreign key's role. You can see this table in ArcCatalog if you select the LandUseToOwners relationship class table. Select the Preview tab and the Table preview mode from the bottom of the Preview panel to examine the attribute fields.
Follow these steps to test the relationship behavior:
- Start ArcMap, and open an existing map document
WorkingRelationships.mxd from ...\Data\DesigningGeodatabase. In Table Of Contents, you have two layers (BuildingsR and LandUse), two intermediate tables (LandUseToOwners and BuildingsRToOwners), and one non-spatial table, Owners. - Let's validate the relationship rules for the
LandUseToBuildings composite relationship. Zoom in to the full extent of a map by selecting Full Extent in the Standard toolbar. Relationships are active and can be validated during an edit session. - In the Editor toolbar, select Start Editing. Select all features from
BuildingsR and LandUse using the Select Features tool. - In the Editor toolbar, navigate to Editor | Validate Features. A message box will appear: 72 features are invalid. Click on OK to close. All invalid features are selected.
- Open the Attributes window by selecting the Attributes button in the Editor toolbar. You will see two layers:
BuildingsR and LandUse. Select Expand All Relationships In Branch to see all selected features (blue bullets), related tables, and table records. - Let's inspect a relationship error. Click on Bookmarks and choose Error2. With the Select Features tool, select the Others terrains parcel with LandUseID=1262. In the Attributes window, expand the
LandUse layer. You should see something similar to the following screenshot: - Right-click on
LandUse, and navigate to Selection | Open Table Showing Selected Feature to see the LandUse attribute table in the Show selected records mode. Navigate to Table Options | Related Tables, and choose LandUseToBuildingsR: ToBuildingsR. In the Editor toolbar, navigate to Editor | Validate Features. A message box will appear: The feature LandUse(subtype:Other terrains) has 4 related BuildingsR (subtype:Dwelling) features, thus violating the LandUseToBuildings relationships rule that specifies 0-2. Click on OK to close. - To fix the error, delete two buildings. Select the parcel and the remaining buildings and validate features once again. The message box will tell you: All features are valid.
- Let's check the feature following and cascade deleting behaviors of the
LandUseToBuildings composite relationship. With the Select Features tool, select the Other terrains parcel with LandUseID=1262. In the Editor toolbar, select Edit Tool. Drag the parcel away from the previous location. The related buildings should follow the parcel. Select Rotate Tool. Rotate the parcel. The building should rotate, too. Delete the parcel using the Delete key. The buildings are deleted, too. Restore the features using Ctrl + Z. - In the Editor toolbar, select Editor | Stop Editing, and save your edit. Select File | Save as to save your map document.
- To learn how to edit the features stored in feature classes and how to maintain the spatial relationships among them, please refer to Chapter 2, Editing Data. To learn how to create visual representation of the features from different feature classes on a map, please refer to Chapter 5, Working with Symbology, and Chapter 6, Building Better Maps.


 Free Chapter