Book Image

Salesforce Lightning Reporting and Dashboards

By : Johan Yu
Book Image

Salesforce Lightning Reporting and Dashboards

By: Johan Yu

Overview of this book

Built on the Salesforce App Cloud, the new Lightning Experience combines the new Lightning Design System, Lightning App Builder, and Lightning Components to enable anyone to quickly and easily create modern enterprise apps. The book will start with a gentle introduction to the basics of Salesforce reports and dashboards. It will also explain how to access reports in depth. Then you will learn how to create and manage reports, to use Schedule Report, and create advanced report configurations. The next section talks about dashboards and will enable you to understand and compare various types of dashboard component and how you can benefit the most from each of them. Then we move on to advanced topics and explain tips and tricks related to reports and dashboards, including reporting snapshots, report parameters, and collaboration. Finally, we will discuss how to access dashboards and reports from the Salesforce1 mobile app.
Table of Contents (13 chapters)

Salesforce Lightning Experience

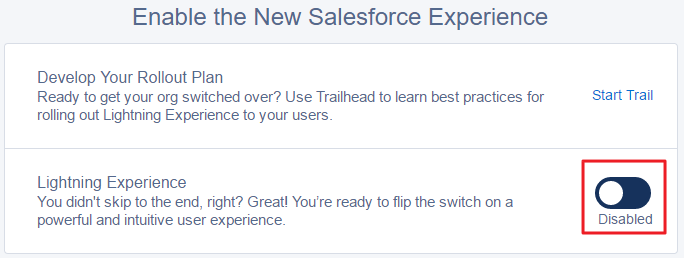
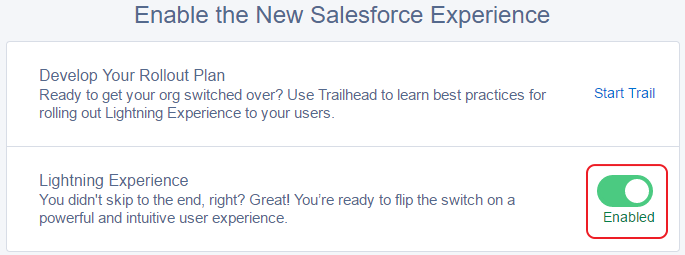
Lightning Experience is a modern, fast, and beautiful user interface designed to help your sales users to be more productive and efficient. It is built with a sales-centric mindset, focusing on helping sales representatives work more naturally on a daily basis. With Lightning Experience, your users will get an intuitive and intelligent user interface.

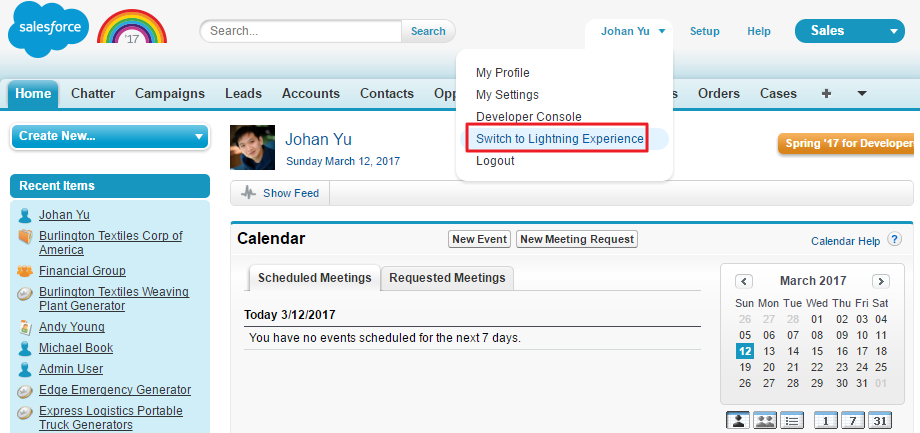
Lightning Experience is built with proven Salesforce1 Mobile App technology. Your sales representatives already use mobiles to enter prospective customers, log tasks and notes after client meetings, run reports and dashboards, and more. All this cool stuff from the mobile experience is being brought into the computer web browser by Lightning Experience.

Let's get the right term

On many occasions, Lightning Experience is simply referred to as Lightning, although there are many items in the Salesforce platform which start with the word "Lightning", such as Lightning Login, Lightning App Builder, Lightning for Outlook, Lightning Components, Lightning Sync, and so on. Some of them are applicable in Lightning Experience only, but some others will work in both Lightning Experience and older Classic user interfaces, for example, Lightning Sync is used to sync your user contacts and events between your email server with Salesforce.

Just to make it clear, when you meet someone from the Salesforce community, and he asks if you are on lightning, most probably, he is referring to Lightning Experience. To get the term right, it is Lightning, not Lightening or Lighting.

What was before the Lightning Experience?

If you noticed, we mentioned the term classic user interface in the Let's get the right term section. Yes, that is the one--Salesforce Classic had been serving well for many years before Lightning Experience was introduced. Salesforce Classic still exists, and is widely used by many customers, but mostly, the new features introduced by Salesforce in recent releases are only applicable for Lightning Experience.

If you are still with Classic, Salesforce urges you to migrate to Lightning. Why do I use the term migrate? Because the user interface is totally different, and some of your existing customizations may not work, such as the JavaScript button built by your Salesforce partner or your IT team. You should consult with your Salesforce Success Manager, partners, or IT before making the decision.

Because the user interface is totally different from Classic, your user manual, training video and material, and so on, need to be updated, so plan this journey with proper project management to roll out Lightning Experience.

Let's turn the Lightning Experience on

This section is intended for system administrators who still operate in Salesforce Classic--only system administrators will have the permission to enable Lightning Experience. If you are on Lightning Experience already, you can skip this section.

Let's have a quick hands-on exercise on how to enable Lightning Experience:

  1. Click on Setup to navigate to the setup menu, and then click on Lightning Experience in the top-left menu:
  1. Scroll down to the bottom of the page, look for Lightning Experience, then switch to enable it:
  1. Click on Finish Enabling Lightning Experience to confirm:
  1. Once Lightning Experienced is enabled, notice that the switch turns to green with the label changed to Enabled:
  1. Click on your name in the top-right corner; you will notice that a new menu, Switch to Lightning Experience, is added, as shown in the following screenshot:
  1. Done! Now click on Switch to Lightning Experience from the menu to start exploring the modern Lightning Experience.
  2. This hands-on exercise will allow you, as a system administrator (including other system administrators), to try and explore Lightning Experience for your organization. Your normal users will not see the new menu, Switch to Lightning Experience, until you configure it for them.
  3. To enable Lightning Experience for your business users, as a system admin, you have the option to enable it by Profile (for all the users in that Profile) or by Permission Set (to assign on the user by user basis).
  4. To enable by Profile, click on Edit on the Profile, scroll down to the Administrative Permissions section, and look for Lightning Experience User permission; enable it, then save the Profile.
  5. To enable by Permission Set, the same permission Lightning Experience User is assigned to specific users who need to switch to Lightning Experience.
It is best practice for a system admin to evaluate Lightning Experience before he/she (system admin) enables it for all Salesforce users, and find the gap for the functions that may not work when you switch to Lightning Experience. Before enabling Lightning Experience users, another best practice is to enable it just for a group of pilot users, get their feedback when using Salesforce as part of the daily job. Permissions Set would be the option if the users have a different type of Profile.

Salesforce provides a tool to help you check your organization's readiness for Lightning Experience. Click on the Evaluate link under Check Your Lightning Experience Readiness from the Lightning Experience setup menu. Salesforce will email a readiness report to you.

Switch to Lightning Experience

Once Lightning Experience is enabled and permission assigned, click on Switch to Lightning Experience after clicking on your name, as seen in the following screenshot:

Here is a screenshot of the modern Salesforce Lightning Experience:

Notice that the user interfaces of the Classic and Lightning Experience are totally different; if you still see a bluish background around the tab menu, you are in the Classic interface. Follow the Let's turn the Lightning Experience on section to enable it, or contact your system administrator to enable this for you.

All navigations and screenshots for this book will be in the Lightning Experience interface only.

As of now, not all features from Classic are available in Lightning Experience; you may need to switch back to Classic when needed. For example, Recycle Bin is not available in Lighting Experience. To switch back to Classic, click on your photo, then click on Switch to Salesforce Classic. You can use the same path to switch back to Lightning Experience:

The Summer '17 release offers the ability for admin to remove the switcher for a user to go back to Classic. If you are not the system admin, reach out to your system admin, but if you are the system admin, there is a new permission that controls this-- it is called Hide Option to Switch to Salesforce Classic in Profile.