

First, we will add some logic to the list page's controller file. Open /packages/cookbook_events/controllers/dashboard/cookbook_events/list.php in your code editor.
Add a view method to the controller class:
public function view() {
    Loader::model('cookbook_event', 'cookbook_events');
    $event = new CookbookEvent();
    $events = $event->find('1=1 ORDER BY event_date');
    $this->set('events', $events);
}
public function delete($id = null) {
    if ($id) {
        Loader::model('cookbook_event', 'cookbook_events');
        $event = new CookbookEvent();
        $event->load('id = ?', $id);
        $event->delete();
        $this->redirect('/dashboard/cookbook_events/list?deleted');
    }
}
Remember that view() is one of the automatic callback functions that gets executed when the single page is viewed. Here, we are loading the model class that we created and are using it to find all instances of the events in the database. We then send the array of event objects to the view, using $this->set().
We also added a function to delete events from the system, using the model class and active record.
Let's open up the view and add some HTML to it. Open /packages/cookbook_events/single_pages/dashboard/cookbook_events/list.php in your editor.
Add the following HTML code to the view file:
<?php defined('C5_EXECUTE') or die(_("Access Denied.")); ?>
<div class="ccm-ui">

   <?php if (isset($_GET['success'])): ?>
      <div class="alert-message">
         <?php echo t('The event was saved successfully!') ?>
      </div>
   <?php endif; ?>
   <?php if (isset($_GET['deleted'])): ?>
      <div class="alert-message">
         <?php echo t('The event was deleted successfully!') ?>
      </div>
   <?php endif; ?>
   <div class="ccm-pane">
      <?php
         $dashboard = Loader::helper('concrete/dashboard');
         echo $dashboard->getDashboardPaneHeader(t('Events'));
      ?>
      <div class="ccm-pane-body">
         <?php if (!empty($events)): ?>
            <table class="table table-striped table-bordered">
               <tr>
                  <th><?php echo t('Event ID') ?></th>
                  <th><?php echo t('Date') ?></th>
                  <th><?php echo t('Title') ?></th>
                  <th><?php echo t('Location') ?></th>
                  <th><?php echo t('Actions') ?></th>
               </tr>
               <?php foreach ($events as $event): ?>
                  <tr class="event-row">
                     <td><?php echo $event->id ?></td>
                     <td><?php echo $event->getDate() ?></td>
                     <td><?php echo $event->title ?></td>
                     <td><?php echo $event->location ?></td>
                     <td>
                        <a href="<?php echo $this->url('/dashboard/cookbook_events/add/edit/', $event->id) ?>" class="btn"><?php echo t('Edit') ?></a>
                        <a href="<?php echo $this->action('delete', $event->id) ?>" class="btn danger delete"><?php echo t('Delete') ?></a>
                     </td>
                  </tr>
               <?php endforeach; ?>
            </table>
         <?php else: ?>
            <p>
               <?php echo t('There are no events! Add one now.'); ?>
            </p>
         <?php endif; ?>
      </div>
      <div class="ccm-pane-footer"></div>
   </div>
</div>
There's a lot here, but it's actually not too complex. First, we make sure to include the defined or die statement at the top of the file. Next, we output the header of the dashboard pane. This includes the controls to navigate around our add-on, as well as add the page to the main dashboard menu.
A little further down, we check to see if there's anything in the $events array. If there are, we can show the list of events in an HTML table. If there aren't, we will show a message to the user that there are no events in the system.
Next, we create an HTML table to hold the events. The table has five columns: the event ID, the event date, the title, location, and a column for some actions to be performed on the event.
Once we begin looping through the events array, we will output one table row for each event in the system. Each column in the event row will output the corresponding field on the event. Notice the use of the date getter function to output a nicely formatted date.
The last column contains the buttons to edit and delete an event. We added an additional CSS class of .delete to the Delete button that will allow us to use JavaScript to display a confirmation message. Let's save this file and refresh the page:
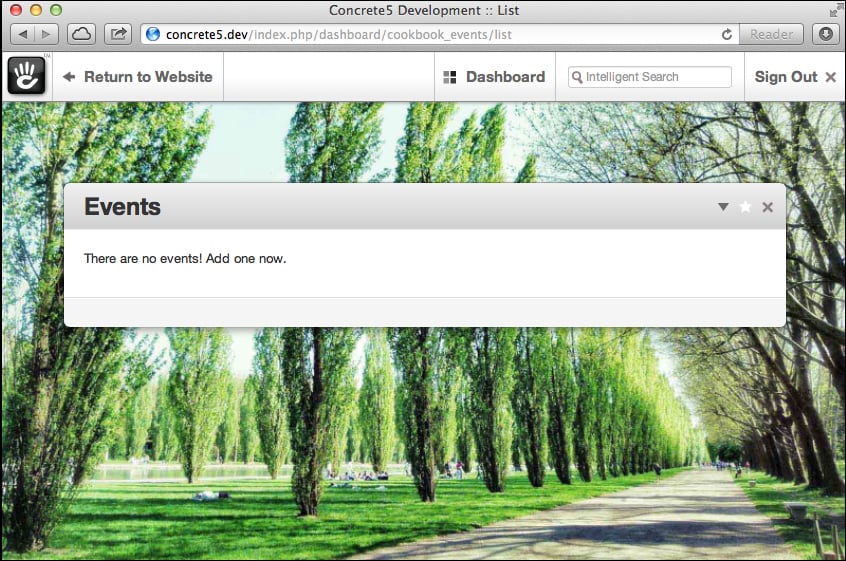
Looking good, except we don't have any events in our system yet. Let's create the form to add events.