

The tool needed to develop SpriteKit games is Apple's Integrated Development Environment (IDE) Xcode, which can be found free of charge on Apple's App Store at https://itunes.apple.com/en/app/xcode/id497799835?l=en&mt=12. We are going to work with version 7.0, which is the latest at the time of writing the book, and iOS 9.
Creating a new project with Xcode is a straightforward task, but I would like to take advantage of it to help you understand how a default Xcode project looks like.
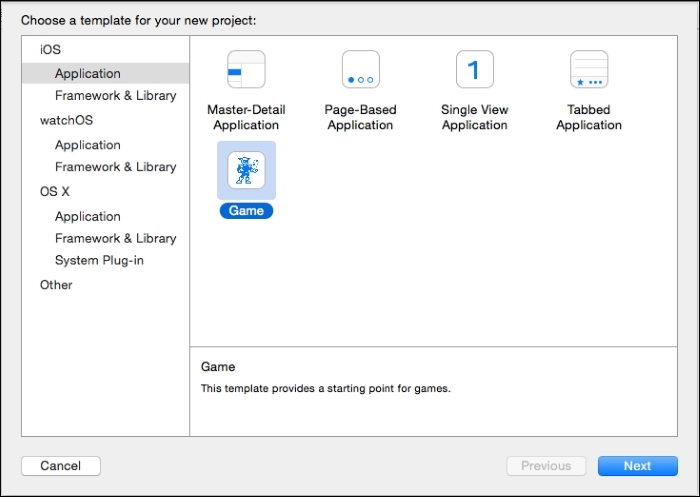
To create a new SpriteKit project, we need to open Xcode and then navigate to File | New | Project…. On the left-hand side, you will need to click on the iOS | Application Template; you will see what's shown in the following screenshot:
At this point, you will need to perform the following steps:
Select the Game template and click on Next.
Set InsideTheHat as the template name. Ensure that the Swift option is chosen in the Language menu. Select SpriteKit as the Game Technology, and Universal is chosen on the Device Family menu. Leave the default configuration (checked) for Include Unit Tests and Include UI Tests before clicking on the Next button.
Choose a place to save your project in and click on Create.
The first thing that you should look at is the left section, which is called Project Navigator and contains the folders, and files that will be a part of our game; this section is shown in the following screenshot:
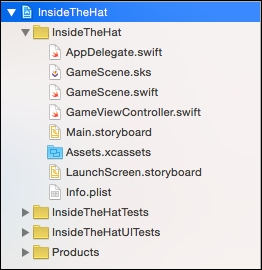
The Project Navigator shows a tree of files and folders that represents a hierarchy that doesn't correspond with how these files are located on your hard drive. It means that, if you move some file, on the Project Navigator, it won't affect their position in Finder. However, if you move some file in Finder, the reference kept by Xcode will be broken and it won't be able to make use of it.
The yellow containers on the project navigator are called Groups in Xcode, and they are equivalent to folders in a filesystem; as folders, the groups' responsibility is to organize all the files (images, classes, and so on) of an Xcode project.
One of the most important groups is the one called Project. It contains classes and resource files. As you can see in the preceding screenshot, a default project contains three Swift classes, namely AppDelegate, GameScene, and GameViewController, that will contain the core of the game.
Tip
Swift is Apple's programming language that was created by Apple for iOS, Mac OS X, watchOS, and Linux development. It was first released in June 2014.
There are a couple of storyboard files, namely Main and LaunchScreen, that are responsible for showing the game screen and launch image respectively. You will also see an image asset file, which will contain the images used on the game, and a plist file with the project configuration.
In addition to this, there is a file called GameScene.sks that should look pretty new to you. This file is used to build the screen in a static way, which is similar to a storyboard, that is created with Interface Builder.
Getting back to Xcode, there is another important section in the Project; it is the window at the center, which shows the configuration of the Project, as shown in the following screenshot:
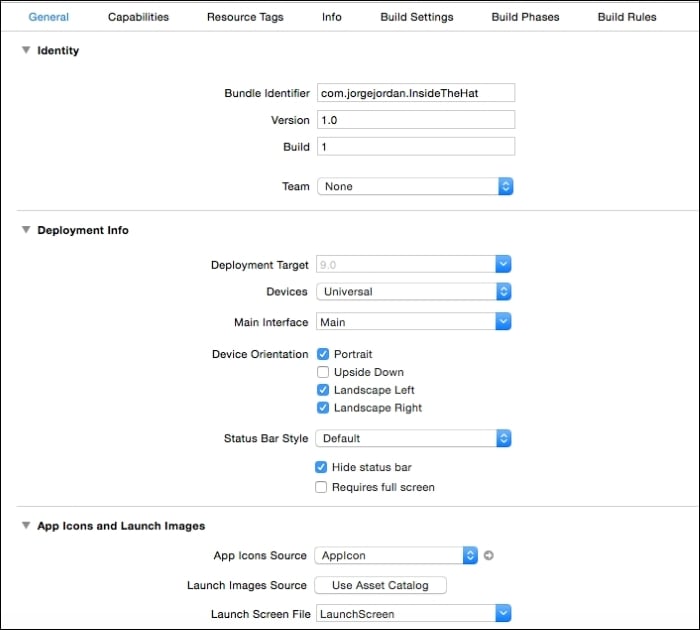
In this panel, you will see three different sections, namely Identity, Deployment Info, and App Icons and Launch Images. Let's take a look at the second one first, where you can configure the following:
Deployment Target: This is the iOS version that is used to run the game. By default,
9.0is chosen.Devices: This is the family of devices (iPhone, iPad, or both), on which we will be able to run the game. In our case, it shows Universal, which is the property that we specified when creating the project.
Main Interface: This is the main storyboard file that is used to run the project.
Device Orientation: This determines the different orientations that our game will be able to support. As we are going to develop a vertical game, unselect the Landscape Left and Landscape Right checkboxes, leaving just Portrait checked off.
Status Bar Style: This helps us determine how we want the status bar to be shown.
The third section contains the following configuration:
App Icons Source: This comprises the asset catalog for app icons.
Launch Images Source: This comprises the asset catalog for the launch image.
Launch Screen File: This determines the screen shown while loading the game. If you want to avoid the launch screen that shows the copyright (such as the one that you can use to show your company's logo), choose Main.Storyboard in the drop-down menu.
After performing the aforementioned modifications, the project's properties will meet our requirements. So, let's run the project.