

The SKScene class is a subclass of SKNode that has some specific properties and methods to handle the way content is drawn in an SKView object (the screen).
Each node provides content that will be animated and rendered by the scene in a process called game loop. It looks like the following screenshot that was taken from https://developer.apple.com/library/ios/documentation/GraphicsAnimation/Conceptual/SpriteKit_PG:
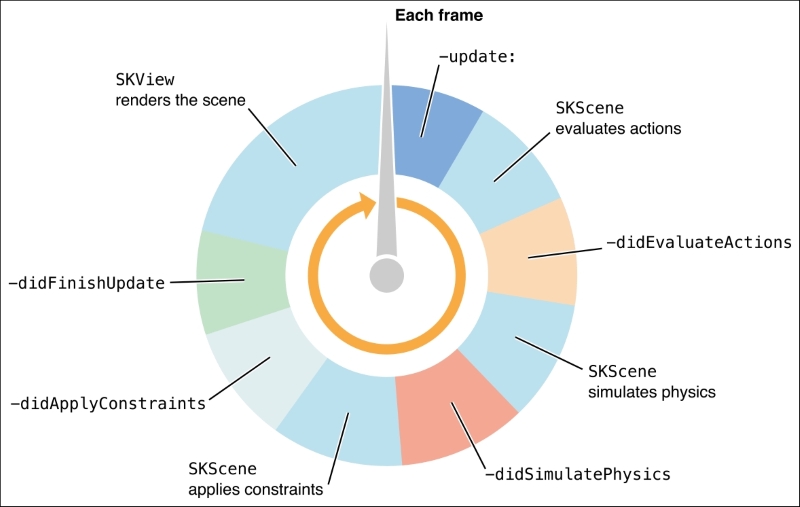
According to the preceding screenshot, each frame in a SpriteKit game is calculated in the following order:
Firstly, the
scenecalls theupdatemethod. Here, we can specify the code that we want to execute just before the scene actions are evaluated.Then, the
sceneexecutes the actions on itschildrennodes.Once the actions have been executed, the
scenetriggers itsdidEvaluateActionsmethod. We should include in this method the code that we want to execute as soon as the actions have been evaluated.Now, it's time for the physics to be evaluated. SpriteKit provides an easy way to simulate physics in a node such as
gravity,collisions, andfriction, but we are not going to cover it in this book. You just need to know that there is a step in the game loop where thesceneexecutes every physics simulation on the physic bodies in the scene.After the physics is simulated, the scene triggers its
didSimulatePhysicsmethod. We should include in this method the code that we want to execute as soon as the physics is simulated.Then, the scene applies the constraints associated to its
childrennodes. These constraints are an array of instances of the SKConstraint class, which basically are restrictions applied to a node that can be related to another node in the scene. For example, we can create constraints to set a node'szRotationmethod so that it always points at another node or position in the scene, or keeps a node inside a specified rectangle or within a specified distance of another node.Once the constraints have been applied, the scene triggers its
didApplyConstraintsmethod, which we should take advantage of to include the code that we want to execute as soon as the physics has been simulated.Then, the scene calls the
didFinishUpdatemethod, which is the last method that is called before the scene is rendered.Finally, the scene renders all of its children nodes and updates the view.
In this section, we are going to study in detail the most important properties that are available in the SKScene class.
An SKScene instance provides some properties that can become interesting when creating a scene. For example, the scaleMode property allows us to specify the way a scene is mapped to the view that presents it, which can be one of the following four values defined in the SKSceneScaleMode enumeration:
Fill: Each axis of the scene (x and y) is scaled independently. This way, each axis in the scene exactly maps to the length of the same axis in the view.AspectFill: This is thescalemode that is used by the default project. In this case, we will choose a scaling factor, that will be the larger scaling factor between the two dimensions, and each axis of the scene will be scaled by the same factor. This way, the entire area of the view will be filled, but it's possible that some parts of the scene may be cropped.AspectFit: In this case, we will choose a scaling factor that will be the smaller scaling factor between the two dimensions, and each axis of the scene will be scaled by the same factor. This way, the entire scene will be visible, but letterboxing may be required in the view.ResizeFill: This value will automatically resize the scene so that its dimensions match those of the view.
This property makes reference to the origin point of the scene. By default, its value is (0,0), which means that the scene will be pinned to the bottom left point of the view, as shown in the following screenshot. When we add the first sprite to the scene, we'll see how important it is:

This property specifies the part of the scene's coordinate space that is visible in the view. When this property is changed, the didChangeSize method is triggered. An important aspect that needs to be highlighted is that this property will also be modified if we set the ResizeFill value in the scaleMode property.