Book Image

Practical Autodesk AutoCAD 2021 and AutoCAD LT 2021

By : Yasser Shoukry, Jaiprakash Pandey
Book Image

Practical Autodesk AutoCAD 2021 and AutoCAD LT 2021

By: Yasser Shoukry, Jaiprakash Pandey

Overview of this book

AutoCAD and AutoCAD LT are one of the most versatile software applications for architectural and engineering designs and the most popular computer-aided design (CAD) platform for 2D drafting and 3D modeling. This hands-on guide will take you through everything you need to know to make the most out of this powerful tool, starting from a simple tour of the user interface through to using advanced tools. Starting with basic drawing shapes and functions, you'll get to grips with the fundamentals of CAD designs. You’ll then learn about effective drawing management using layers, dynamic blocks, and groups and discover how to add annotations and plot like professionals. The book delves into 3D modeling and helps you convert your 2D drawings into 3D models and shapes. As you progress, you’ll cover advanced tools and features such as isometric drawings, drawing utilities for managing and recovering complex files, quantity surveying, and multidisciplinary drawing files using xRefs, and you'll learn how to implement them with the help of practical exercises at the end of each chapter. Finally, you’ll get to grips with rendering and visualizing your designs in AutoCAD. By the end of the book, you’ll have developed a solid understanding of CAD principles and be able to work with AutoCAD software confidently to build impressive 2D and 3D drawings.
Table of Contents (17 chapters)

Making an arc

An arc is a segment of a circle and there are lots of ways that you can make one in AutoCAD. The method that you use to make the arc depends on the type of geometry that you want to make. In this case, I will explain some of the most frequently used methods of making an arc and I will use this right-angled triangle with the A, B, and C vertices in all of the following examples:

Figure 2.32: A right-angled triangle, ABC

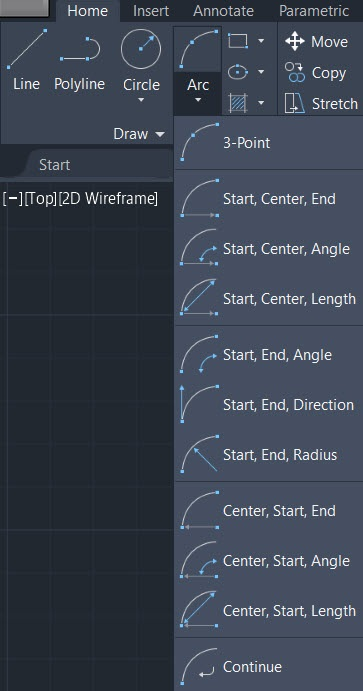
Select the Arc tool from the Draw panel in the Home tab. You can also use its command: ARC:

Figure 2.33: The arc tools in the Arc flyout of the Draw panel

The command line will now prompt you to select the first point of the arc. Click on the A point of the triangle, then specify the second point as the B point, and the third point as the C point. An arc connecting the A, B, and C points will be formed, as shown:

Figure 2.34: An arc connecting all three points

This was the most basic and obvious way of making an arc in AutoCAD, but there are lots of other ways of making arcs as well. Let’s select the Start, Center, End option from the Arc dropdown and then, gradually, we will look at the other frequently used options.

Start, Center, End

As the name of the command suggests, you need to specify the start point first, then the center point, and lastly, the end point. Click on the B point to specify the start point, then click on the midpoint of the BC line, which will be taken as the center point of the arc, and lastly, click on the C point.

An arc that starts from the B point with the center on the midpoint of the BC line and ends on the C point will be formed, as shown:

Figure 2.35: An arc made on the BC line with a start point on B and an end point on C

In this case, the arc is formed outside the triangle because the arc will be formed in an anticlockwise direction with respect to the start point, which is the B point. If you select C as the start point and B as the end point, you will get your arc on the opposite side. Alternatively, you can also press and hold the Ctrl key while making the arc to change the direction of the arc, irrespective of the start and end points.

Start, End, Radius

The next arc tool that I will tell you about is Start, End, Radius. For this arc tool, you need to specify the start point, end point, and radius value. The direction of the arc will be determined by the order in which you select the start and end points.

To make this arc, I will select the option from the Arc drop-down menu of the Draw panel and click on the B point, and then on the A point. Now, the command line will prompt you to specify the radius of the arc. Enter the radius value in the command line and press Enter. The final arc will look like this:

Figure 2.36: An arc made with the Start, End, Radius option

The diameter of the arc, in this case, should always be greater than the length of the AC line, otherwise it will not be possible to construct the arc. For our example, I have used a diameter of 16 units (or a radius of 8 units) and the length of the AC line is 14.

In this case, you too can change the order of the start and end points to reverse the direction of the arc, or you can press and hold the Ctrl key while making the arc to reverse the direction of the arc.

Center, Start, End

The last arc in this series of arc options that I will explain here is Center, Start, End. By now, you must have understood the workflow of making the arc. In this case, you need to click on the center point of the arc, then the start point, and lastly, the end point.

Select the tool from the Arc drop-down menu in the Draw panel and click on the midpoint of the AB line as the center point. Now, click on the A point and then click on the B point. The arc shown here will be made:

Figure 2.37: An arc made with the Center, Start, End option

Here, we can also reverse the order of selection of the start and end points to reverse the direction of the arc. For example, you can select the midpoint of the AB line as the center of the arc, then B as the start point, and then A as the end point, and the arc will be formed inside the triangle. You can also press and hold the Ctrl key to reverse the direction of the arc while making it. In this case, the AB line will be the diameter of the arc.

So, these are the most frequently used arc tools from the list, but there are also other tools in the list and I encourage you to explore the remaining arc tools yourself. After arcs, we will explore the Rectangle command, which is another frequently used draw tool. You can make a rectangle or square using lines, but we have this direct tool as well, which enables us to make rectangles very easily with fewer clicks.