

Follow these steps to create the dialog window and invoke it from the MainWindow to show a message to the user:
- Open the Solution Explorer and right-click on the project node.
- From the context menu, select Add | Window... to open the Add New Item dialog.
- Making sure that the Window (WPF) template is selected, give it the name MessageDialog, and click Add to continue. This will create MessageDialog.xaml and MessageDialog.xaml.cs files in the project.
- Open the MessageDialog.xaml file and replace the entire XAML content with the following:
<Window x:Class="CH01.DialogBoxDemo.MessageDialog"
 xmlns=
   "http://schemas.microsoft.com/winfx/2006/xaml/presentation"
    xmlns:x="http://schemas.microsoft.com/winfx/2006/xaml"
    ShowInTaskbar="False" WindowStyle="SingleBorderWindow"
    Title="Message" Height="150" Width="400"
    FontSize="14" Topmost="True" ResizeMode="NoResize">

    <Grid>
       <TextBlock TextWrapping="Wrap" Margin="8"
        Text="Thank you for reading 'Windows Presentation
        Foundation Cookbook'. Click 'OK' to continue next."/>
        <StackPanel Orientation="Horizontal"
                    VerticalAlignment="Bottom"
                    HorizontalAlignment="Right"
                    Margin="4">
            <Button Content="OK" Width="60" Height="30"
                    Margin="4" IsDefault="True"
                    Click="OnOKClicked"/>
            <Button Content="Cancel" Width="60" Height="30"
                    Margin="4" IsCancel="True"
                    Click="OnCancelClicked"/>
        </StackPanel>
    </Grid>
</Window>
- Open the MessageDialog.xaml.cs file, and add the following event implementations for the OK button and Cancel button:
private void OnOKClicked(object sender, RoutedEventArgs e)
{
    DialogResult = true;
}

private void OnCancelClicked(object sender, RoutedEventArgs e)
{
    DialogResult = false;
}
- Now open the MainWindow.xaml page and replace the Grid with the following XAML content:
<Grid>
    <ListBox x:Name="result" Height="100" Margin="8"
             HorizontalAlignment="Stretch"
             VerticalAlignment="Top" />
    <Button Content="Show Message" Width="150" Height="30"
            VerticalAlignment="Bottom" Margin="8"
            Click="OnShowMessageButtonClicked"/>
</Grid>
- Go to the code-behind file, MainWindow.xaml.cs, and add the button event implementation as shared in the following code section:
private void OnShowMessageButtonClicked(object sender, RoutedEventArgs e)
{
    var messageDialog = new MessageDialog();
    var dialogResult = messageDialog.ShowDialog();

    if (dialogResult == true)
    {
        result.Items.Add("You clicked 'OK' button.");
    }
    else if (dialogResult == false)
    {
        result.Items.Add("You clicked 'Cancel' button.");
    }
}
- Now run the application. The visible window will have a button labeled Show Message. Click on it to invoke the message dialog window that we have created:
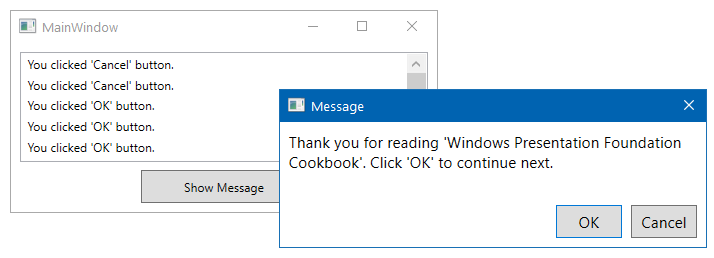
- Click on the Cancel button, which will add You clicked 'Cancel' button text into the list present in the MainWindow.
- Launch the message window again and click on the OK button. This will add You clicked 'OK' button in the list.