

Before we end this chapter about Maya and Unity, there is one last step we must take care of configuring imported animations in Unity Inspector. This is the topic of our next recipe.
Again, we pick up from where we left the previous lesson. Open Unity and select the animated FBX file in the project panel.
With the animated FBX file selected in the project panel, go to Inspector and access the Model tab. Since we are only interested in the animation data stored in this file, we will basically unflag most of the options that we set when we imported the static model. Use the following screenshot as a reference and then click on Apply:

Now we move on to the Rig tab. As the animation clip stored in this file is to be used by the model we imported before, we need to set the Avatar Definition field as Copy From Other Avatar.
We also need to set the source avatar. Click on the small button to the right of the Source field and add the avatar created from the static model to it, as shown in the following screenshot:

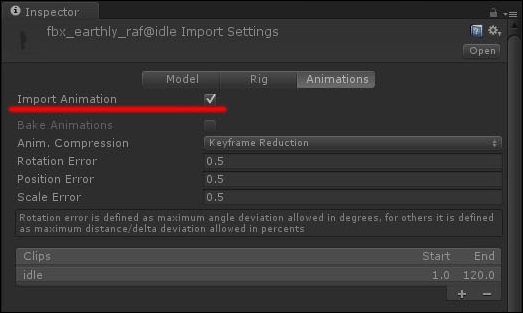
In this tab, there is much to do. First of all, flag the Import Animations option, which will make a group of related options that depend on this option visible:
Scroll down the panel and look for the Root Transform Rotation. Flag Bake Into Pose and select Root Node Rotation from the drop-down menu.
In the Root Transform Position (Y) group, flag Bake Into Pose and check that Root Node Position (Y) is flagged. In the Root Transform Position (XZ) group, flag Bake Into Pose and ensure that Root Node Position isn't flagged.

Notice that this is an idle animation and, as such, it should be set on looping by flagging the Loop Time option. We didn't do this intentionally to provide a more general example.
Click on Apply to end configuring the animation.
Let's begin with a few words on the topic of root motion, as Unity Inspector displays several options about it.
Root motion has to do with controlling the actual position of the mesh with regard to its collider while animations are being played. Most animations happen in place, meaning that the mesh and the collider don't actually move around as the character is animated. This may be the case for examples of walk and run animations.
There are other animations though that require the mesh and collider to actually move or rotate in the 3D world as the animation is played. Actions such as strafing, jumping, and other in-game specials require the mesh and the collider to change their position and rotation in the 3D world as the animation is performed.
By setting the properties of Root Rotation and Root Position groups, you control whether the collider should rotate or move with the mesh during specific animation clips.
In a walk animation, the start and stop root orientations and positions in world space are identical. In such cases where animations are acknowledged by Unity with a green light in Unity Inspector, it is recommended to flag the Bake into Pose option in the Root Transform Rotation group and set Root Node Rotation from the drop-down menu. Also, flag Bake Into Pose in the Root Transform Position (Y) group and set Root Node Position from the menu.
As for the Root Transform Position (XZ) group of options, the manual recommends using them for long, idle animations, where the repetition of many frames could lead the mesh to drift from its collider in the long run. In such cases, it is recommended that you bake the position on the x and z axes as well.
Latin speakers used to say "Repetita iuvant," meaning repetition helps. The settings provided here are to be intended as general, default settings that may not fit into any situation. For example, you may find yourself having to set Scale Factor in the Model tab for the animated FBX file too in order to prevent the animation from not fitting the model rig. Alternatively, you may need to tweak the Root Transform Rotation and Root Transform Position settings differently, depending on how you rigged\animated your model with specific animation clips. As usual, we recommend that you refer to the Unity documentation at http://docs.unity3d.com/Manual/AnimationsImport.html whenever you have questions.
The Rig tab in Unity Inspector displays an option that we didn't mention here: Animation Type. You configure this option to select whether you want your character to be animated as a humanoid or a generic object, as it could be with a vehicle, a ball, or whatever.
Also, when a rigged FBX file is imported into a project, Unity automatically creates a so-called avatar out of it. This task is generally performed automatically by Mecanim, the built-in tool responsible for animation setting and management; we will discuss this in detail in Chapter 3, Animating a Game Character.
Mecanim has routines that examine the skeletal configuration of a rigged model imported in Unity and then recompute it into a general template it can interpret. This template is called the avatar. Once an avatar has been created, other animation clips can be targeted to that same avatar. This is how multiple animation clips are linked to a single character model in Unity.
In the recipe, we configured the model scale and material in the Model tab only for the static version of the model; in the Rig tab, we set the Avatar Definition option to Create for this model. For animated clips, on the other hand, we didn't configure the Model tab, and we set Avatar Definition to Copy From Other Avatar with a reference to the static avatar. This assumes Mecanim succeeds in interpreting the rigged model.
There are cases where for some reason Mecanim is unable to correctly compute the avatar; alternatively, you may just want to make changes on your own. In such cases, it is possible to manually edit the avatar in Unity Inspector and check that all bones required by Mecanim are correctly named and in place.
A recipe about setting up the avatar would go beyond the scope of this book, as it has a lot to do with modeling and rigging techniques, which are beyond the scope of this book.
Refer to the Unity manual at http://docs.unity3d.com/Manual/AvatarCreationandSetup.html. Besides this, if you are interested in delving more into this matter, we suggest the many tutorials available on websites about game development and 3D graphics. For example, digital tutors offer many exceptional tutorials about Unity in general and Mecanim in particular; we recommend you check them out.