

To get a basic understanding of how to use Spacescape, let's create a simple nebula with some stars in it.
Double-click the
Spacescape.exefile in theSpacescapefolder to start the program. When the program starts, a screen similar to the following screenshot comes up:
Click on the New Layer button to introduce a new layer to the scene, and then click on the plus icon to the left of the new layer. This will open the settings for that layer. The second item on the list, Layer Type, is currently set to points. Click on the word points to get a drop-down box of options and then select the noise option.
This changes the available settings for the layer, and instead of seeing white dots in our preview we now see a gray cloud. Without worrying about what they all mean exactly, we're going to edit some of the values for this layer.
Click on the values to the right of the Inner Colour setting and a button with an ellipses(. . .) on it will appear on the right-hand side of those values. Click on that button to open the color picker, and choose the purple color at the bottom-left of the Basic Colours section.
Next, change the Lacunarity from 2.000 to 2.200.
Change the Octaves to 6.
Change the Power to 1.200.
Change the Threshold to .450.
Now, we have a dark purple cloud with a bit of graininess to it that looks sort of like a nebula. Let's go ahead and throw in some stars as well. Click on the New Layer button again.
Click on the plus icon next to the new layer to open its options. Click on the values for the Near Colour and open the color picker again. Choose the same purple, but adjust the Sat down to 180 and then click on the OK button.

We've got a decent start going there, and we've seen the basic premise behind Spacescape: layers of noise and stars. Before we start getting more complicated, though, we should talk about the noise layers and their controls.
The noise layers are generated by adding a series of noise functions together. These noise functions use wave-forms to produce a value between 0 and 1 for each pixel, and that value determines the mix of the inner and outer color for the pixel. A value of 0 means pure outer color, and a value of 1 means pure inner color. A value of .5 would be halfway in between the two.
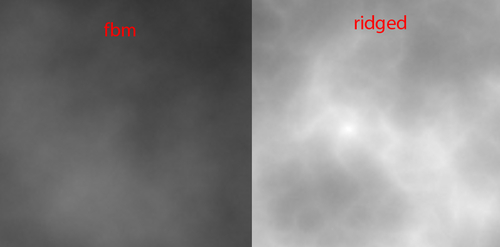
There are two types of noises to choose from: fbm and ridged . Fbm noise creates a smoother, more cloud noise. Ridged noise contains ridges that resemble tendrils or electricity.
There are three settings that control the basic wave-form: octaves, gain, and lacunarity.
Lacunarity: Controls the size of the "major" regions in the noise. Higher values produce smaller, more numerous regions. Typically, this value is kept fairly close to
2.Gain: Controls the grittiness, or roughness, of the "major" regions. Higher values will produce rougher regions. This value is usually set between
0and1.Octaves: Controls the number of additive noise functions that are used. This value effectively multiplies the lacunarity and gain. Usually 4 to 8 octaves are used. If this value is less than
2, gain and lacunarity will have no effect.
We have two settings that let us control the distribution of the noise value after it has been generated by the wave-form: power and threshold.
Threshold: This setting creates a lower limit for the noise value. Essentially, the noise value in each pixel is reduced by the threshold. This value needs to remain between
0and1.Power: This setting is an amplifier for the noise value, and it is applied after the threshold. Essentially, a higher power will push the noise values that remain toward
1, the inner color. Noise values of0are not affected by power.
There are three remaining settings for noise that we haven't talked about yet. They are noise scale, noise offset, and random seed.
Noise scale: Adjusts the initial coordinates for the noise. It's difficult to predict exactly how this will affect the result, but that doesn't mean it's useless. We'll use noise scale to produce variation in noise layers we've copied.
Noise offset: This setting is only used by ridged noise. It controls the contrast of the ridges. A value of
.5results in a flat mix of the inner and outer colors, and a value of1allows the ridges to reach the pure inner color. Overdriving this value beyond1will force more of the ridges to the pure inner color, which can look pretty ugly. Values between.5and1are recommended.Random Seed: It's impossible for a computer to generate a truly random number, but by performing operations on a seed number a pseudo-random number can be generated. Spacescape uses pseudo-random numbers when generating noise, and random seed is the seed number used. The same seed number will always produce the same result, so two layers that have the same settings and the same random seed will be the same. Different random seeds will produce different layers of the same style.