

Controlling how the layers in Spacescape blend together is both the most important aspect of creating a skybox and also the most complicated. All of the layers have controls for blending that work similarly to the blending methods available in image editors, such as Photoshop or GIMP, but unlike those programs there aren't any control presets like "Multiply" or "Lighten". Instead, we get direct access to the equation those presets use.
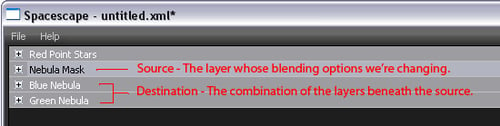
Before we get into the equation itself, we need to define some things the equation uses. First off, let's talk about the destination and the source. These refer to the two things that are being blended. The source is the layer whose blending controls we're working with. The destination is the combination of all the layers beneath the layer we're working with. In other words, the source is the layer itself, and the destination is all the layers beneath it.
Here's an example with four layers named Red Point Stars, Nebula Mask, Blue Nebula, and Green Nebula. The source and destination of the Nebula Mask layer are labelled.
Spacescape v0.2, the most up-to-date version at the time of this writing, uses values ranging from 0 to 255 for color, but to understand the math in the blending equation we have to think of the colors as ranging from 0 to 1, like they do in Panda3D. That's because multiplying colors together makes them get darker, rather than lighter, and that only makes sense when we're using decimal numbers, rather than numbers greater than 1.
Keeping these things in mind, let's take a look at the following equation:
( Source * sourceFactor ) + ( Destinaton * destinationFactor )
The equation is composed of four parts. Two of those parts are the source and destination. The other two parts are multipliers that alter the source and destination. These multipliers, called the sourceFacto
r and destinationFactor
, are the items we get to change. The addition and multiplication operations are performed on the red, green, blue, and alpha channels separately. This means that for each pixel in the image, the equation is calculated four times, once for each channel.
( srceR * srceFactorR ) + ( destR * destFactorR ) = outR
( srceG * srceFactorG ) + ( destG * destFactorG ) = outG
( srceB * srceFactorB ) + ( destB * destFactorB ) = outB
( srceA * srceFactorA ) + ( destA * destFactorA ) = outA
To control blending of layers, we change the sourceFactor and destinationFactor. We have a bunch of options, all of which can be used for either the sourceFactor or the destinationFactor. Here's the list of options:
|
Option |
Description |
|---|---|
|
|
This gives a value of |
|
|
This gives a value of |
|
|
This option inputs the color values of the destination. |
|
|
This option inputs the color values of the source. |
|
|
This option inputs |
|
|
This is the same as |
|
|
This option uses the destination alpha values. In v0.2 of Spacescape, the color alpha values are not used. Instead, the noise value is used for alpha blending. The outer color shows through where the noise value is lower, and the inner color shows through where the noise value is higher. |
|
|
This option is the same as |
|
|
This uses the inverse of the noise value from the destination. If the noise value is |
|
|
This is the same as |
The default option for both sourceFactor and destinationFactor is one, which uses a value of 1 for every channel of every pixel. Since multiplying a value by 1 will cause it to stay the same, the default settings simply add the source and destination together. If the destinationFactor was changed to zero, which uses a value of 0 for every channel of every pixel, the destination would get thrown out entirely and only the source would show.
A Multiply layer in an image editor multiplies the source by the destination. To achieve the same effect in Spacescape, we could set the sourceFactor to dest_colour and the destinationFactor to zero.
To create a mask that hides a part of the destination, but allows some of it to show through, we could set the sourceFactor to zero (so the mask layer doesn't affect the color of the result at all) and set the destinationFactor to src_alpha or one_minus_src_alpha (so the noise value of the source controls the alpha of the destination).