
This section will now introduce you to the various toolbars and menus available in the Sandbox. With these toolbars, users can very quickly access many of the features of the Sandbox editor by using simple icons and groups of icons at the top of the interface. These toolbars can be configured to fit the preferences and needs of individual users.

Before adjusting the toolbars, it is important that we explore a brief summary of the default toolbars that are available in Sandbox.
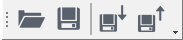
The Standard ToolBar contains open, save, hold, and fetch options.

The EditMode ToolBar contains various tools for level editing. These tools include undo and redo, link and unlink, select all, object movement/scaling, axes and terrain options, as well as object selection, saving, and loading.
The Object ToolBar contains tools for object alignment. The icons are go to selected object, align selection, align object to grid, set object(s) height, align object to the surface normal, and fix and unfix selected objects.

With the Mission ToolBar, you can select the current mission, duplicate a mission, delete a mission, and reload and edit mission scripts.

The Terrain ToolBar contains shortcuts to tools within the Terrain Editor, the Terrain Texture Layer editor, and Terrain Lighting dialog.

The Dialogs ToolBar contains icons used to access extender editor such as the Materials Editor, the Character Editor, the DataBase View, and the Flow Graph Editor.

The Console ToolBar has options specific to console game development. The buttons include sync data to console, automatically sync data to console, sync camera, options, load current level on console, and launch current level on console.
Now that we know about the default toolbars, let's go ahead and set up our layout:
To do this, we will need to access the ToolBar settings menu.
To access it, right-click anywhere on the Icon Bar.

This will display the ToolBar settings menu.
Selecting a toolbar from the list will display it or hide it on the main header.
To customize these toolbars and to create new ones simply click on the Customize option at the bottom of the ToolBar settings menu.
The Customize dialog box allows users to customize preset toolbars, as well as create custom user toolbars.

The New button allows you to create a new custom toolbar. On pressing the button, a prompt will appear requesting a name for the new toolbar.
The Rename button allows you to rename any of the custom toolbars you have created.
The Delete button allows you to delete any of the custom toolbars you have created.
The Reset button returns any changes made to the toolbars back to default.
Click on New and name it
my_toolbar.You will then see the toolbar added as an empty container on the interface.

We can now add commands to this toolbar for easy and customized access!
The Commands tab allows you to drag-and-drop any of the icons in the Commands box into any toolbar, even custom ones.
Go to View in the categories options.
Click and drag the Show Rollup Bar command into your new toolbar.

Click Close to accept the changes to your custom toolbar.
To test its function, click the newly created button and notice that it now toggles the rollup bar on and off.
Custom toolbars and overall toolbar configuration is saved in the registry information written by Sandbox to the PC. The toolbars are quite organic in the fact that you can undock and move them anywhere in the Sandbox interface, which, of course, makes it far easier to interface with some of them.
You may want to explore some of the other tabs available within the Customize interface.
In the Options tab, there are some options that allow you to edit the way the interface reacts.
The first option is Always show full menus, which as the name suggests always shows the full menu of the currently selected menu.
The next is the Show full menus after a short delay, which will, after a short delay, display the full menu even if a skin collapses the menu to only show frequently used items.
The Reset menu and toolbars usage data deletes the record of the commands that you've used in the editor, restoring the defaults.
Under the Other Header, we have the Large icons checkbox. This displays large icons when the editor skin has the choice of using large or small icons.
We also have the Show screen tips on toolbars checkbox, which displays screen tips when the mouse is held over toolbar buttons.
There is a subcheckbox to the screen tips, which is to show shortcut keys in screen tips. This shows keyboard shortcuts along with the screen tips.
Finally, we have Menu animations. This changes how menus are displayed. The options include: (System default), Random, Unfold, Slide, Fade, and None.
The Keyboard tab allows the user to assign different shortcuts to certain functions within the editor.
You can browse through different categories using the Category drop-down list. Depending on the category selected, different commands will be listed in the commands frame. If the function is already assigned to a key, it will be shown in the Key Assignments frame.
To assign a shortcut key, you must have a command selected and then click within the Press new shortcut key textbox and that key will then be ready to be assigned to the selected command. To accept the shortcut assignment click the Assign button. You can also remove this later by using the Remove button.