Book Image

Hands-On GUI Programming with C++ and Qt5

By : Lee Zhi Eng
Book Image

Hands-On GUI Programming with C++ and Qt5

By: Lee Zhi Eng

Overview of this book

Qt 5, the latest version of Qt, enables you to develop applications with complex user interfaces for multiple targets. It provides you with faster and smarter ways to create modern UIs and applications for multiple platforms. This book will teach you to design and build graphical user interfaces that are functional, appealing, and user-friendly. In the initial part of the book, you will learn what Qt 5 is and what you can do with it. You will explore the Qt Designer, discover the different types of widgets generally used in Qt 5, and then connect your application to the database to perform dynamic operations. Next, you will be introduced to Qt 5 chart which allows you to easily render different types of graphs and charts and incorporate List View Widgets in your application. You will also work with various Qt modules, like QtLocation, QtWebEngine, and the networking module through the course of the book. Finally, we will focus on cross-platform development with QT 5 that enables you to code once and run it everywhere, including mobile platforms. By the end of this book, you will have successfully learned about high-end GUI applications and will be capable of building many more powerful, cross-platform applications.
Table of Contents (18 chapters)

Downloading and installing Qt

Without wasting any time, let's begin with our installation! To get the free installer for Open Source Qt, first go to their website at https://www.qt.io. There, look for the button that says Download Qt (the website might look different if they have updated it). Do note that you might be downloading the free trial version for the Commercial Qt, which you cannot use after 30 days. Make sure that you are downloading the open source version of Qt instead. Also, you may want to pick the right installer for your platform, since there are many different installers of Qt for different operating systemsWindows, macOS, and Linux.

You might wonder why the installer is so small in size—it is only around 19 MB. This is because the unified online installer doesn't actually contain any of the Qt packages, but is rather a downloader client which helps you to download all the relevant files and install them to your computer once the download has completed. Once you have downloaded the online installer, double-click on it and you will be presented with an interface like this (the following example is running on a Windows system):

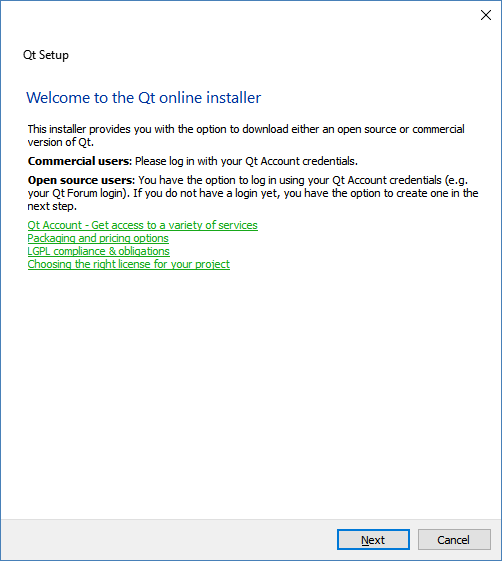
Click the Next button, and a DRM (Digital Rights Management) page will appear and ask you to log in with your Qt account. If you don't have one, you can also create your account on the same page:

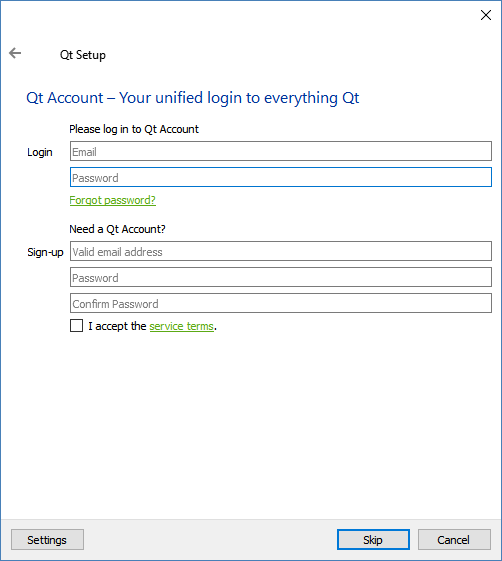
Once you have logged in, you will see a message that says No valid commercial license available in your Qt Account for this host platform. Don't worry about that, just click the Next button to proceed.

Next, you will be asked to specify the installation path. The default path is usually just fine, but you can change it to any other path as you please. Also, you can either leave the Associate this common file types with Qt Creator option checked, or uncheck it manually if otherwise.

After that, you will be presented with a series of checkboxes with which you can select the version(s) of Qt you need to install to your computer. Typically, for new users, the default options are sufficient. If you don't need some of the options, such as support for Qt on Android, you can unselect them here to reduce the size of the download. You can always go back and add or remove Qt components later if needed, using the Maintenance Tool:

Next, you will be presented with the license agreement. Check the first option, which says I have read and agree to the terms contained in the license agreements, and click the Next button. Make sure you do read the terms and conditions stated in the license agreement!

Finally, the installer will ask you to enter a name to create a start menu shortcut for Qt. Once you're done, just click Next and then click Install. The download process will take a couple of minutes to a couple of hours, depending on your internet speed. Once all the files have been downloaded, the installer will automatically proceed to install the files to the installation path that you have just set in one of the previous steps.

Setting up the working environment

Since you have installed the latest version of Qt, let's fire up Qt Creator and start messing around by creating our first project! You should be able to find Qt Creator's shortcut icon either on your desktop or somewhere within your start menu.

Let's look at the steps to set up our environment:

  1. When you first start Qt Creator, you should see the following interface:
  1. Before you start creating your first project, there are several settings that you might want to tweak. Go to the top menu and select Tools | Options. A window that looks something like this will pop up on the screen:
  1. There are quite a number of different categories available on the left of the window. Each category represents a set of options you can set to customize how Qt Creator will look and operate. You may not want to touch the settings at all, but it's good to learn about them first. One of the first settings you might want to change is the Language option, which is available in the Environment category. Qt Creator provides us with an option to switch between different languages. Although it doesn't support all languages, most of the popular ones are available, such as English, French, German, Japanese, Chinese, Russian, and so on. Once you have selected your desired language, click Apply and restart Qt Creator. You must restart Qt Creator in order to see the changes.
  1. The next setting you probably need is the setting for indentation. By default, Qt uses space indentation, in which four spaces will be added to your script whenever you press the Tab key on your keyboard. Some people, like me, prefer tab indentation instead. You can change the indentation setting at C++ category.
Do note that if you are contributing to Qt project's source code, it's required that you use space indentation instead of tabs, which is the coding standard and style of the Qt project.
  1. Under the C++ category, you can find a Copy button located beside the Edit button, somewhere in the top right position. Click it and a new window will pop up.
  2. Insert a code style name of your own, as you can't edit the default built-in coding style. After you have created your own settings, click the Edit button. You can now see the actual Tabs And Indentation settings under the General tab:
  1. Do note that even though there is a Tabs And Indentation setting located at the Text Editor category, I believe it's an old setting that no longer has any effect in Qt Creator. There is also a note written on the UI that says Code indentation is configured in C++ and Qt Quick settings. A possible reason for this is that since Qt Creator now supports both C++ project and QML projects, Qt developers probably felt there was a need to separate the settings into two, so therefore the old setting is no longer valid. I'm pretty sure this section on Text Editor will be deprecated in the near future.
  1. Next, under the Build and Run category, you'll see a tab labeled Kits.
  1. This is where you can set the compile settings for each platform. As you can see from the next screenshot, my Qt does not support desktop build under MSVC (Microsoft Visual Studio Compiler) because I never installed Visual Studio on my computer. Instead, my Qt only supports desktop build under the MinGW (Minimal GNU for Windows) compiler. From this window, you can check and see if your Qt supports the platform and compiler you wanted for your project and make changes to it if necessary. But for now, we'll just leave it as it is. To learn more about what is a kit is and how to configure the build settings, please head over to Chapter 15, Cross-Platform Development:
  1. Finally, we can link our project to our version control server at the Version Control category.
  2. Version control allows you or your team to submit code changes to a centralized system so that each and every team member can obtain the same code without passing files around manually. When you're working in a big team, it's very difficult to manually keep track of the code changes, and even more so to merge the code done by different programmers. Version control systems are designed to solve these issues. Qt supports different types of version control systems, such as Git, SVN, Mercurial, Perforce, and so on. Although this is a very useful feature, especially if you're working in a team, we don't need to configure it for now: