

When you choose to release your application online and you need performance for your web mapping applications, you need to perform certain steps.
Closure Compiler enables you to do so at the JavaScript level. In the OpenLayers project, some tools facilitate the use of Closure Compiler.
These tools, such as Closure Compiler, depend on three languages: Python, Java, and Node. We will quickly review the install process to run it.
We will review how to install the environment on the different operating systems. We will start with Python. Then, we will install NodeJS. Next, we will do a Java installation and we will end with other tools such as Git installing.
Closure Compiler requires 2.x series of Python. You can install it using the following instructions for Microsoft Windows and Linux. For Mac OSX, Python is already bundled.
Go to http://www.python.org/downloads/ and follow these steps:
Click on the link referring to the latest Python 2.x series (2.7.9 at writing time). Next, click Download on the Windows x86 MSI Installer or Windows X86-64 MSI Installer, depending of your Microsoft Windows architecture.
You also need to add Python to the PATH variable.
For this, right-click on My Computer and click Properties. Go to the Advanced System Settings link in the left column. In the System Properties window, click the Environment Variables button. You can now, on the bottom part of the System variables, click on Edit Path and add the path at the end of the string,
;C:\Python27;C:\Python27\Scripts.
You need to open a command line as superuser:
On a RedHat-based OS:
yum install python python-setuptools
On Ubuntu/Debian OS:
apt-get install python python-setuptools
On every OS, open a command line (for MS-DOS, go to open Command Prompt or Bash for Linux/Mac OSX) and type:
python –-version
It will echo something such as Python 2.7.5.
For all OS, you must install pip, a packet manager for Python.
Download it at https://bootstrap.pypa.io/get-pip.py and then execute the following code line:
python get-pip.py
It's quite easy. We will not rely on external packages but only official binaries. Check out the official website at http://nodejs.org/download/.
Just download the binary, and then execute the installer. Nowadays, except if you have an old Windows XP, you should download the 64 bit Windows Installer (.msi).
Instructions are for both RedHat-based OS and Ubuntu/Debian OS.
Go to the download page to get the 64-bit Linux Binaries (.tar.gz), except if for any reason, you are using an old 32-bit Linux.
From the command line, you can do it as
suor by addingsudo:mkdir /opt/node && chmod -R 777 /opt/node/Uncompress the downloaded directory.
Move the content to the new
/opt/nodedirectory.Then, add to the
~/.profilefile the following:export PATH=$PATH:/opt/node/bin
We have assumed you started from scratch. You may already have Java installed. Mostly, it will be the JRE (Java Runtime Environment). JRE is enough to execute Java, but we can also use the developer-oriented JDK (Java Development Kit).
Before downloading a new JRE, try to see if you already have Java installed. For this, open a command prompt and type the following:
java -version
If the feedback is not something like java version "1.7.0_xx", you should consider installing the JRE. The returned version must be 1.7.0_xx (xx is the exact version) and it should not be 1.6.0_xx or 1.8.0.xx. At the writing time, the version was 1.7.0_72.
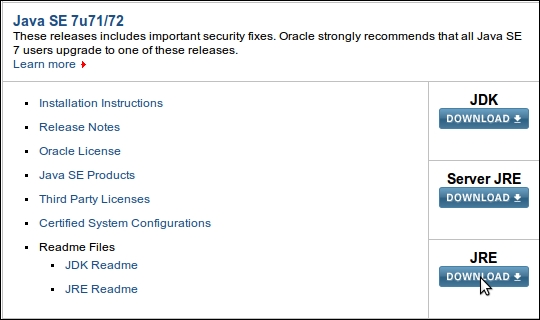
Independent of the OS, head to http://www.oracle.com/technetwork/java/javase/downloads for downloading the file you require to have Java JRE (Java Runtime Environment).
As there are many links, you will find the following screenshot with the mouse indicating the link to follow:
After download, run the installer and set the PATH, as for Python.
Here, you will need to add a new system environment variable called JAVA_HOME with the value C:\Program Files\Java\jrexxx or C:\Program Files(x86)\Java\jrexxx, depending on your architecture (32 or 64 bit). You will follow the same recipe described to change PATH in Python but instead of editing an existing variable, you will add it.
After, add at the end of the PATH environment ;%JAVA_HOME%\bin.
On a RedHat-based OS:
Retrieve the RPM from the URL retrieved by following the screenshot JRE Download button and perform the following command as superuser (depending on your java version):
rpm -ivh jre-7u72-linux-x64.rpm
On an Ubuntu/Debian OS, get the tar.gz Linux file instead of the RPM file:
tar xvzf jre-7u72-linux-x64.tar.gz
mv jre1.7.0_72 /opt/ && chmod -R 777 /opt/jre1.7.0_72
In ~/.profile, add the following content at the end of the file:
export JAVA_HOME=/opt/jre1.7.0_72
export PATH=$PATH:$JAVA_HOME/bin
In the information box about Closure Library, we mentioned an SCM called Git. Now, it's time for installation. Let's see how it works on a different OS.
Head to the msysGit project, https://msysgit.github.io, download the installer by clicking on the Download link and execute it.
After installation, add to the PATH, as for Python, the string; C:\msysgit\bin\;C:\msysgit\bin\mingw\bin
yum install git-core
On an Ubuntu/Debian OS:
apt-get install gitMac OSX
Go to the Mac installer website, http://code.google.com/p/git-osx-installer, and install it.
Now that you have Git, you can install other tools.
Now, everything is ready! So, let's start to use the Closure Compiler to better understand how to optimize your code to display faster maps. We will review how to use the OpenLayers development workflow to make your custom application.