In this section, we will address how to set up your Canvas profile, adjust your account settings, and customize your notification settings. If you are using an institutional instance of Canvas, the ability to adjust your profile, settings, and notifications may be different than what's described in this section, but the basics will be the same.
While your individual situation may vary, let's start by covering how to set up your Canvas profile, which other users will see as they interact with you on Canvas.
Editing your profile
Your Canvas profile includes your profile picture, name, pronouns, contact information, bio, and website links. To add and edit this information, follow these steps:
- Click on Account at the top of the left Global Navigation menu.
- Select Profile from the menu that appears. This will bring you to your profile page.
- On your profile page, click on Edit Profile from the right sidebar menu.
- This will open editing boxes for the Name, Pronouns, Title, Biography, and Links fields. You can click on each editing box to adjust or add content.
- Once you've finished editing, click on Save Profile at the bottom of the screen.
Adding detailed information to your Canvas profile will help other users gain a better understanding of who you are as a person. Within a fully online learning environment, establishing personal connections with other users can be very important in building a productive and comfortable learning community.
Once you have saved your updates, they will be visible to other Canvas users when they view your profile. You may notice a message under the Contact section that mentions you have not registered any services. We will learn how to add registered services and add your contact information once we've covered how to add a profile picture.
Adding a profile picture
Including a photo of yourself immediately makes your presence on Canvas more relatable and inviting. When participants can see a photo of who is writing to them, providing feedback, or posting on discussion boards, the Canvas community becomes more vibrant, personalized, and engaging. Especially in fully online learning environments where students and the teacher are never physically together, a profile picture can be an important way to build relationships and make interactions more personal.
To add or change your profile picture, perform the following steps:
- Click on the gray outline of a person next to your name on your profile page. Notice that when you hover your mouse over this gray image, an icon appears in the bottom right of the image that looks like a pencil. You can click this pencil icon to add or edit your profile picture.
- Once you've clicked on the pencil icon, a pop-up will appear with options along the top to Upload a Picture from your computer, Take a Picture of yourself using your built-in camera, or to add your globally recognized avatar From Gravatar if that is a service you utilize. If you are not familiar with Gravatar, you can select one of the first two options.
- If you choose to Upload a Picture, click on choose a picture, find and select the photo file from your computer, follow the on-screen instructions to crop your photo, and then click Save.
- If you choose to Take a Picture, provide permissions in the pop-up window to Allow Canvas to use your built-in camera. You will see a preview appear. Make sure to smile, click Take Picture, and then click Save.
- If you use Gravatar, you can add your avatar From Gravatar by entering the email address connected to your Gravatar and following the on-screen instructions, and then clicking Save.
Once you have added your profile picture, it will appear next to your name on your profile page, as well as other places throughout Canvas, when you use a variety of features.
Note
The pencil icon you saw when you hovered over your profile picture is the symbol for editing something within Canvas. Whenever you see the pencil icon, you can click on the icon to edit what you're viewing.
Next, we will learn how to adjust your account settings and add alternative forms of contact, including email addresses, cell phone numbers, or registered services such as Google Docs, Twitter, or Skype.
Adjusting your account settings
To adjust your account settings, such as your display name, contact information, language, time zone, and integrated web services, click on the Account option of the left Global Navigation menu, and then click on Settings.
Let's begin by adjusting your contact information so anything you receive from Canvas goes to an address or device that you check frequently.
Adding a new email address
On your Settings page, the Ways to Contact section of the right sidebar menu includes the email address with which you registered. It also includes the option to add more email addresses and other methods of contact. To add an email address, perform the following steps:
- Click on the + Email Address link.
- A pop-up window will appear that will let you add an alternate email address. You have the option of signing into Canvas with the new email address if you check the box below the new email address you have entered.
- Click on Register Email in the bottom-right corner of the pop-up window.
- Check the email account you've just added for a confirmation email from Canvas, which will contain instructions for verifying your new email address so that you can use it for Canvas.
Once you have verified your new email address, you can continue editing your contact information.
Adding a cell phone number for SMS text notifications
Canvas offers the option for you to receive notifications about course activity directly to your cell phone. To add your cell phone number so that you receive SMS text message notifications, perform the following steps:
- On the Settings page, click on + Contact Method under the Ways to Contact section of the right sidebar menu.
- In the pop-up window, enter your cell phone number and select your provider. The SMS email address should automatically appear once you select your provider.
- Once you have entered your number and selected your provider, click on Register SMS in the bottom-right corner of the pop-up window.
- You will then see a new pop-up window appear in your browser that asks for a confirmation code. You should receive a text on your cell phone with a case-sensitive confirmation code, which you should then enter into the pop-up window on your screen. Then, click on Confirm.
If you do not receive a text with a confirmation number and you entered your phone number correctly, click on the Re-Send Confirmation link in the pop-up window. If you entered your number incorrectly, close the pop-up window and begin the process again.
- Once you have confirmed your cell phone number with the confirmation code, you will be able to receive notifications via text message.
With your contact information updated, you're now ready to personalize your general settings within Canvas.
Note:
For international users using an institutional instance of Canvas, your institution may have the SMS text notification feature enabled for international numbers. In this case you would follow the on-screen instructions that appear to select your country and enter your mobile number. The SMS text notification feature may be unavailable for international users using a Free for Teachers instance of Canvas or if your institution has not enabled this feature. If this is the case, you can still receive notifications in several other ways discussed in this chapter.
Editing your general settings
As with many other online services you may have encountered, configuring the general settings of your Canvas account is important so that your account functions correctly and accurately. Your general settings include your name, pronouns, preferred language, current time zone, and password. Also found within the general settings menu are the options to receive Instructure informational emails. To edit your general settings, perform the following steps:
- Select Account from the left Global Navigation menu, and then click Settings.
- On the right sidebar menu, click on the Edit Settings button underneath the Ways to Contact menu, as shown in the following screenshot:
Figure 1.8 – Edit Settings button
- You will see textboxes and drop-down menus appear in the center part of the screen so that you can adjust your general settings. When adjusting the Full Name, Display Name, Sortable Name, and Pronouns fields for your account, each section includes a brief description of where that name or item will appear. For example, if you are teaching a college course, you may want your name to be displayed with the title of Professor or Dr. for discussion posts, messages, and comments. The following screenshot provides an example of each type:
Figure 1.9 – Example settings
- Below your name settings, you can use the Default Email, Language, and Time Zone drop-down menus to adjust the email used for Canvas, the language of your Canvas experience, and the time zone in which you live, respectively. Click on the drop-down menu and select from the listed options to adjust any of these settings.
Note
The Time Zone option you choose in your settings will only apply to your account. Any due dates posted on Canvas will be adjusted to each user's time zone, so keep that in mind for later if you are teaching students in multiple time zones.
- You can check the box next to I want to receive information, news and tips from Instructure if you would like Instructure to email you about certain features of Canvas. You will not receive informational product emails from Instructure if you do not check this box, though you will receive course notification emails based on your notification settings.
- To change your password, check the box next to Change Password; a new menu will open below that checkbox. If you are using an institutional instance of Canvas, this feature may function differently, and you may need to contact your IT department or change your password elsewhere, depending on your institution's password procedures.
- Using the drop-down menu that appears, select the email address for which you would like to change the password. Enter your old password, your new password, and confirm your new password in the appropriate boxes, as shown in the following screenshot:
Figure 1.10 – Changing your password in the Free for Teachers instance of Canvas
- When finished, click on the blue Update Settings box, below your settings information.
Tip
Including your personal pronouns shows others who are using Canvas how to refer to you and normalizes people sharing their pronouns instead of assuming one another's pronouns. This small gesture can make a huge difference for people throughout the gender spectrum to feel welcomed and accepted in your online learning environment. For more information, visit https://www.glsen.org/pronouns.
Moving on from your general account settings, let's explore some of the innovative connections you can configure between Canvas and other common online services, referred to as Registered Services.
Using Registered Services
Canvas allows you to link external services to your Canvas account so that you can integrate Canvas into your life online. Utilizing Registered Services allows you to connect Canvas to other websites, programs, and networks you already use. Again, if you are using an institutional instance of Canvas, your options for external services may be different compared to those discussed in this section, but the basics will be the same.
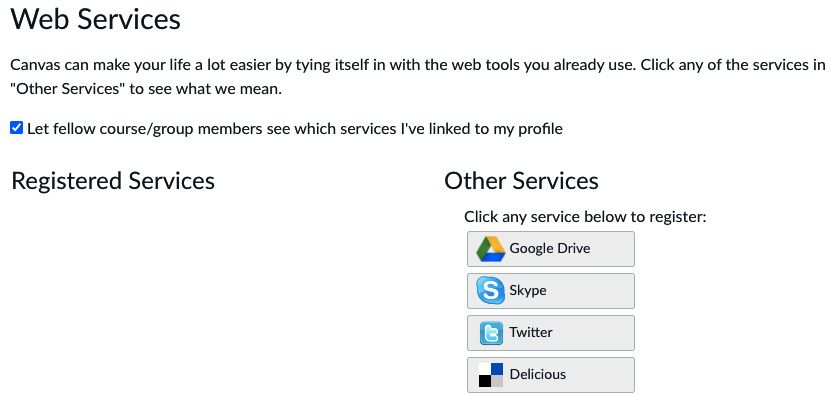
If you already have accounts with any of the services shown in the following screenshot, you can link your Canvas profile to your external accounts to utilize the features of those external services:
Figure 1.11 – Examples of available Registered Services that have not been added yet
You can choose whether other Canvas users can see Registered Services or not by clicking or unclicking the checkbox underneath Web Services.
To connect Registered Services to your Canvas account, perform the following steps:
- Click on the service you would like to link to your Canvas account listed under Other Services.
- Follow the onscreen instructions carefully to link your Canvas account to your external service account. Each service has slightly different instructions that appear, but it typically involves logging into the service and providing permission to link the service with Canvas. The on-screen instructions will tell you what to do for each service.
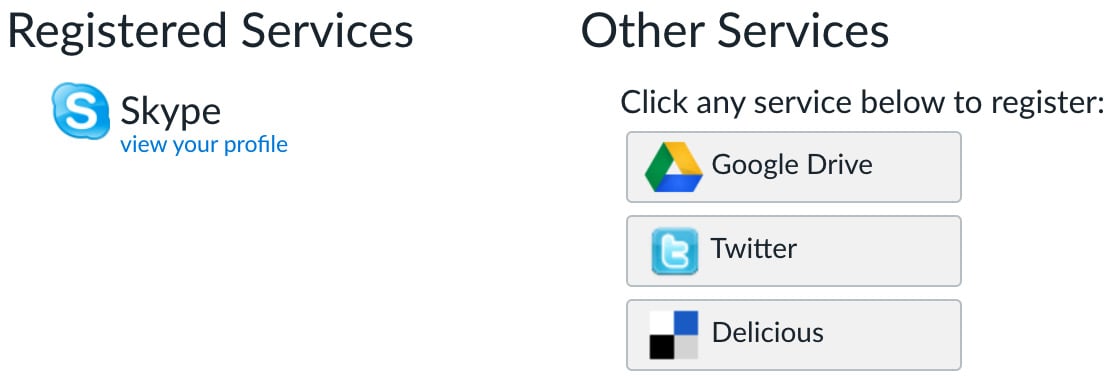
- Once you have linked Canvas to one of the listed services, that service will appear under the Registered Services heading, as shown in the following screenshot:
Figure 1.12 – Examples of added Registered Services
Once you've added Registered Services, you'll have the option to utilize the functionality of that service throughout various features of Canvas. Below the Registered Services section of the Settings page, in the Free for Teachers instance section of Canvas, you'll notice two other sections related to Approved Integrations and Features.
Customizing approved integrations and features
The Approved Integrations section shows you a list of third-party apps that are currently integrated into your instance of Canvas. You can view details of these or adjust these integrations using the links in this section. You can add a new integration by clicking the + New Access Token and following the on-screen instructions.
The Features section shows several specific features that you can enable or disable in your instance of Canvas. To view a description of the feature, click the drop-down arrow to the left of the feature's title. To enable a feature, click the red X icon under the State column to the right of the feature title; the icon will turn into a green check mark to show that the feature has been enabled.
To disable a feature, click the green check mark to the right of the feature title; the icon will turn into a red X icon to show that the feature has been disabled. The following screenshot shows the first feature option with the drop-down description and a red X icon next to it, indicating the feature is disabled:
Figure 1.13 – Feature example
Next, let's discuss how to customize your notification preferences to ensure that you know when important things have happened in Canvas.
Customizing your notification preferences
Adjusting your notification preferences is one of the most important things you must know how to do when you're getting started with Canvas. The same goes for your students – not being notified of an announcement or a direct message could mean missing an online meeting or assignment if their notification preferences have not been adjusted appropriately.
To access your notification settings, click on Account on the left Global Navigation menu, then click on Notifications at the top of that menu.
The Notifications page allows you to adjust the following:
- What activity you receive notifications about (for example, due dates, inbox messages, or announcements)
- How you will receive notifications (for example, via email, text message, or Twitter)
- When you will receive notifications (for example, immediately, daily, weekly, or never)
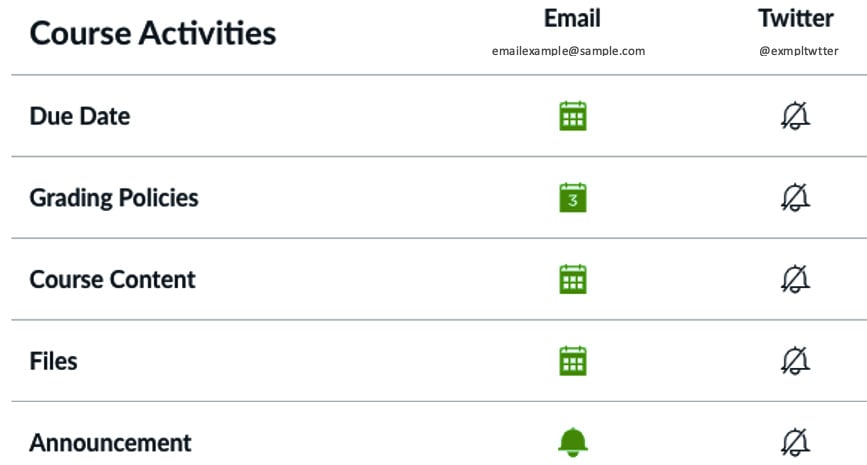
When you open the Notifications page, you will see a spreadsheet-like grid, as shown in the following screenshot, which lists the course activities you can be notified about in the left column and the method of notification along the top row:
Figure 1.14 – Course activities and notification methods
The methods of notification along the top come from the contact information and registered services that you have configured in your settings. In the center of the grid, you will see the different frequency icons displayed in the cross sections of course activities and contact methods. If you click on any of these icons, a drop-down menu will appear, where you can select one of the four options for how frequently Canvas will notify you about the selected activity.
To adjust your notification preferences, perform the following steps:
- Locate the course activity you would like to be notified about on the left-hand side of the table.
- Find the contact method on the top row you would like to use to be notified about that activity.
- Within the grid, click on the notification icon and select one of the four notification icon options to set the notification frequency. For example, the following screenshot displays the configuration for sending a Daily Summary to an Email Address for any changes that are made to a Due Date for an activity:
Figure 1.15 – Configuration to receive daily summaries via email for any due date changes
- Go through each type of course activity and select the contact method and frequency of notifications that will work best for you.
- Your notification preferences are automatically saved whenever you click on the frequency icons.
As you become more familiar with Canvas and begin participating in courses, you may decide to return to your notification settings once you have a better idea of your needs and preferences.
Now that we've covered all the basics of setting up your profile, adjusting your settings, and customizing your notification preferences, let's get started with creating your course!


 Free Chapter