

Although TFS has many fields that cover a lot of common pieces of data about a work item that teams would want to capture, you often find yourself requiring more fields. In this section, we will be adding two new fields to the Product Backlog item Work Item Type Definition (WITD) at http://msdn.microsoft.com/en-us/library/ms243932.aspx. First, we will add a field using the TFS Power Tools; and then we will add another field using the raw .xml files without using any of the Power Tools GUI.
In the example of adding a field with the TFS Power Tools, we will be adding a field for Stream of Work. This field will be a text field that is restricted to the options Website, Email, and Phone Call, and it will be a required field.
We will notice that the following points are important in the creation of this new field:
Text Field: This field will be a string field type, so it will support the expected data type
Restricted options: This field will make use of the
ALLOWEDVALUESelement within the field rules, with the allowed values such as Website, Email, and Phone CallRequired: This field will need to make use of the
Requiredelement in the field rules
To get started with our new field, open the ProductBacklogItem.xml WITD inside Visual Studio 2013 with TFS Power Tools installed, which you should be able to locate in the path C:\ProcessTemplates\Microsoft Visual Studio Scrum 2013\WorkItem Tracking\TypeDefinitions. When it is open, you should see the following screenshot in your IDE:
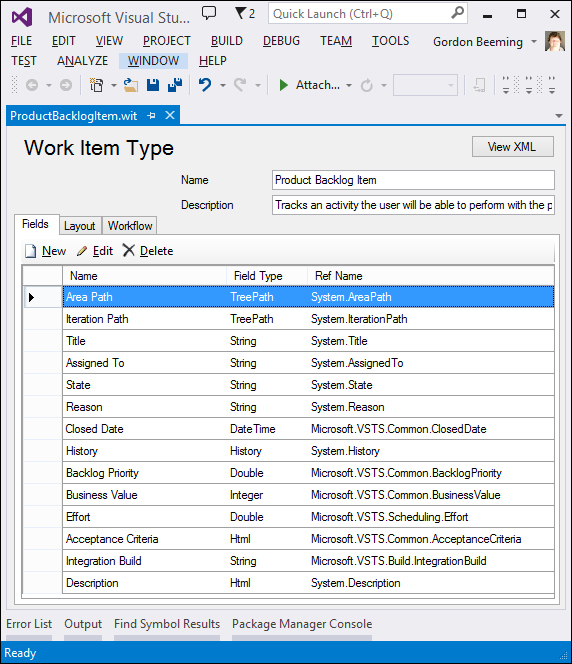
ProductBackLog.xml opened using the TFS Power Tools
Click on the New button. This will open up the Fields Definition window. The first tab contains information that is used to identify this field, such as its name, type, whether it is reportable, and help text that is used in the tooltip for the field. The second tab contains all the rules for this tool that are used to determine how this field behaves during the work items workflow.
We are going to use 2 bits from the 4 bits of information that we gathered from our fields' requirements for the details of this field. We are going to use Stream of Work for the Name and Reference Name fields, and then also Text Field which we will translate to being a string data type for this field. Populate the form with the values shown in the following screenshot:
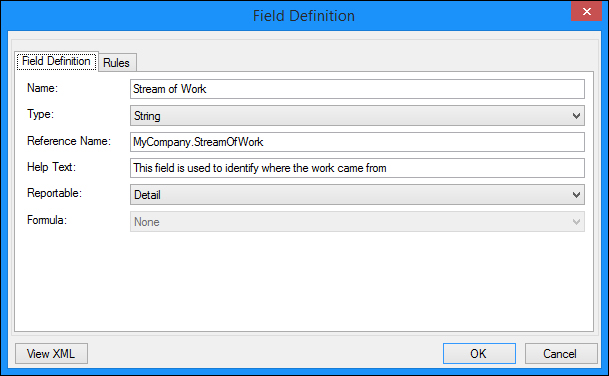
Field Definition details for Stream of Work
It would be a good idea to have some sort of naming convention for the name and reference name of fields, as it's very easy to make a mess with random new fields in TFS. The reference name determines many usages of the field in TFS. For example, the reference name replacing periods (.) with underscores (_) will give you the name of the field in the warehouse if the field is configured to be Reportable, and it is also used to reference this field if it is needed in other parts of the process template. The name values will be used in many other places. For example, when you use the query editor, the names will appear in the fields list as well as in the column header in the grids that display the field.
Note
The field definition name and reference name are unique. If combined with a type other than what's used in other Work Item Definitions (in another collection in the same TFS instance), it can cause your reporting warehouse to stop refreshing. This is because the two different collection definitions will be conflicting, and the refresh job would throw an error.
For more guidelines on Naming conventions for work item tracking objects, go to http://msdn.microsoft.com/en-us/library/ms194941.aspx.
Now, switch to the Rules tab so that we can define the rest of our new field. We are going to add the remaining items from our requirement now. These items are the ones in which the field must have a restricted set of options and must be required. To do this, click on New, then select ALLOWEDVALUES from the list, and then click on OK. Then click on New and enter the value Website. Repeat this step for Email and Phone Call. Your form should look like the window in the following screenshot:
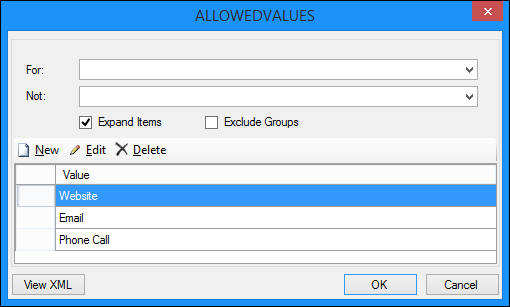
ALLOWEDVALUES options
Next, click on New, select REQUIRED, and double-click on OK. Your rules will look as follows:
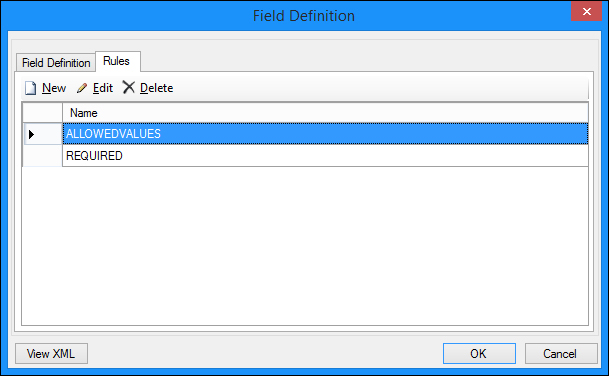
Rules for the Stream of Work field
After you click on OK, the new field will be added to the Product Backlog Item WITD. To find out more about the different rules and elements that you can use with a field, see http://msdn.microsoft.com/en-us/library/aa337627(v=vs.90).aspx.
Switch to the Layout tab. We will now add this control to the form that is displayed for this work item type. Right click on the first column node in the tree view and click on New Control. In the column options that appear on the right, locate the Label field and type in Stream of Work. Then, select MyCompany.StreamOfWork in Field Name. You can use the Preview Form button to preview an example of the layout of the controls.
That's all that is required to add a new field. To upload this work item type back into TFS, go to Tools | Process Editor | Work Item Types | Import WIT. Then, select your Team Project Collection and click on OK. Click on BROWSE and browse for the ProductBacklogItem.xml file that you have just modified, then select the Team Project you would like to upload this change to, and finally click on OK.
If you create a new Product Backlog Item in the Web Access, you will notice that your change is visible.
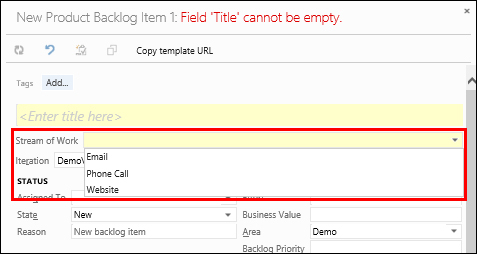
Stream of Work in the new Product Backlog Item form
Notice how all the values are listed alphabetically. TFS will automatically display all list items alphabetically.
In the example of adding a field by editing the .xml file, we will be adding a field for Product Code. This field will be a number that will be used to highlight a product code that the work item is related to (if applicable). When any work item for that product code is approved, the product code can't be changed.
We will notice that the following points are important for the creation of this new field:
Product Code: This will be the name of the field
Number: This field will be an integer field type, so it supports the expected data type
When work is approved, the value can't change: This will mean that when a PBI moves into the approved state, we need to lock the value of the product code
To get started with our new field, open the ProductBacklogItem.xml WITD inside your favorite text editor. You should be able to locate it in the path C:\ProcessTemplates\Microsoft Visual Studio Scrum 2013\WorkItem Tracking\TypeDefinitions.
In the .xml file, find the end of the FIELDS node. Just before it, insert the XML shown as follows:
<FIELD name="Product Code" refname="MyCompany.ProductCode" type="Integer" reportable="dimension" />
We have now defined the name, reference name, and data type for this field.
Next, we need to add the field to the work item layout. Locate the control we added earlier in the chapter, and add a new control below it with the following XML:
<Control FieldName="MyCompany.ProductCode" Type="FieldControl" Label="Product Code" LabelPosition="Left" />
We have now added the field to the layout with a label Product Code.
The next step of meeting the requirements is to make sure that this field is locked when the state is changed to Approved. Find the Approve State in the XML, look for <STATE value="Approved">, and add the following field rule to the FIELD element:
<FIELD refname="MyCompany.ProductCode">
  <FROZEN />
</FIELD>
Our new field will now be locked (frozen) when the state of a PBI changes to Approved for any transition that will be approved. If we only want this to apply from a certain state to be approved, we would add this rule to the transition between the two states.
The last step will be importing this definition into TFS. Open a Developer CMD console, and then we will use the witadmin tool to import this definition as follows:
cd C:\ProcessTemplates\Microsoft Visual Studio Scrum 2013\WorkItem Tracking\TypeDefinitions
witadmin importwitd /collection:http://localhost:8080/tfs /p:Demo /f:ProductBacklogitem.xml
You should notice a message that reads The work item type import has completed when the work item type is imported successfully. This will import the file (/f) ProductBacklogItem.xml into the Team Project Collection (/c) at the URL http://localhost:8080/tfs, which is in the Team Project (/p) demo.
When you create a new PBI (or open an existing one), you will see the Product Code field.
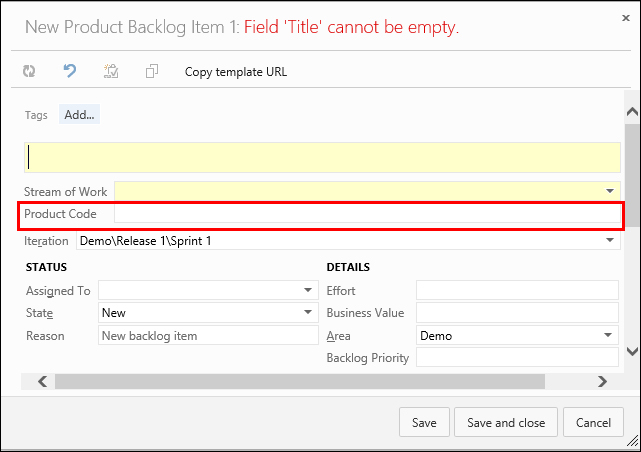
New Product Backlog Item with Product Code field
You can also see that after you have changed the state of a work item to Approved, you are not able to alter the Product Code field.