

Microsoft Bookings
In this section, we will get a deep insight into Microsoft Bookings. As an overview, Microsoft Bookings provides individuals and businesses an end-to-end scheduling assistant and an appointments management system. Bookings are integrated into the Outlook calendar, which gives customers or business users the flexibility to book a time that is best suited for both parties:
- Automated email notifications reduce no-shows and improve customer satisfaction.
- Microsoft Bookings is highly customizable, which helps customers to book efficiently and allows business owners to be prepared before meetings.
- Bookings is integrated into the Office 365 suite of products, which means business owners can effectively use the powerful Microsoft Teams to virtually meet customers. Customers get a unique meeting link to the email address that they enter upon booking, which they can click on and join the meeting.
Note
It is not necessary for the customer to have an Office 365 identity; they are free to use their Gmail or AOL (and other) accounts to join.
There are three primary components of Bookings:
- A booking page where your customers and clients can schedule appointments with the staff member who is providing the service or running the appointment. This web-based scheduling page can be shared via a direct link, your Facebook page, and even through link embedding within your website.
- A web app that contains a set of web-based, business-facing pages where Bookings calendar owners and administrators within an organization can define appointment types and details, manage staff schedules and availability, set business hours, and customize how appointments are scheduled. These pages allow for versatility and the ability to customize a Bookings calendar to fit the diverse needs of the person or organization.
- A business-facing mobile app where Bookings calendar owners and administrators can see all their appointments, access customer lists and contact information, and make manual bookings on the go.
Licensing requirements
Bookings is available and active by default for Microsoft 365 Business Premium, Microsoft 365 Business Standard, A3, A5, E3, and E5 customers worldwide. Bookings is also available in Office 365 operated by 21Vianet.
Note
Before proceeding with Bookings, please ensure that your IT team has enabled the service for you. If you are the global administrator of your own tenant, and if you have any of the aforementioned licenses assigned, Bookings will work for you.
Client requirements
Bookings is an online service, so you do not need to download any client. Just go to the app launcher within the Microsoft 365 web experience. Administrators can also use the Bookings companion app to stay current with the latest information about customers and their appointments.
Let's get started with Bookings:
- To onboard yourself and set up Bookings, please visit the following onboarding URL
- Since this is first-time onboarding, it will prompt you to add a Bookings calendar with a few details about the business. For this demo, we can add a Bookings calendar name such as
DevOps Enterprise Supportand select the business type.
Figure 1.52 – Naming the business
- You are now ready to set up Bookings for your organization. In the left-hand pane, you have all the configurable items to have a seamless Bookings solution for your organization.

Figure 1.53 – Welcome page on Bookings
- Once the calendar is added for the first time using the onboarding link, you can use the direct URL:
- As an alternate approach, you can use the default Office 365 login, https://login.microsoftonline.com, select All apps, and click Bookings.
Follow these steps to add Bookings to the Teams client:
- Click on the three dots (…) on the Teams client.
- Search for the Bookings app in the search window.
- Click on the app and add the widget to your Teams client.
- The Bookings app will be available for quick access when you launch the Teams client every time.
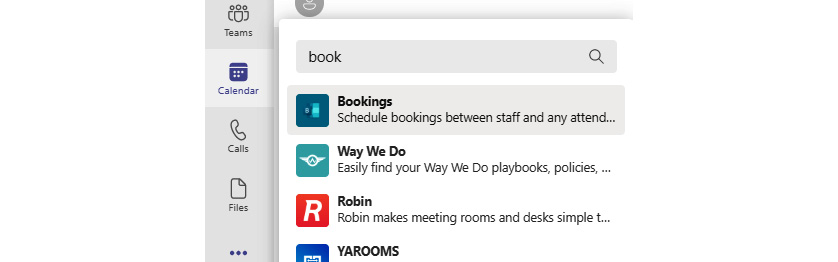
Figure 1.54 – Adding Bookings to your Teams client
Customizing Bookings
Let's start by setting up the company logo by clicking on the Add Logo tile in the top-left corner of your Bookings page. Select an image from your computer that is appropriate for the business. Once the logo is updated, it will allow you to choose a theme for the background color.
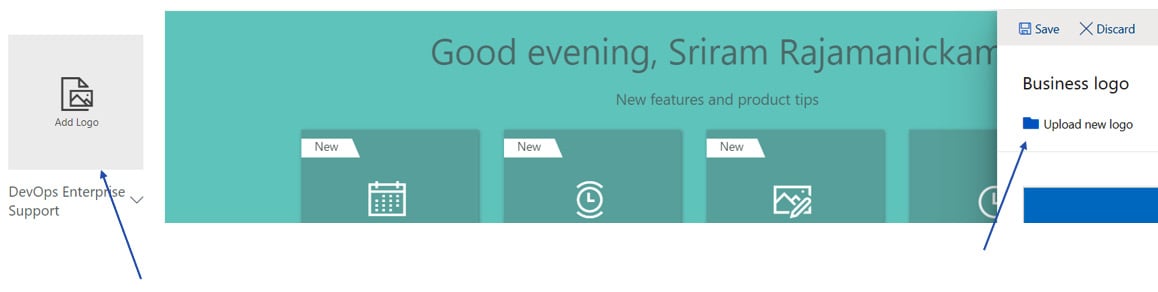
Figure 1.55 – Adding an organization logo
Business information
In Microsoft Bookings, the Business information page within the web app contains all the details that you would typically find on a business' "About us" page. These details include the relevant name, address, phone number, website URL, privacy policy URL, logo, and business hours.
The information you provide here will be displayed on the page customers and clients use to book appointments (known as the booking page) and in messages and reminders sent to them by Bookings. An example of this information on the booking page is highlighted here.
In Microsoft 365, select App launcher and then select Bookings.
- In the navigation pane, select Business Information.
- Enter a name suitable for the business and the phone number that you will need for the Bookings calendar.
- Type in the email address where you would like to get notifications in the Send customer replies to.
- For the website URL, please type the URL that is the home page of your business.
- You can mention the privacy policy and terms and conditions of your business.
- Finally, set the currency type for the service offering and click on Save.
Business hours
- By default, in the Microsoft Bookings app, business hours are set to 8 a.m. to 5 p.m. with 15 mins increments; however, you can tweak this as per the business needs.
- On the Business information page, under Business hours, use the dropdowns to select start and end times for each day.
- Click + or - to set the start and end times for Business hours.
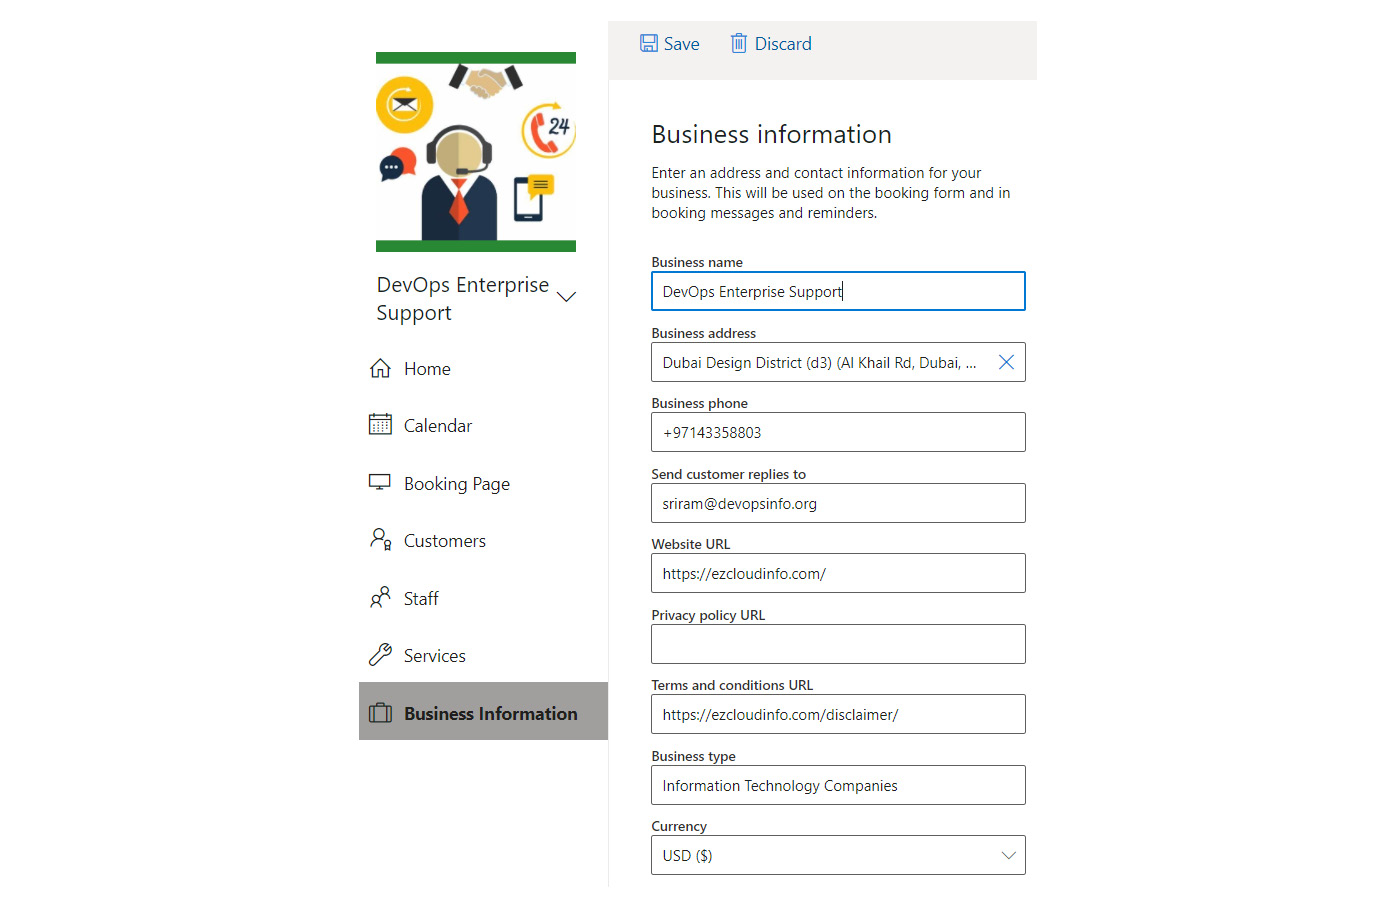
Figure 1.56 – Editing Business information
Setting off hours
The business needs to have off hours to take care of internal processes such as staff meetings and updating inventory. Bookings allows you to add off hours, where customers will not have time slots available for booking.
For example, if you have staff meetings every Thursday from 13:00 to 14:00 and want to block out that time so all your staff members can attend, you can do this:
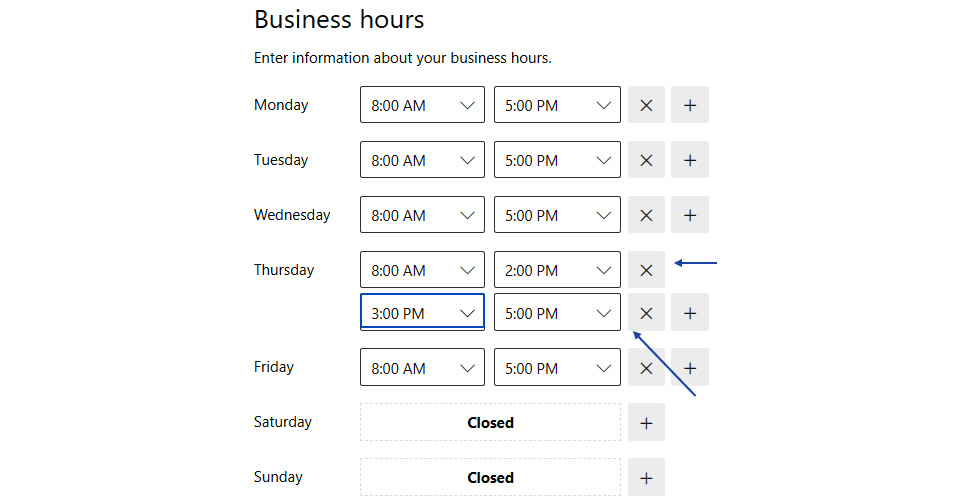
Figure 1.57 – Editing Business hours
To configure off hours, please follow these steps so customers don't see these times for booking appointments:
- On the Business information page, under Business hours, select a start and end time during which time staff can do their internal processes.
- Select + to create a new row for Thursday.
Configuring service details
- Service name: Enter the name of your service. This is the name that will appear in the drop-down menu on the calendar page.

Figure 1.58 – Editing Service name
- Description: It is good to give a description of the service offering, which will help the customer to pick a suitable service.

Figure 1.59 – Modifying the service description
- Default location: This location will be displayed on confirmation and reminder emails for both staff and customers, and it will be displayed on the calendar event created for the booking.

Figure 1.60 – Modifying the service location
- Add online meeting: Online meetings allow you to have a meeting online with Microsoft Teams. You can click on the toggle bar to adjust the settings.

Figure 1.61 – Enabling online meetings
- Default Duration: This helps to book the staff calendar for a time. In this case, we have selected 1 hour when the staff calendar won't be available during this time slot for other meetings.

Figure 1.62 – Duration to block the staff calendar
- Buffer time your customers can't book: Buffer time helps your staff with extra time for every appointment. It will help staff to cover internal processes.

Figure 1.63 – Buffer time for staff
- Maximum attendees per event: This setting allows you to create services that require the ability for multiple people to book the same appointment time and the same staff (such as a fitness class). The appointment time slot for the selected service, staff, and time will be available to book until the maximum number of attendees, specified by you, has been reached. The current appointment capacity and attendees can be viewed in the Calendar tab in the Bookings web app.
- Default price: This is the price that will be displayed on the Self-Service page. If Price not set is selected, then no price or reference to cost or pricing will appear.
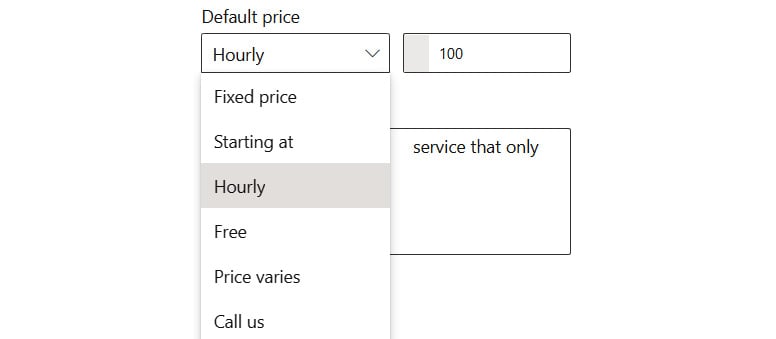
Figure 1.64 – Buffer time for staff
- Notes: This field appears in the booking event for booked staff, as well as on the event that appears on the Calendar tab in the Bookings web app.
- Custom Fields: This section allows questions to be added, or removed, if the customer needs to answer any questions to successfully book.
- Customer email, phone number, address, and notes are non-removable fields, but you can make them optional by deselecting Required beside each field.
- You can add a multiple-choice or text-response question by selecting Add a question.
- Custom fields can be useful when collecting information that is needed every time a specific appointment is booked. Examples include insurance provider prior to a clinic visit, loan type for loan consultations, major of study for academic advice, or applicant ID for candidate interviews.
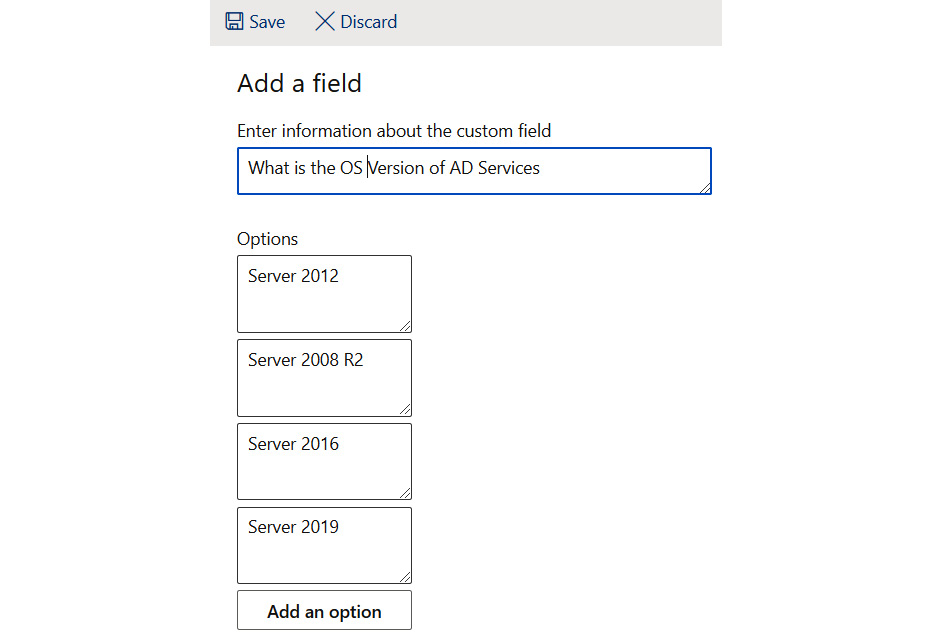
Figure 1.65 – Mandatory information to be provided by a customer
- Reminders and Confirmations: Both types of emails are sent out to customers, staff members, or both, at a specified time before the appointment. Multiple messages can be created for each appointment, according to your preference.
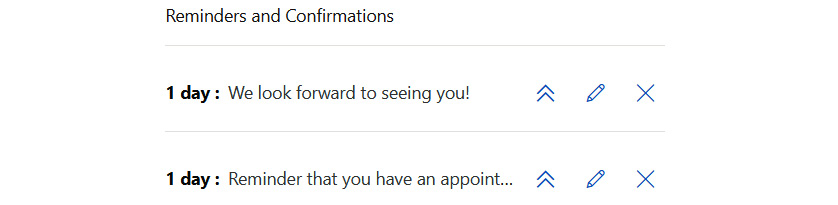
Figure 1.66 – Reminder and confirmation to customer
- Enable text message notifications for your customer: If selected, SMS messages are sent to the customer, but only if they opt in. Note that SMS notifications are currently only available in North America.
- Publishing options: Choose whether to have this service appear as bookable on the Self-Service page or to make the service bookable only on the Calendar tab within the Bookings web app.

Figure 1.67 – To show the service on the booking page
- Scheduling policy: This setting determines how appointment times are viewed, and the time during which bookings can be made or canceled.
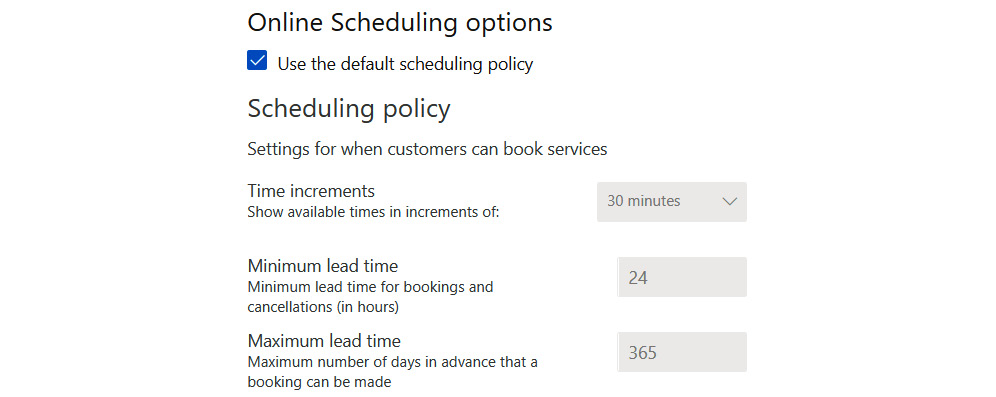
Figure 1.68 – Managing the Scheduling policy
- Email notifications: Sets when emails are sent to organization staff and to customers or clients.

Figure 1.69– To get the internal team notified about the booking
- Staff: Selecting this checkbox allows customers or clients to choose a specific staff member for their appointment.

Figure 1.70 – To allow customers to choose their preferred staff
- Enabled:
- Customers can choose from all staff assigned to the appointment when booking on the Self-Service page. Selecting the option of Anyone will make Bookings choose an available staff member at random to assign to the appointment.
- Disabled:
- Availability: The following options determine when the service can be booked:
- Bookable when staff are free: The service maintains availability based on when staff are free within business hours, with no extra time restrictions.
- Custom hours (recurring weekly): The service has an added layer of availability that can be further restricted (in addition to restricting by business hours or staff hours). Use this option when your service can only be provided or performed at a specific time.
- Set different availability for a Date Range: This setting impacts availability at a specific point in time, instead of on a recurring basis. For example, this could be used when a machine that is needed for the service is temporarily being serviced and unavailable, or when an organization is closed for a holiday.
- Assign Staff: Select the staff (provided you have added staff members to the Staff tab) who will be bookable for that specific service. Selecting no individual member of staff will result in all staff being assigned to the service.
- Manage staff:
- Go to the Manage staff page and select Add staff button.
- When adding staff from within your organization, type their name in the Add people field and select them when they appear in the drop-down menu. The other fields will automatically populate.
- Administrators can edit all settings, add and remove staff, and create, edit, or delete bookings.
- Viewers can see all the bookings on the calendar, but they cannot modify or delete them. They have read-only access to settings.
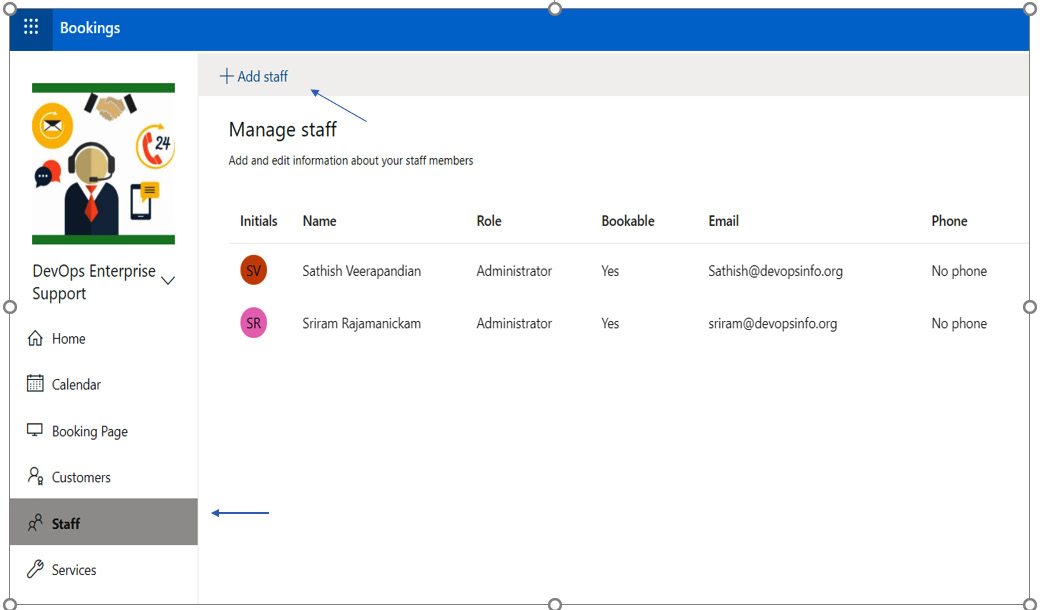
Figure 1.71 – Adding staff details
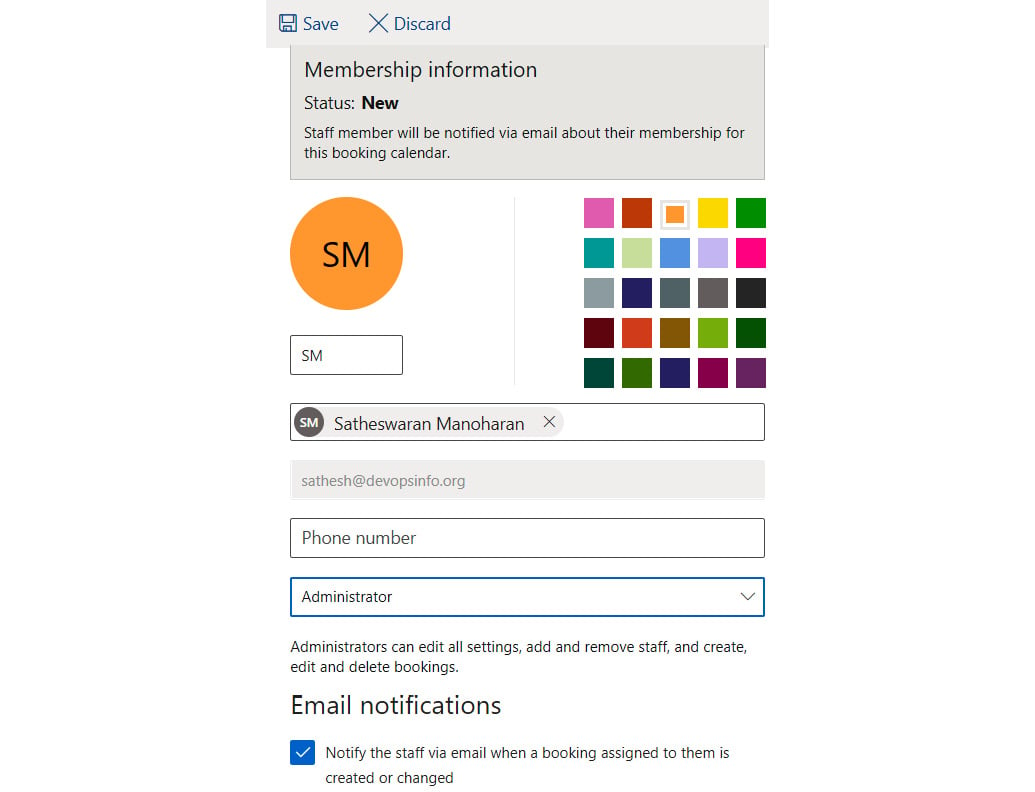
Figure 1.72: Updating the staff details
- Booking Page:
Click on Booking Page on the left side to configure booking controls.
- If you select Require a Microsoft 365 Account for booking, other customers with Gmail or an AOL ID won't be able to book.

Figure 1.73 – Booking page access control
- Booking page access control: Selecting Disable direct search engine indexing of booking page prevents your booking page from appearing in the search results of Google or other search engines.
- Customer data usage consent: When selected, text requesting the user's or customer's consent for your organization to use their data will appear on the Self-Service page. The box will have to be checked by the user in order to complete the booking.
- Availability: Availability helps you to customize the time ranges when the service is available; otherwise, it is restricted to the configured business hours.
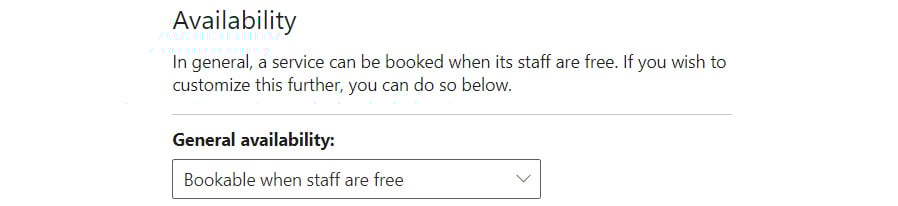
Figure 1.74 – Configuring Availability
- Customize your page: Choose colors and logos that appear on the Self-Service page for brandling.
- Region and time zone settings: Set your local time zone, which converts the time zone to the customer's time zone automatically whenever booking a meeting. For example, if an appointment is available at 5:00 p.m. GST, someone in IST will see the available time displayed as 6:30 p.m. IST.

Figure 1.75 – Time zone adoption
Publish/Unpublish
After configuring the settings, click on Publish/Unpublish at the top of the page to allow external parties to book meetings.

Figure 1.76 – Publishing the configuration
Staff calendar
As the business owner, you can have a quick glance at all your staff members' calendars to see their availability.

Figure 1.77 – Checking the staff calendar
Booking page for customers
As we have created a booking page, you can share this URL or embed this URL on the public website or Facebook feeds to have seamless booking for your customers:
https://outlook.office365.com/owa/calendar/[email protected]/bookings/
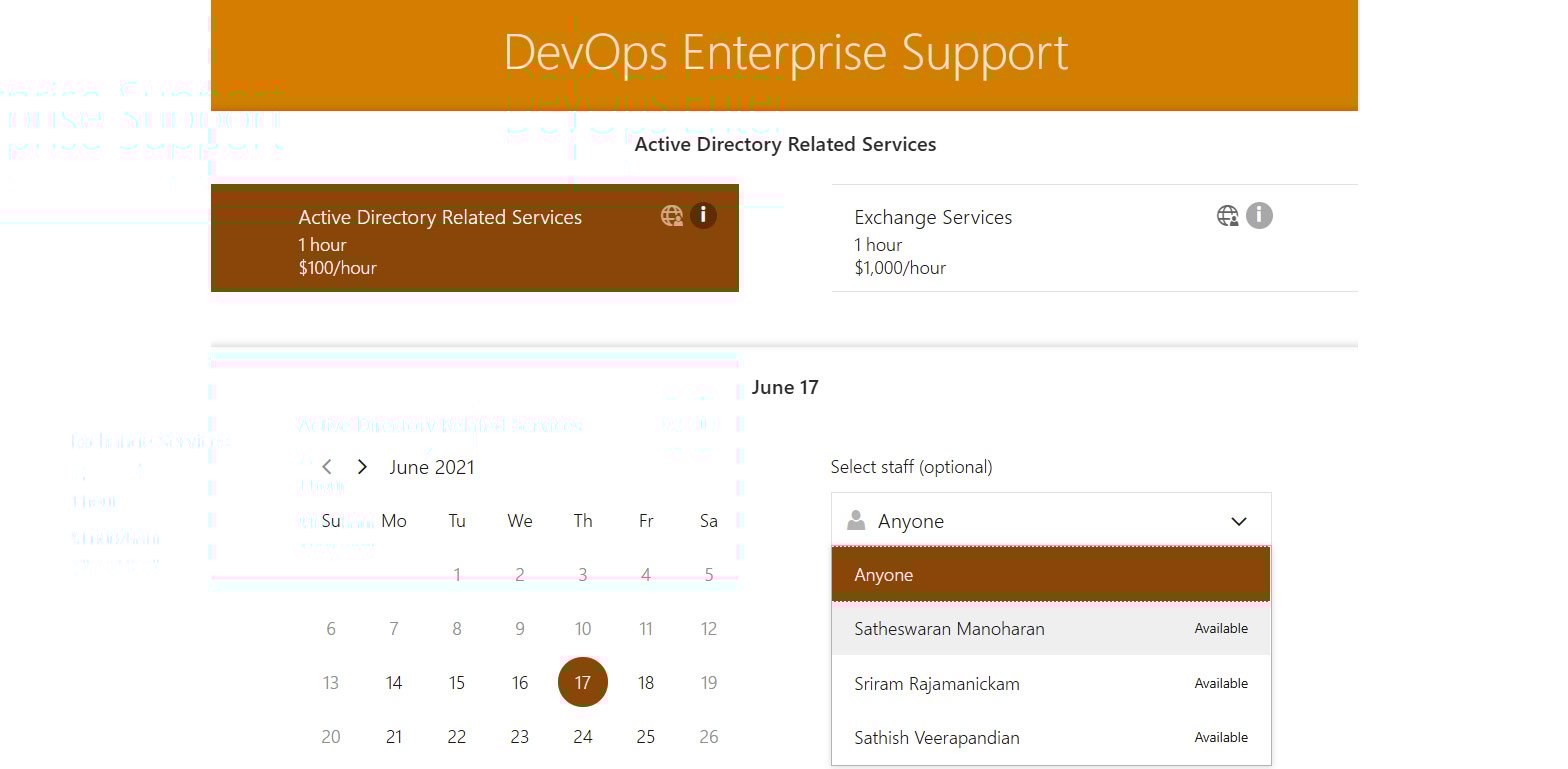
Figure 1.78 – Final look of the booking app
Note
Admins can use the Microsoft Bookings app on their Android/iOS platform to have a quick overview of all their booked sessions and be prepared to serve.
With remote working increasing, Microsoft Bookings helps small businesses to set up an easy solution for customers using Microsoft collaboration tools to connect with customers.
You now have a better understanding of, and are familiar with, the various options on Microsoft Bookings.
In the upcoming section, you will learn about Microsoft Forms, which is a powerful tool for corporate surveys or quizzes, to collect reports from staff or customers.