

Configuring marketing settings
When you set up a new Dynamics 365 Marketing system, you have a lot of links to go through on the Settings overview page, as shown in Figure 1.3:
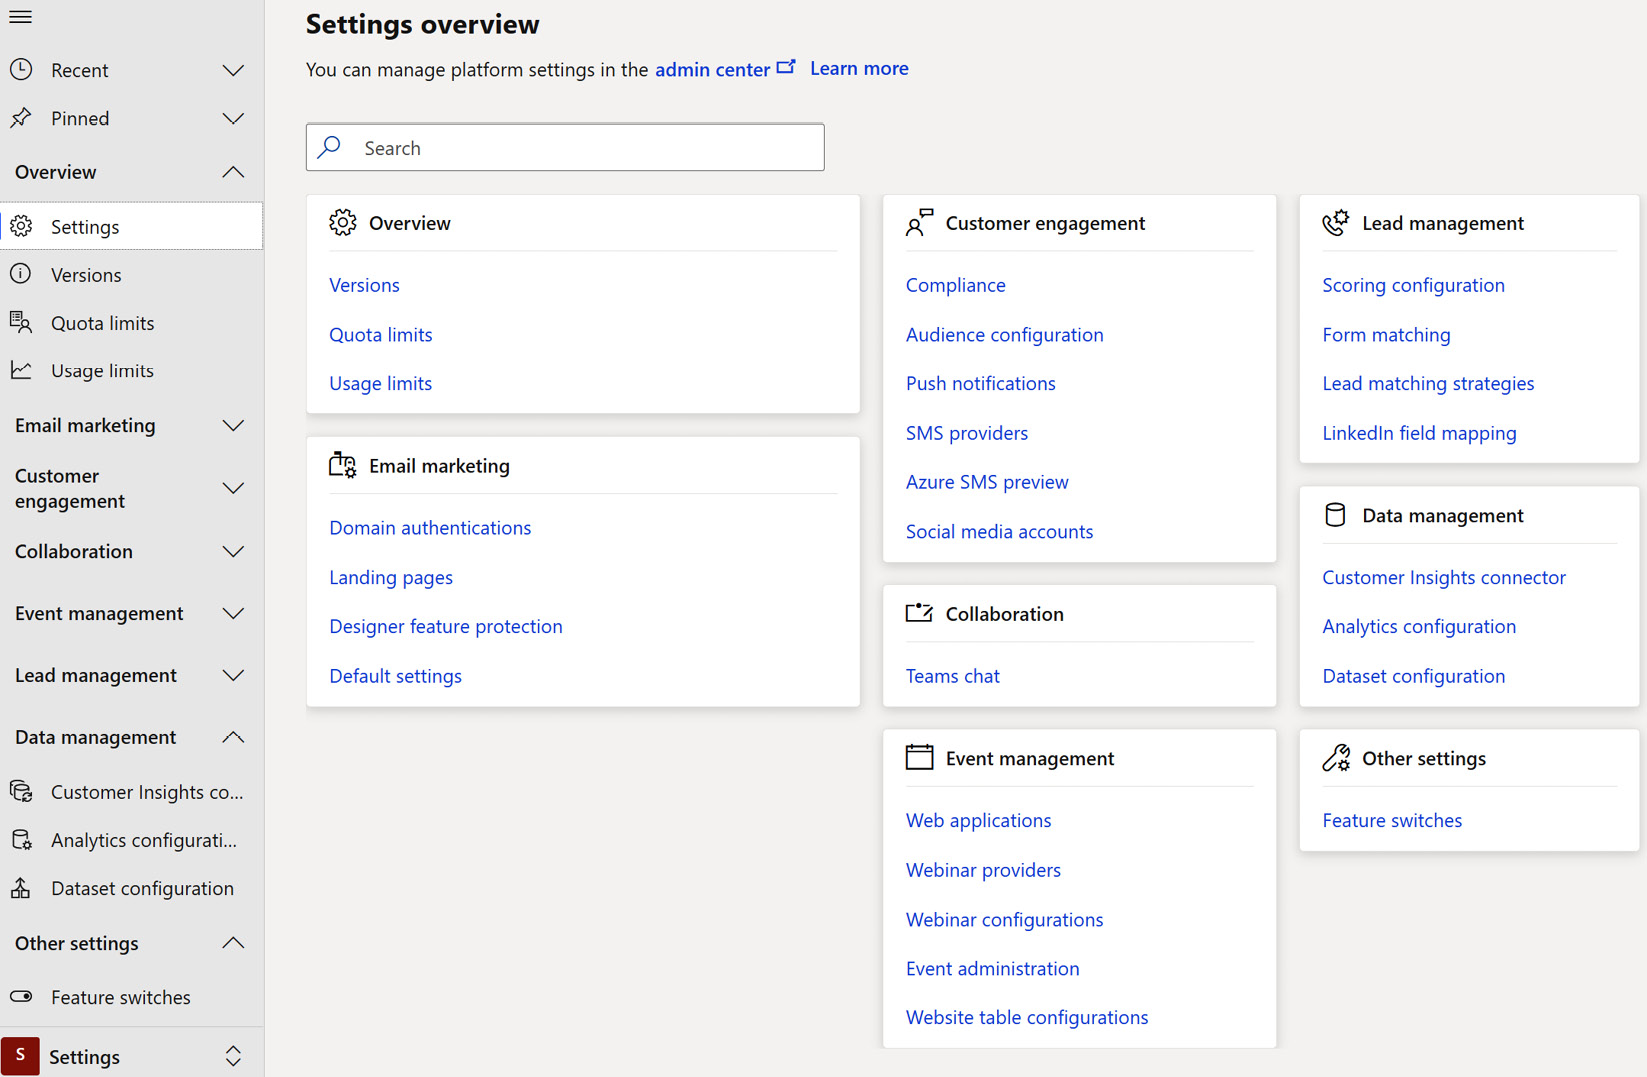
Figure 1.3 – Settings overview
We’re going to go through all of these so that you know what each one does and how you can use them to tailor your system in the best way possible.
Overview
The first area we start with is the Overview area. Here, you can see the available versions, quota limits, and usage limits.
Versions
About once a month, the team from Microsoft comes out with a new version. Some of these contain lots of new stuff, while others just contain bug fixes and minor changes. The Versions area is where you make sure that your Dynamics 365 Marketing is up to date with all the new features. I highly recommend updating the system outside of normal business hours to make sure that you don’t interfere with the usage of the system.
If you set up your system before March 2022, the Versions area is where you activate the real-time marketing features. This book will dive deeper into the features of real-time marketing in Chapter 6, Outbound Customer Journeys, and Chapter 7, Real-Time Marketing Journeys. If you don’t see it on your system, go to Settings | Versions and activate it. This will take a couple of hours.
Quota limits
As we discussed in the first part of this chapter, you get a set of interactions and marketing contacts with your license. In the Quota limits area, you get an overview of what you have used every month based on the licenses you have. You can see how many emails, text messages, or push notifications you have used that month and how much you have left on your quota. You can also see how many marketing contacts you have in Dataverse. If you have gone over your limit of marketing contacts or your interaction quota, then you can buy additional licenses. The contacts in your system with which you haven’t done marketing for the last 12 months move over to regular contacts and no longer count against the quota of your marketing contacts.
Usage limits
On the Usage limits screen, you can see the fair use policy usage limits. Dynamics 365 uses cloud resources for data and processing that are shared with other organizations, and to avoid taking up all the capacity of the tenant, there are limits per organization. You can see these limits in Figure 1.4:
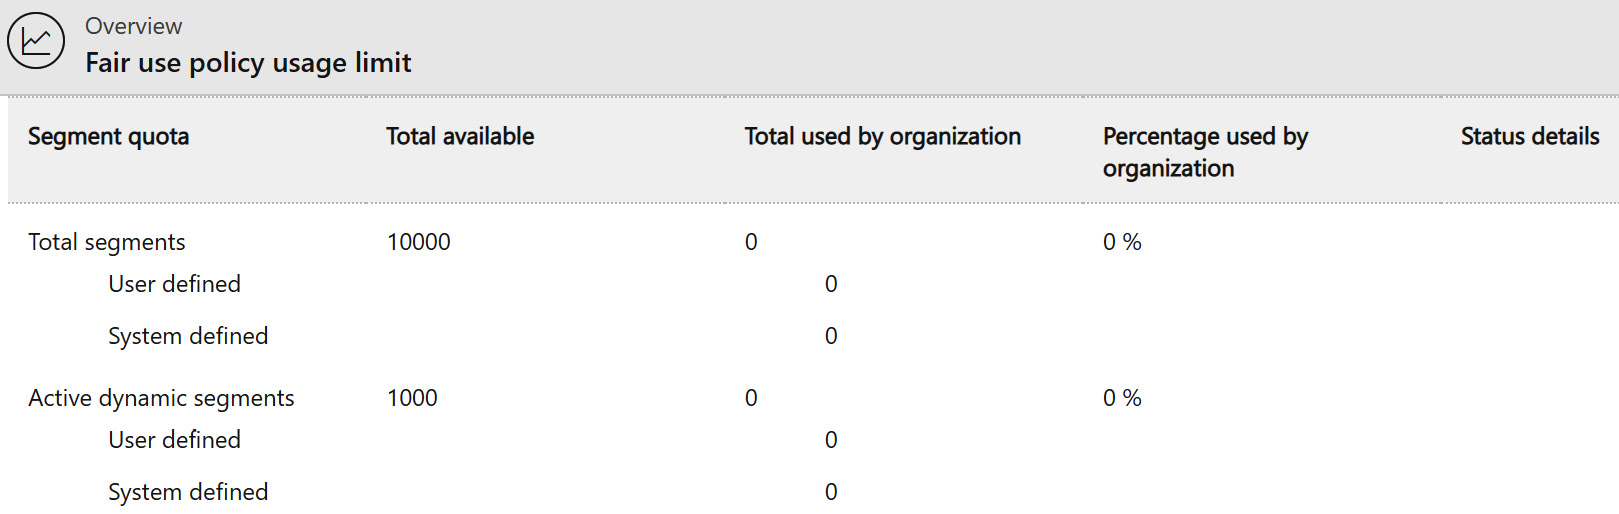
Figure 1.4 – Fair use policy usage limit
Email marketing
For many, email marketing is a fundamental part of their marketing. Email marketing is how a lot of companies share their information with both established and potential customers. There are several settings you should go through to tailor your system to your company’s needs as much as possible.
Domain authentication
When sending an email to a customer or hosting a form, you want the sender to be your organization and the sender’s email to be your company’s email. To be allowed to do this, you need to register your domain in Dynamics 365 Marketing. First, you need to claim your domain through a method called DomainKeys Identified Mail (DKIM). DKIM is an authentication method that tells your users that this is a safe domain and is not used for phishing or email spam. Domain authentication is implemented through the internet’s DNS system; you will need to own your domain before you can claim it in Dynamics 365 Marketing, as shown in Figure 1.5:
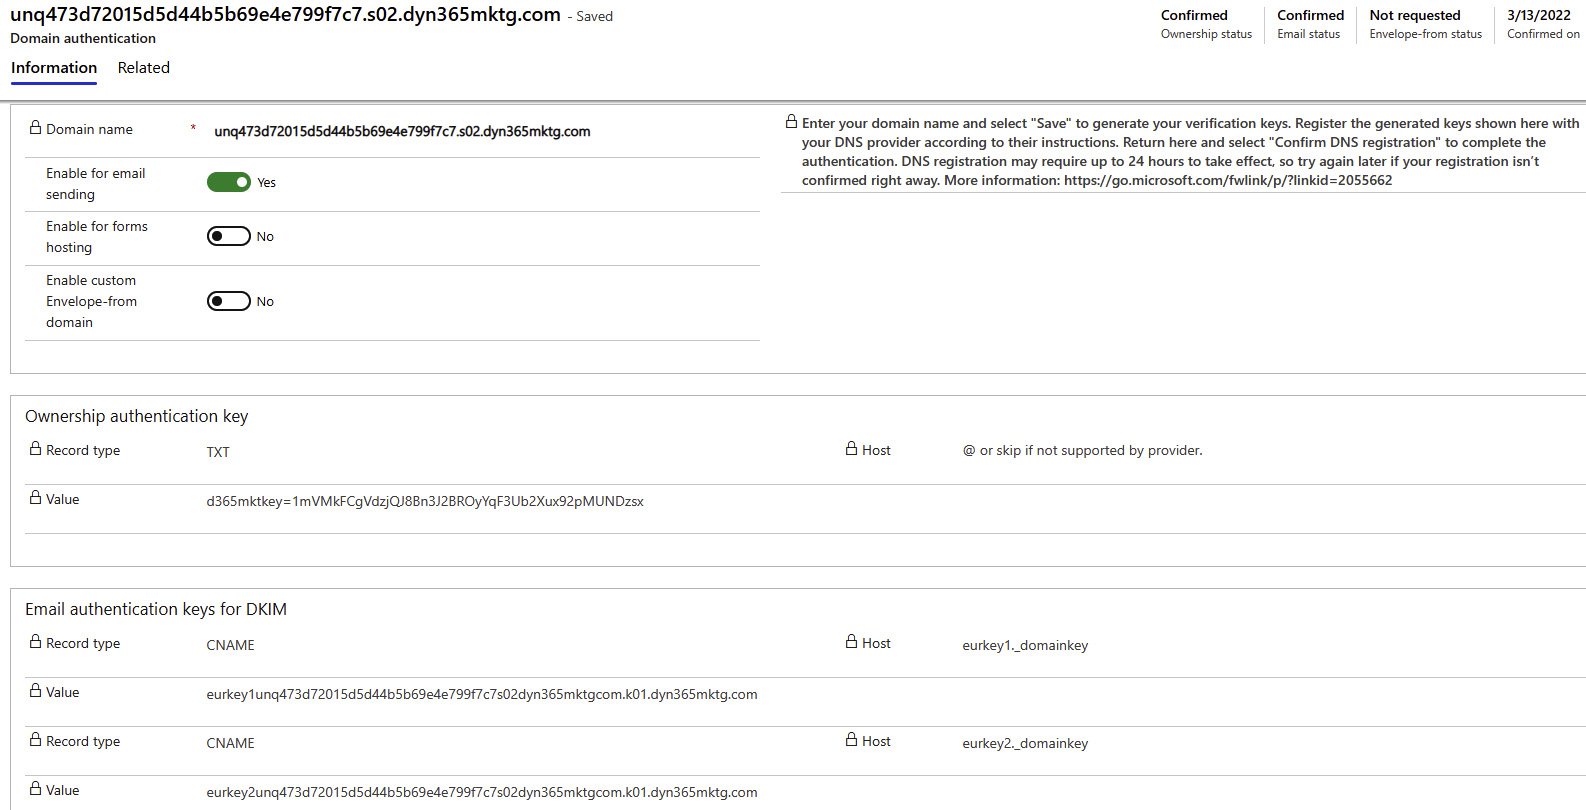
Figure 1.5 – Domain authentication
This means that you cannot send an email in Dynamics 365 Marketing from another domain that you do not own. This is for security reasons – you can only use a domain that you own; otherwise, it will automatically be flagged as spam and will not be sent out by the system. When you start with Dynamics 365 Marketing, you get a default domain that you can use. While it won’t look as pretty as your domain, it gives you a place to start.
Landing pages
The settings area for landing pages is where you create a record for configuring your landing pages. You need to have one record that will act as the default configuration for your landing pages, as shown in Figure 1.6, but you can have multiple configurations for landing pages. Maybe your company has several departments, or you might have multiple companies in the same organization:
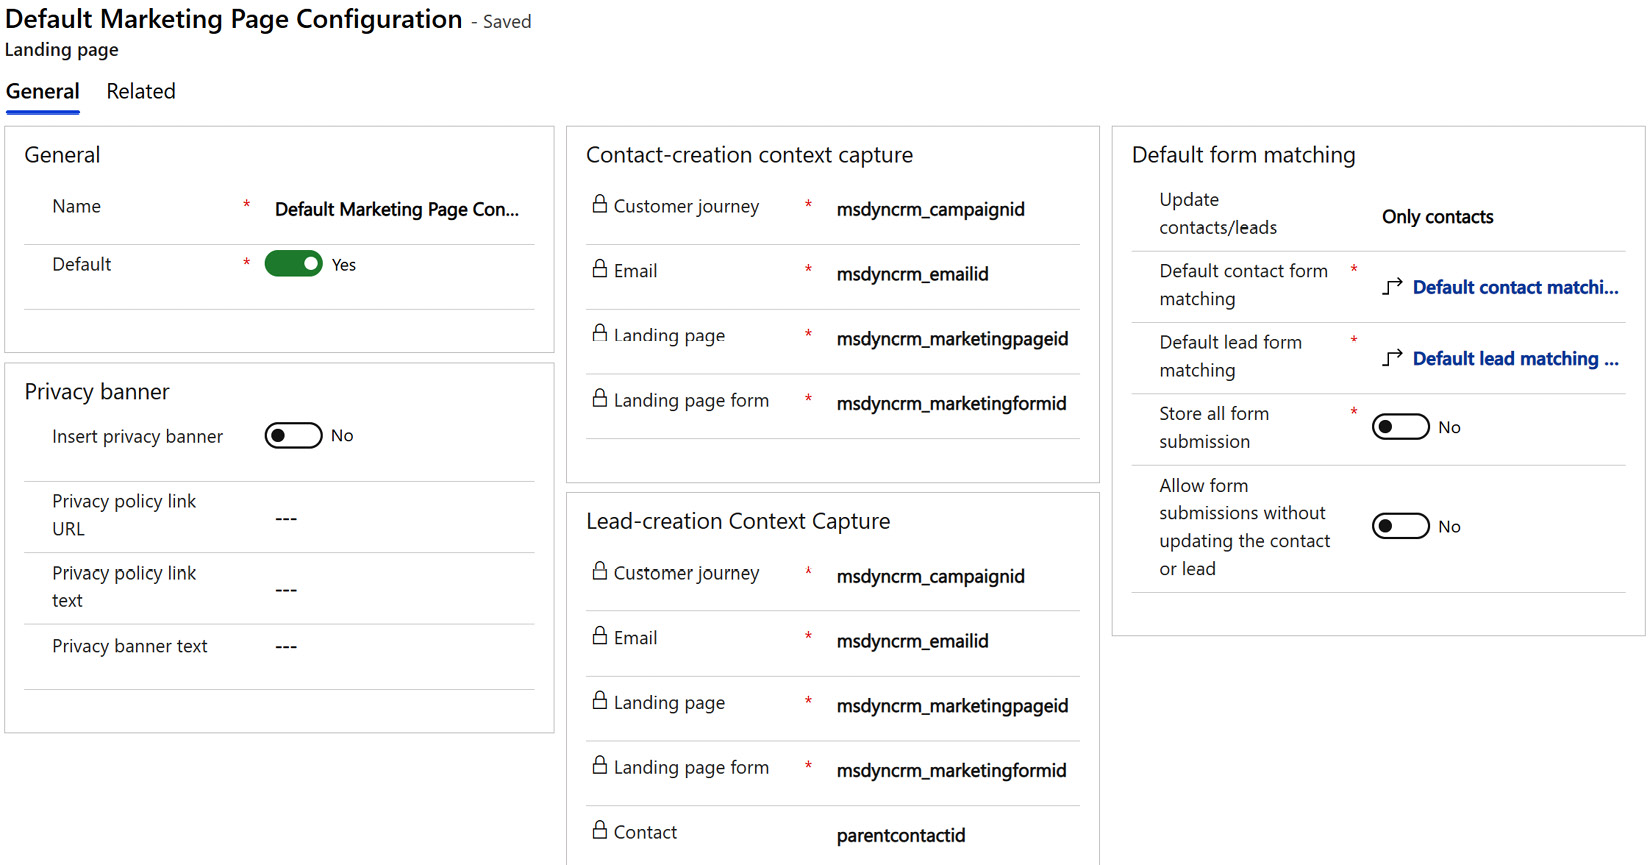
Figure 1.6 – Default Marketing Page Configuration
In the record, you can specify if you want a privacy banner and what links you want in that banner. You can also set the form matching and whether you want to store form submissions and allow submissions where you don’t update the contact or lead. All these settings will impact how your landing pages will behave.
Designer feature protection
There is at least one of these people in every company. You know the ones I’m talking about – the ones that always break the design guidelines or just tweak the email a bit so that it becomes exactly as they wanted. With designer feature protection, you can add a team or a user and block them from using either the HTML features or the Litmus integration (preview functionality for emails you create). This can be great when you need to make sure that everyone in your company is using predefined templates for their emails or landing pages.
Default settings
You can have multiple default settings, but you can only have one default setting record that is the default and will be used as a standard. These are confusing names, but I will make sense of it all later in this book when we go through how you use these settings.
In the Marketing email tab (Figure 1.7), you need to connect to features such as default content settings and default sending domain, which we’ll go through in depth in this chapter:

Figure 1.7 – Default settings – the Marketing email tab
Another important feature to enable here is Litmus integration. Litmus allows you to preview your emails in different browsers and systems. A limited number of previews are included in your Marketing license, but you can always buy more previews directly from Litmus if that’s needed.
In the Customer journey tab, you can set the preferred time zone.
Double opt-in is when you send an email to have the customer confirm that they want to sign up for your newsletter, as you need to confirm that it’s them that signed up for it. The global level double opt-in option allows you to set this for the entire tenant, and you can change the settings for it in the Global level double opt-in tab (Figure 1.8):
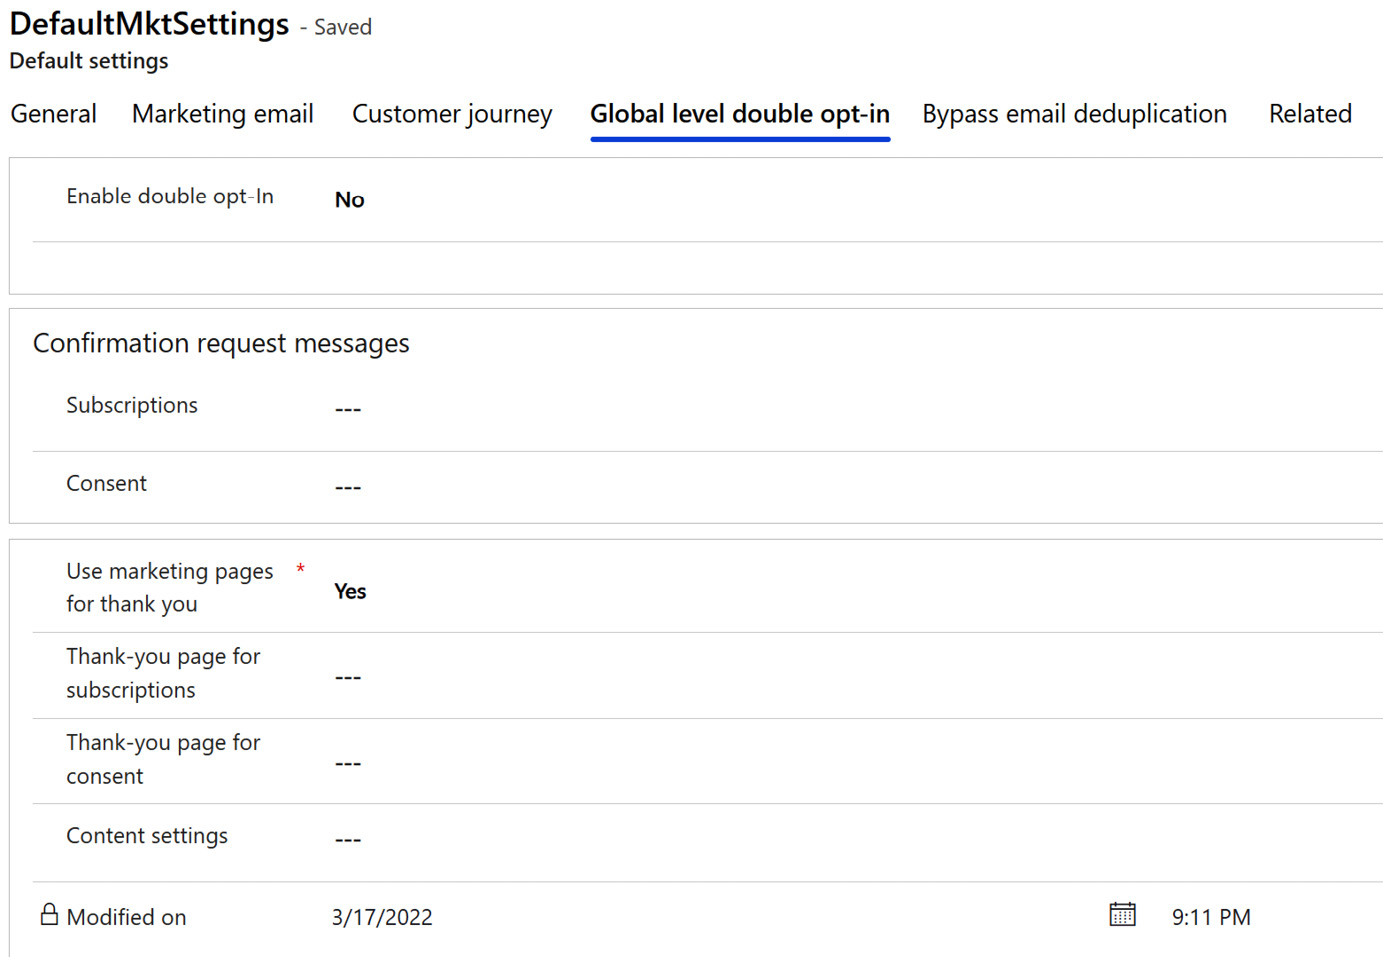
Figure 1.8 – Default settings – Global level double opt-in
Important note
I don’t recommend using this feature – there are only a few customers I’ve met that need to use double opt-in, and I’ve never come across any that should use Global level double opt-in.
The Bypass email deduplication tab is also a rare feature for my customers to use, but some special customers need it. One of my customers is a bank; their customers are parents and their children, often with the same email address. If they want to send out an email that’s personalized to each of their customers, they can use Bypass email deduplication so that only one of these emails is sent out, even if it is supposed to go to each contact, so long as it’s the same email. They need to change this setting to Yes if they want multiple emails to be sent to the same email address.
Customer engagement
In the Customer engagement section, we can find areas for compliance, audience configuration, push notifications, SMS providers, Azure SMS preview, and social media accounts. Let’s take a look at all of these.
Compliance
With the importance of the GDPR and privacy, you need good features to help you make sure you use the system correctly. There are different options for this, including Outbound consent and Real-Time consent. Let’s take a look at what the different options are.
Real-Time consent
In the Real-Time consent part of compliance (Figure 1.9), you can decide if you’re going to use a restrictive or non-restrictive consent model. If you’re somewhere where the GDPR is in play, you need to use the restrictive model, which means you can’t send anything to customers without their consent to do so. The non-restrictive model means you can send commercial information to every customer until they opt out.
You can also specify whether you want to get tracking consent from customers and fill out the physical postal address for your company:
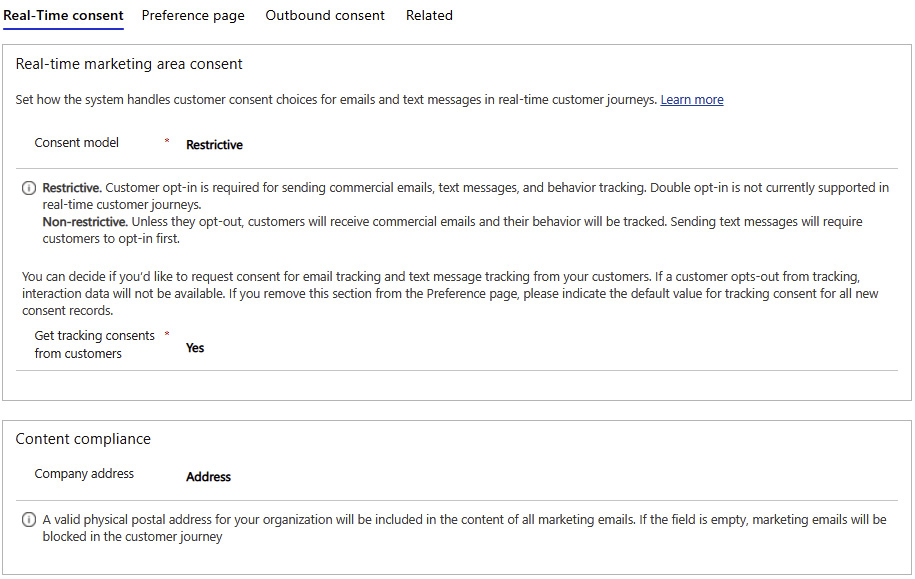
Figure 1.9 – Compliance – Real-Time consent
Preference page
The Preference page options (Figure 1.10) are where you edit the page your customers go to so that they can change their preferences for things such as whether you can send them information or not via email and/or SMS:
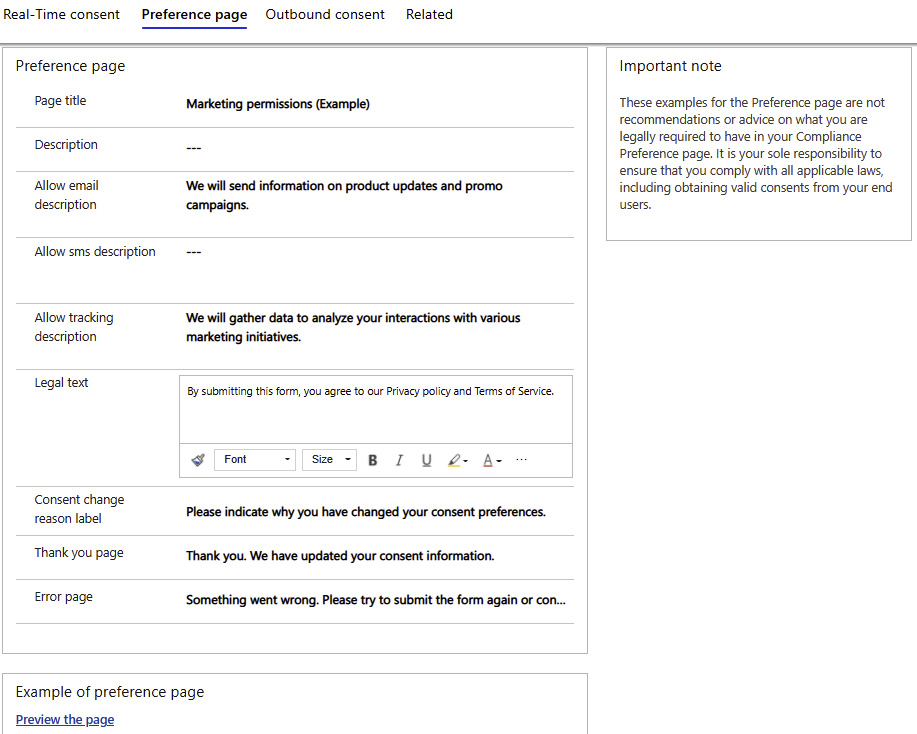
Figure 1.10 – Compliance – Preference page
You can also preview the page to see how the page will appear to your customers, as shown in Figure 1.11:
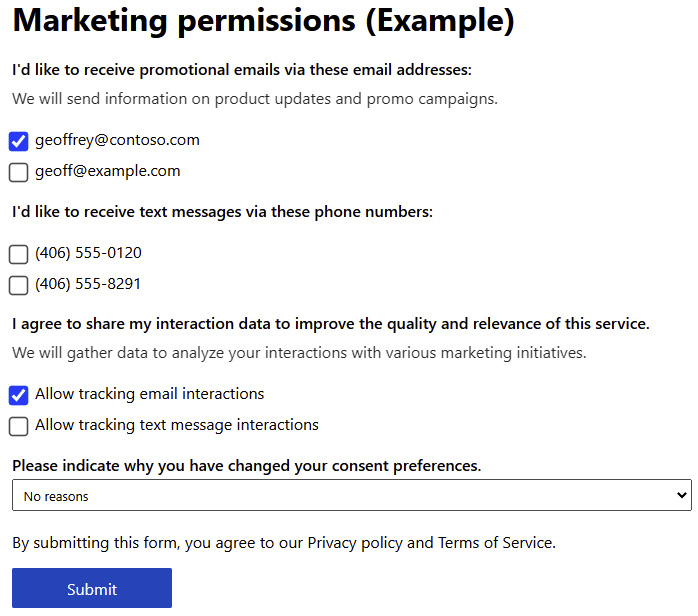
Figure 1.11 – Compliance – Preview of Preference page
Outbound consent
In the Outbound marketing consent area (Figure 1.12), you must decide if you want to enable a dropdown in the outbound customer journey and if you want to log the changes on that field:
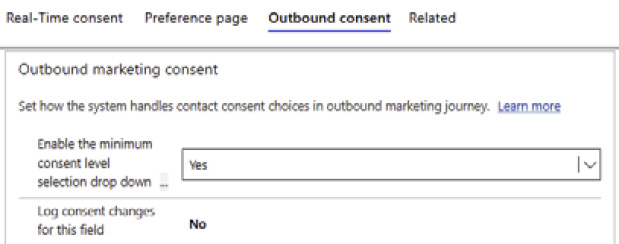
Figure 1.12 – Compliance – Outbound consent
Audience configuration
In real-time marketing, you can send information to contacts, leads, and/or customer profile entities. Both contacts and leads use the default fields for email and phone numbers, so if you aren’t using the default fields for email and phone, you’ll have to go into the audience data configuration options (Figure 1.13) and edit the recipient fields:
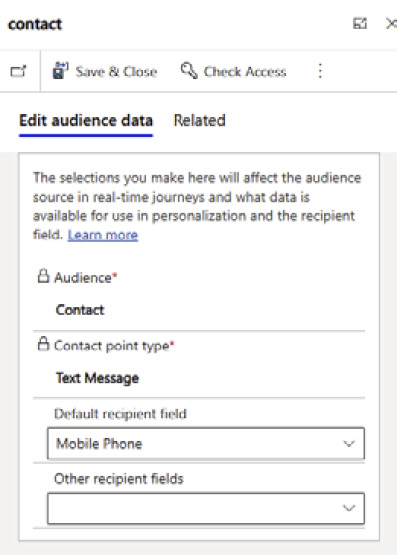
Figure 1.13 – Audience configuration
Push notifications
To use push notifications in Dynamics 365 Marketing, you will have to have a complete app already available on the iOS App Store and/or Google Play. To connect the app and Dynamics 365 Marketing, you need to create a new mobile app configuration, as shown in Figure 1.14:
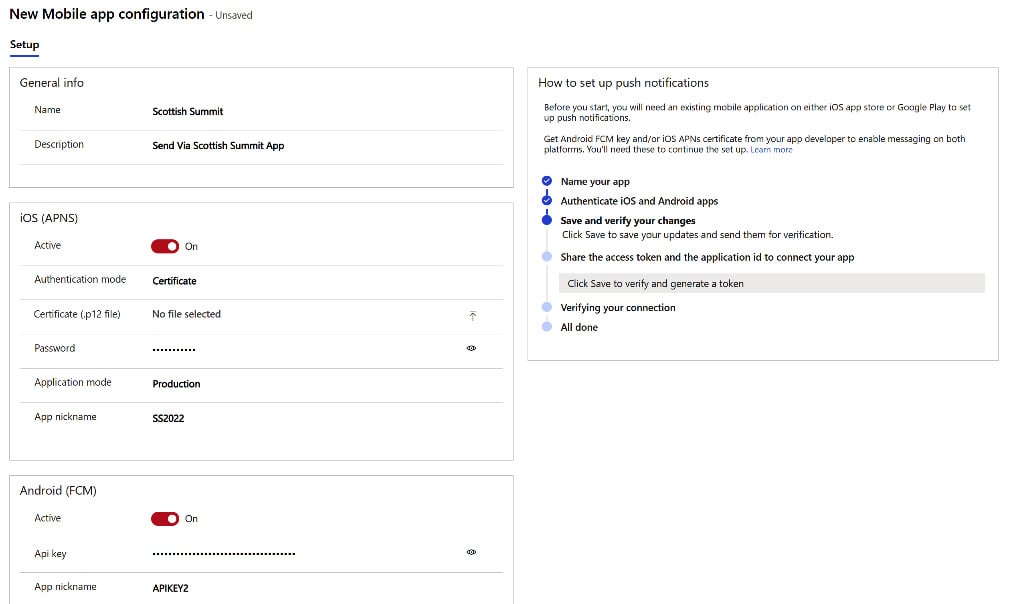
Figure 1.14 – Mobile app configuration
In the configuration, you need to get the Android FCM key and/or the iOS APN certificate from your developers. When you’ve created a new mobile app configuration, you get the access token and application ID you will need to connect your app to the system. Now, you can start using push notifications directly from Dynamics 365 Marketing in your app.
SMS providers
In Dynamics 365 Marketing, you have the option to connect to two out-of-the-box SMS providers, either TeleSign or Twilio, as of October 2022. From October 2022 you have the option of creating a custom channel where you can connect to your local provider. To use either provider, you must become a customer of them, after which you can connect the provider to your Dynamics 365 Marketing instance, and then use the provider to send your text messages. After you become a customer, you need to fill in the details shown in Figure 1.15 to connect with your SMS provider:
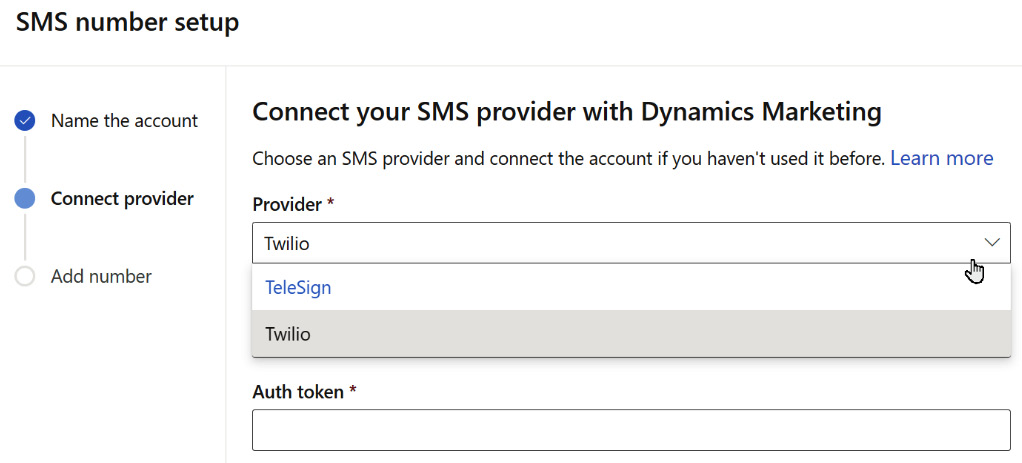
Figure 1.15 – SMS number setup
You will need some information from your provider so that you can register your number. Then, you’ll be ready to start sending SMSs from the system.
Azure SMS
The third choice of SMS provider is the SMS functionality in the Azure communication services, which lets you send out text messages in bulk, have a two-way conversation, and get access to analytics. To see where the data from Azure communication services is available, along with any geographical restrictions, check the page at https://docs.microsoft.com/en-us/azure/communication-services/concepts/privacy.
To learn more about subscription eligibility and number capabilities, visit https://docs.microsoft.com/en-us/azure/communication-services/concepts/numbers/sub-eligibility-number-capability.
Social media accounts
Social media is a big part of marketing, and Dynamics 365 Marketing gives us the functionality to work with social media through the platform. To create social media posts directly from Dynamics 365 Marketing, you will have to set up the connection between the system and your social media profile, which you can do by accepting the terms and conditions and giving the configuration a name (Figure 1.16). When you click Create, you need to sign in to the social media account:
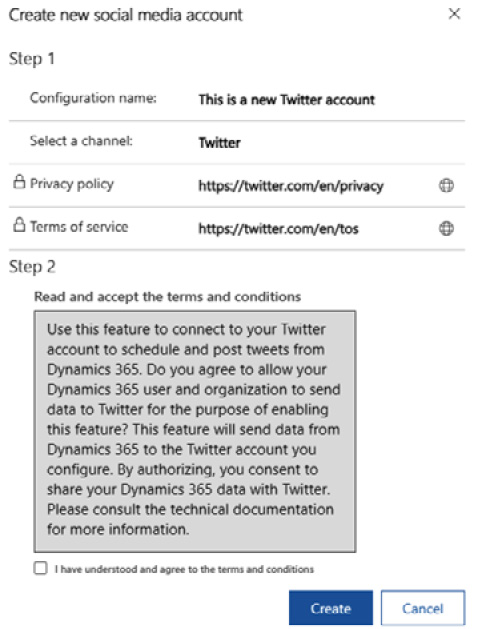
Figure 1.16 – Create new social media account
You will need to sign in to your Facebook, Twitter, LinkedIn, or Instagram account before you can utilize the social media posting feature.
With LinkedIn, you can also connect your account with LinkedIn Lead Gen Forms. Be aware that the LinkedIn user profile (Figure 1.17) is set up a bit differently than other social media, as you always need to connect to it with your own personal LinkedIn that is connected to your company’s LinkedIn site. If you have any campaigns or Lead Gen Forms, the information from these can be automatically sent to your system:
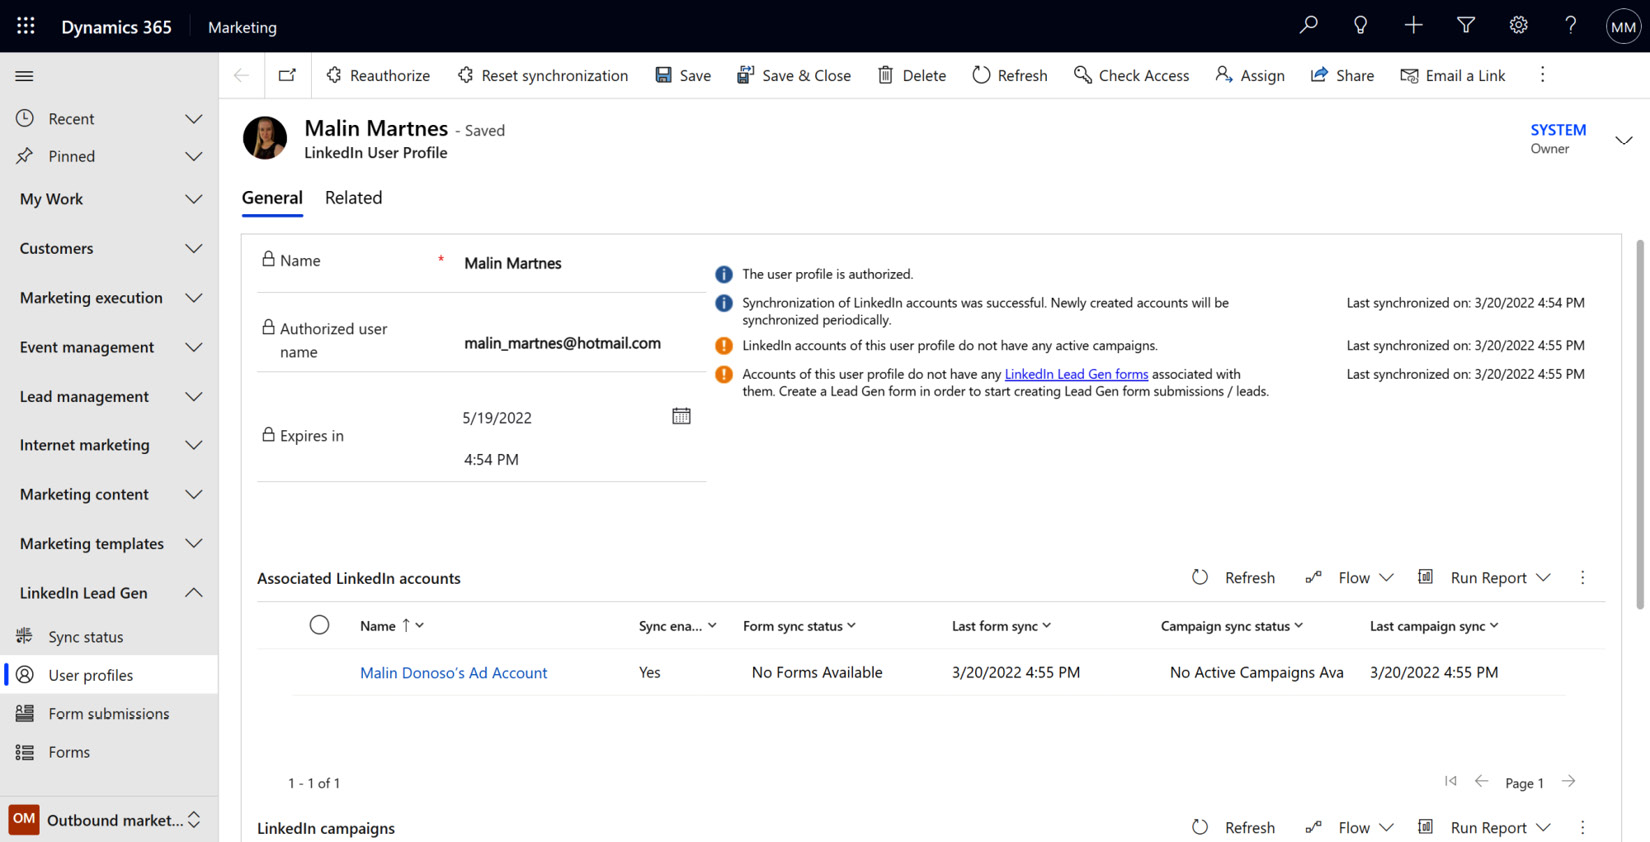
Figure 1.17 – LinkedIn user profile
Collaboration
Collaborating with your colleagues is getting more and more important and Dynamics 365 Marketing has features to help you with this.
Teams chat
Over the last couple of years, Microsoft Teams has become increasingly popular across the globe. In the Teams chat settings area, you can turn on the ability to link your records to different Microsoft Teams channels, which allows you to pin records and views in your Teams channel from Dynamics 365. Another feature allows you to turn on confidential labels so that you can create private teams that only you and selected users have access to.
If you and your team want to chat about the new campaign you are creating in Dynamics 365 Marketing in Teams, this Teams chat can be linked to a record in Dynamics 365, thus storing all the information about this specific customer journey in one place. These two systems working together makes it even easier for marketers to collaborate and share information about the marketing efforts they do for your company.
Event management
The Event management module is one of the features that most separates Dynamics 365 Marketing from other marketing automation tools, so naturally, there are some settings you need to go through before you can start using it. We will look at some of these in the following sections.
Web applications
If you are using APIs to interact programmatically with events, you need to register them in web applications.
Webinar providers
If you want to use another third-party webinar host, you can use On24, for which there is a record already set up, but you rarely need to go into this setting.
Webinar configurations
To use On24 as your webinar host, you need to set up a webinar configuration where you can add your credentials to On24 and connect the two systems.
Event administration
The most important setting in New event administration is Match contact based on, as shown in Figure 1.18.

Figure 1.18 – New Event administration
When a customer registers for an event, this is the field that defines the matching criteria for contacts. If the event participant registers their details, and these match in terms of email, first name, and last name, then the registration for event participation will be connected to the contact. All of these attributes need to match to deem it a contact match. If you have duplicates in your system, then it also makes sense to match on email, first name, and last name to ensure it’s the correct contact.
If you’re in your production environment, you should never enable the demo payment confirmation. This is only meant to be used if you’re doing a demonstration.
Website table configurations
If you want to connect with the event API and expose custom fields, you need to set up website table configurations.
Lead management
Leads are an important part of your system. You can read more about this in Chapter 2, Managing Leads, Accounts, and Contacts. To work with leads and utilize the leads you have in your system properly, you have several settings to do in lead management. Let’s go through the most important aspects of lead management.
Scoring configuration
If you want to use lead scoring in Dynamics 365 Marketing, you must have one scoring configuration. One possible setup is shown in Figure 1.19:
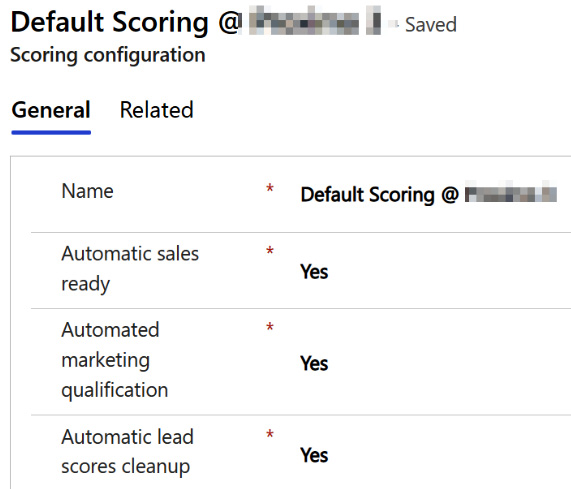
Figure 1.19 – Scoring configuration
When you set Automatic sales ready or Automated marketing qualification to Yes, this will change the out-of-the-box Business Process Flow for the lead. If the lead is Sales-ready, it’s ready for the sales team to take over to work with the lead. If it’s automatically marketing qualified, this means that marketing has approved the lead and the status in the Business Process Flow changes automatically.
The Automatic lead scores cleanup option allows you to specify what will happen with the calculated scores if you stop a lead-scoring model – that is, whether it will remove or keep all the scores of existing leads.
Form matching
Nobody wants duplicates in their system. The Form matching area of the settings is where you set up how you want to match your contacts and leads from forms. You can specify which attributes need to match to map new leads or contacts coming into the system, as shown in the following screenshot:
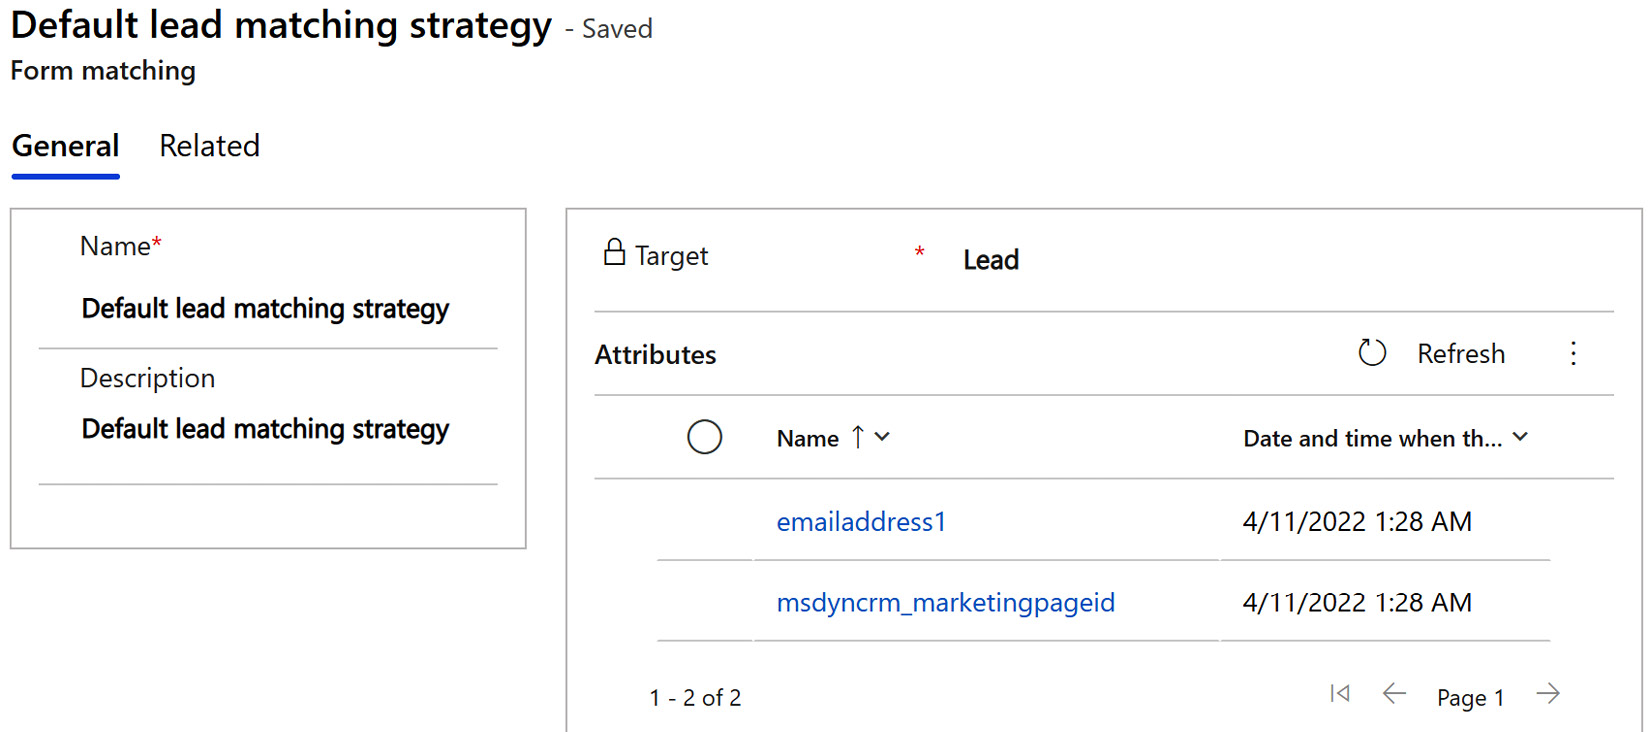
Figure 1.20 – Form matching
Commonly used matching strategies include email addresses and/or phone numbers. You always have one default contact matching and one default lead matching strategy, but you can also have multiple types of strategies that you can use on different landing pages.
Lead matching strategies
In the Email Lead Matching Strategy (Default) area (Figure 1.21), you define how to connect the leads coming from LinkedIn into your system, with the choice of always creating a lead or enabling contact creation. You need to set which matching leads fields you want to use:
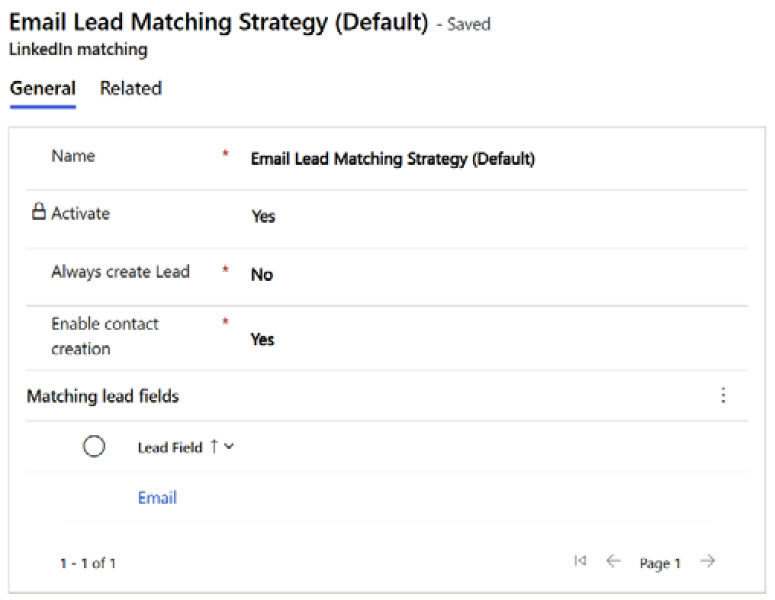
Figure 1.21 – LinkedIn matching
LinkedIn field mapping
In the Active LinkedIn Field Mappings area (Figure 1.22), you define which field from LinkedIn is connected to which field in Dataverse. The reason you do this is to be able to collect all the data from LinkedIn and place it in the correct fields in Dynamics 365 Marketing. If you don’t map them, the system doesn’t know where to store the information and just ignores it:
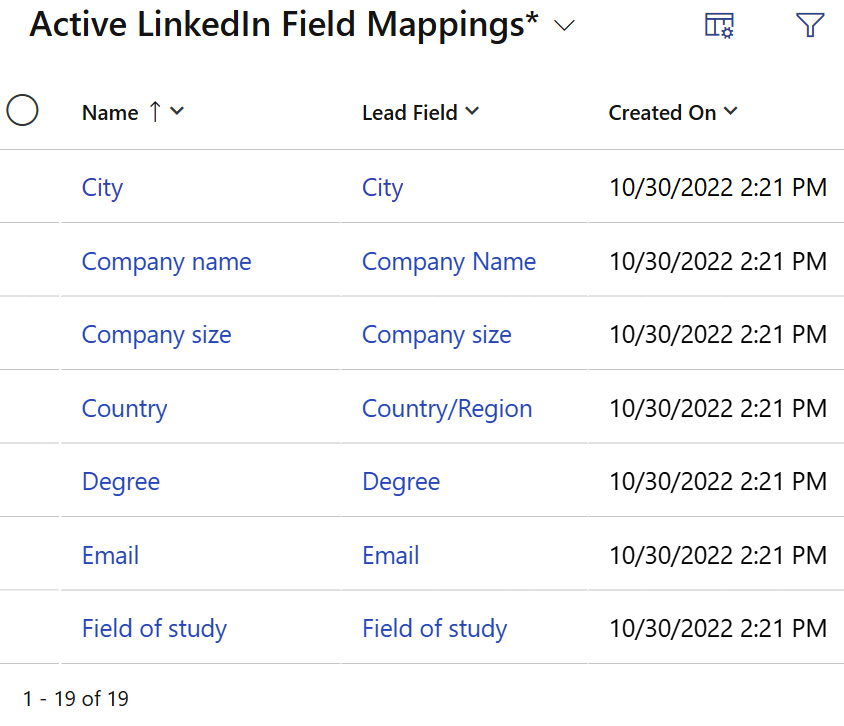
Figure 1.22 – Active LinkedIn Field Mappings
Data management
One of the big advantages of working in the Microsoft ecosystem is the possibility to connect to other Microsoft systems. In this section, we’re going to go through the Customer Insights connector, analytics configuration, and dataset configuration.
Customer Insights connector
The Customer Insights connector (Figure 1.23) lets you connect Dynamics 365 Marketing to Dynamics 365 Customer Insights. Customer Insights is a system that gives you a 360-degree view of your customers using data coming from multiple systems across your company. This gives you a unique opportunity to get insights and helps create segments that you can use in Dynamics 365 Marketing. You will learn more about Customer Insights and the benefits of integrating it into Dynamics 365 Marketing in Chapter 10, Power Platform:
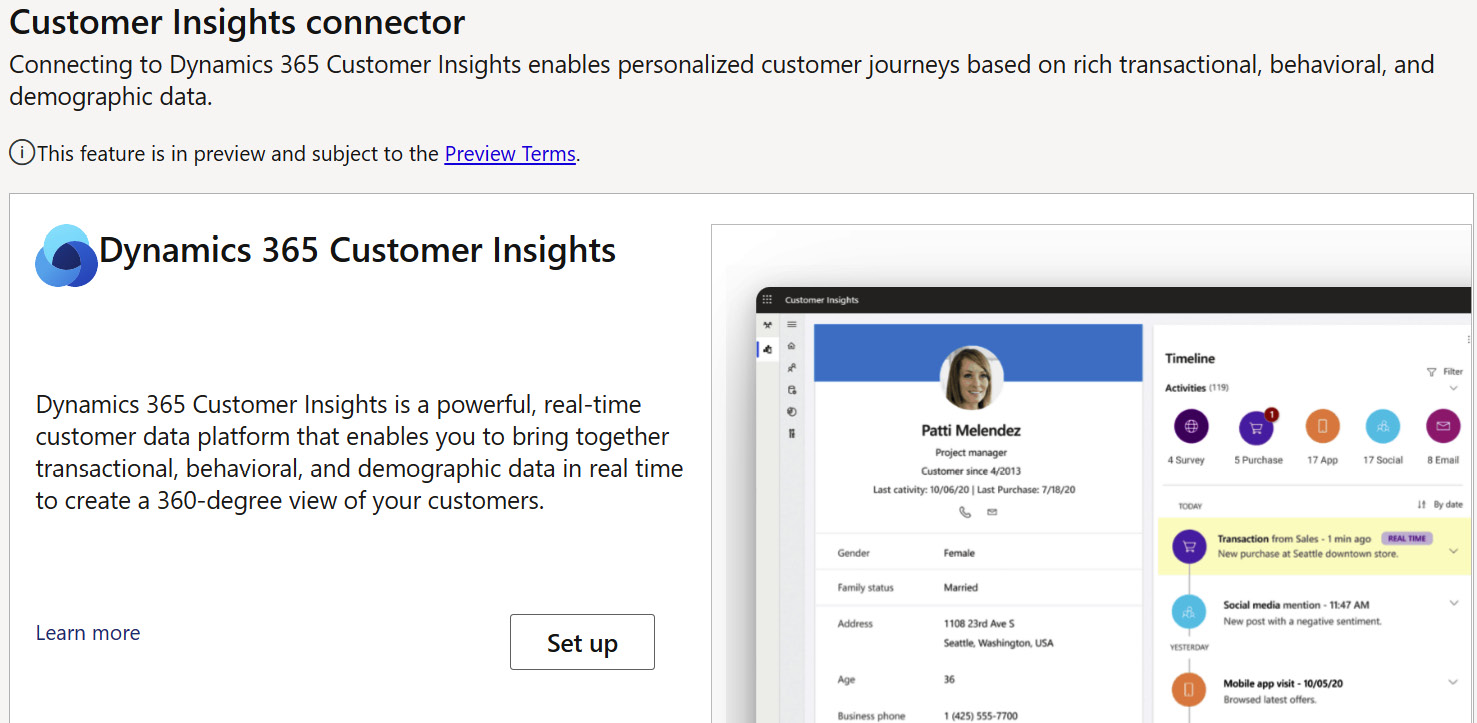
Figure 1.23 – Customer Insights connector
Analytics configuration
In the Analytics configuration area, you can add your existing Azure Blob storage. Many companies connect multiple systems with their Azure Blob storage, such as Power BI or other analytics systems.
Dataset configuration
Imagine you have a lot of custom tables in Dataverse, and you want to do any of the following:
- Use those custom tables in queries in your segments
- Want to show them as dynamic data in your email messages
- Want to use the column values of these tables in lead scoring
- Want to export data to Azure Blob storage
To do so, you have to go into your Dataset configuration area (Figure 1.24) and add your custom tables:
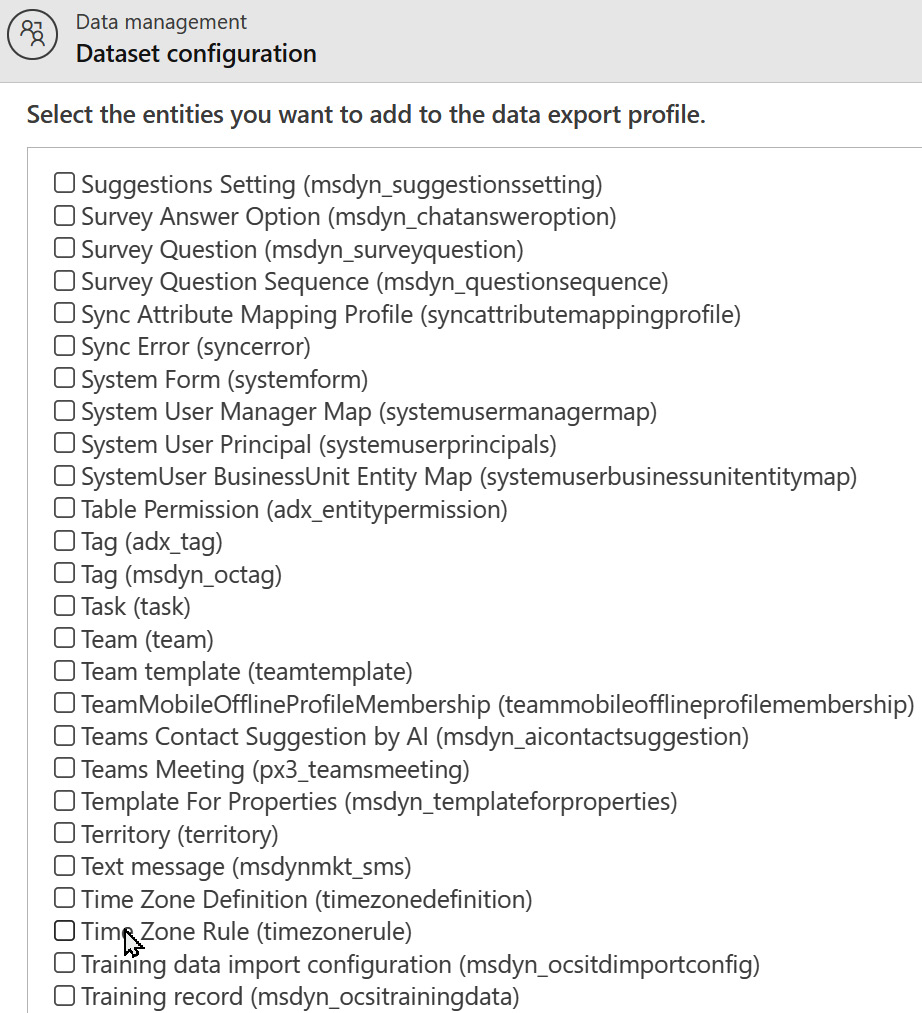
Figure 1.24 – Dataset configuration
It’s important to know that if you add tables to the configuration, you cannot remove them again later. To be able to synchronize these tables, you will need storage space and processing time, so you should never sync tables that you will not use. Be sure that you know which specific tables you need for your work with analytics, dynamic email content, segmentation criteria, and lead scoring.
Other settings – Feature switches
In the Feature switches area (Figure 1.25), you can enable or deactivate several features such as integration with Customer Voice, the usage of event registration forms, and the required consent level to use the smart scheduler. Remember that after you’ve made changes in the settings for the different features, you need to click Save in the top-right corner.
The feature switches are always changing with the new features that are coming. As of August 2022, the following features are available:
- Business unit scoping: If your company has several business units (or perhaps you have two different companies in one system), you can differentiate between the marketing process and data for the different business units.
- Event registration forms: The event registration forms are useful if you’re using event management in Dynamics 365 Marketing and want to have participants register through your forms and fully utilize the system.
- Updated customer journey designer: This offers new features for designing customer journeys.
- New canvas experience and content blocks: When you enable this feature, you get the new and improved version of creation and content blocks.
- Brand profiles: Brand profiles are great if you have different brands that you do marketing for. When you turn this option on, you get the choice to simply choose different brand profiles for a marketing email, for example.
- Conditional content in email editor: This feature is only available in real-time marketing. You can now create personalized messages much more easily than previously.
- Data sharing program: You need to be very careful with this feature if you’re in the EU. This gives Microsoft permission to review and access your customer data to develop better AI models.
- Customer voice integration: This is the feature that enables Dynamics 365 Customer Voice integrations with Marketing.
- Smart scheduler: This lets you specify which level of consent is required from your customers to use the smart scheduler, which allows you to send emails to your different customers at their preferred times:
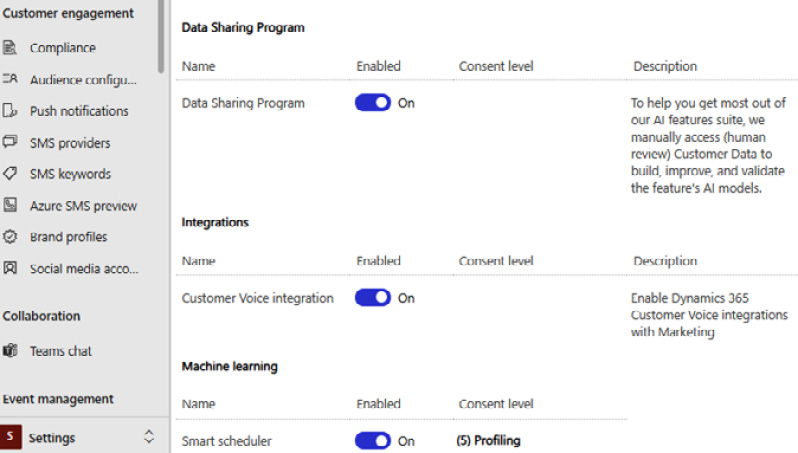
Figure 1.25 – Feature switches, parts one and two
With that, we’ve gone through all the system settings and made sure our system is set up correctly. We’ve tailored the setup to our company’s needs. Now, we’re ready to start using it. One of the first things we should create is templates.