
An editing workflow overview
At the very highest level, every editing job is the same. You shoot — or somebody else shoots — some footage, which is then copied to your system and backed up for safety. You choose the best parts of the best clips, and then arrange them in sequence. You trim and re-arrange, tweak color and audio, and then add titles. You gain approval from the client (who could be you), and then you make further changes. When everyone’s happy, you export the final file. The file is uploaded, or otherwise sent to its destination. The original files are then archived to make room for future jobs or kept for further editing. Sounds simple, right? It can be, but often isn’t. There are several complicating factors, but it’s easy to keep it simple — and that’s what I’d recommend for many first-time editors.
Terminology
FCP uses some unique terms, but here is a quick summary:
- A Library holds all the data for a job.
- Each Library contains one or more Events.
- Each Event contains Clips and/or Projects.
Importantly, a Project is an edited sequence of clips that forms the final output — a timeline, if you prefer. I like to use the term job when talking about a high-level task, such as a collection of finished videos for a client.
Clips and Projects live in Events, and Events live in a Library. You can open multiple Libraries at the same time, but to recap, here’s a handy diagram of just one:
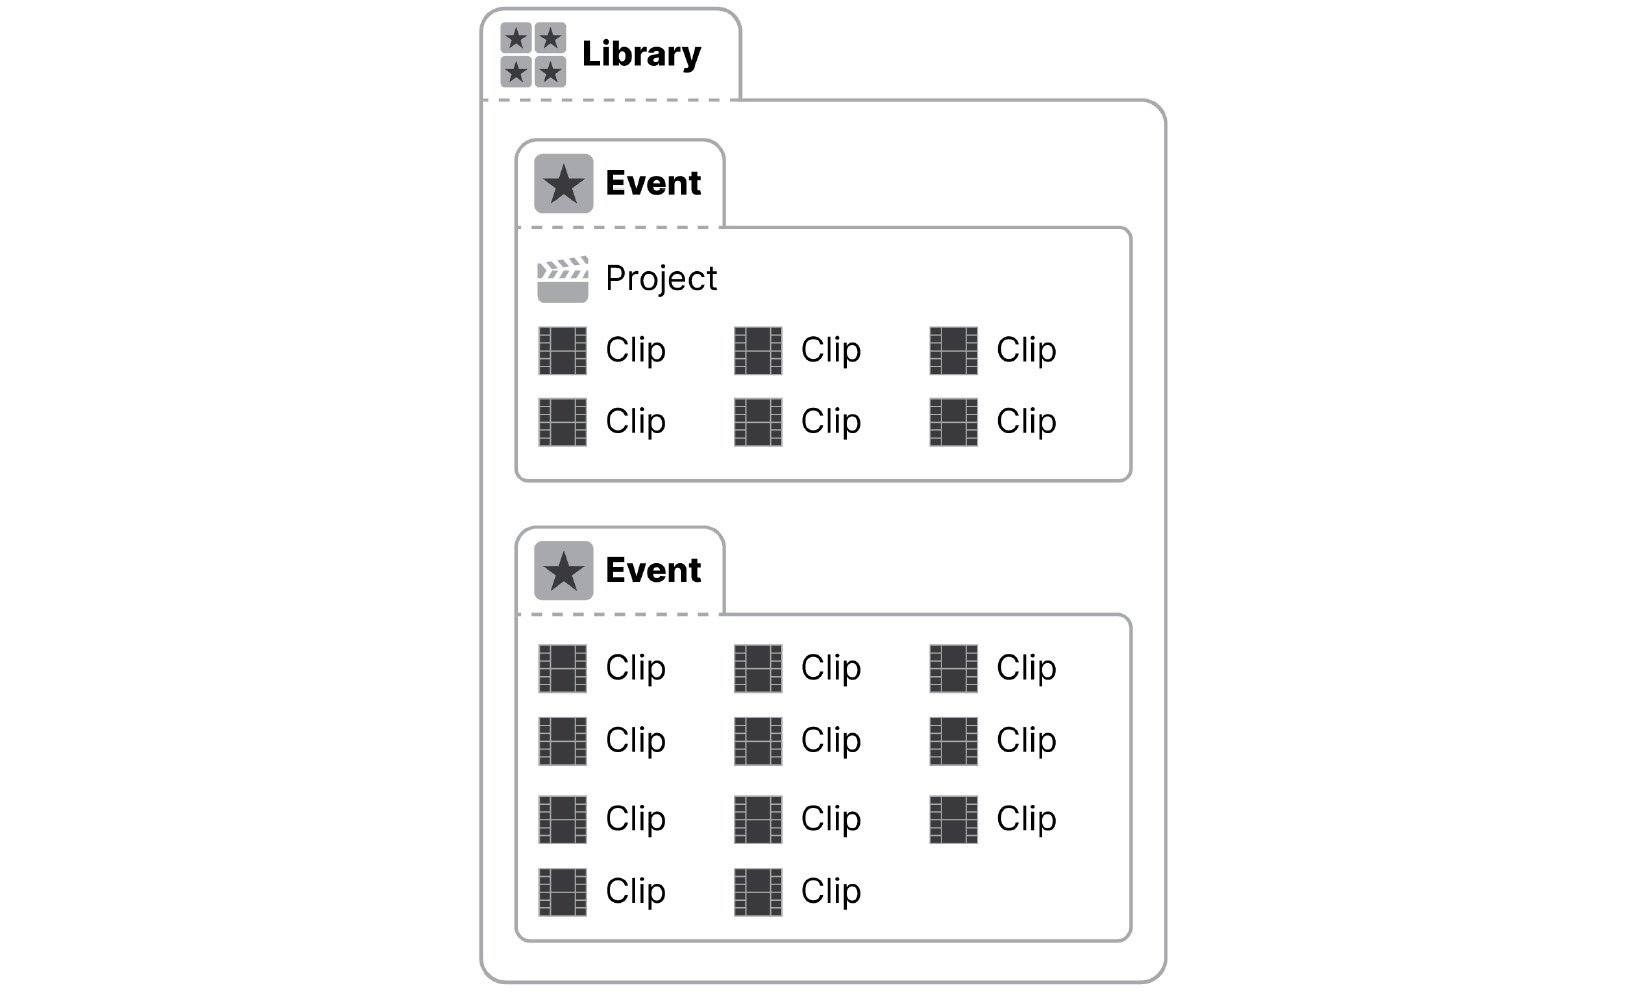
Figure 1.21: A simplified diagram that shows Clips and Projects inside Events, inside a Library
If you’ve edited before, you might be expecting some other terminology, such as bin or sequence, and those concepts do carry across. A sequence is a Project, and a bin is a collection of clips that can be exactly re-created with a Keyword Collection.
Depending on your personal preferences, there are many ways to work with the Library/Event structure. My following recommendation is simple:
While it’s possible to keep everything in a single Library, it will soon become very large indeed — slow, and hard to back up. Ongoing jobs such as home video can be controlled by creating a new dedicated Library every year, or every month.
When you create a new Library, you’ll be immediately asked where you want to save it, and the answer is: on a fast drive with plenty of space. (More on this in Chapter 3, Bring It In: Importing your Footage.)
And Events? When a Library is created, a new Event is automatically created inside the Library, named with today’s date in your system’s date format. You can simply use this Event to hold everything, but for more complex jobs, you might create additional Events, to hold different groups of clips or different Projects (timelines). One way I like to work is to create a new Event for each day in a multi-day shoot, and I like to keep my Projects (timelines) together in another Event. Short jobs just need one Event, while bigger jobs benefit from more. But there are many ways to work, and you can change your mind down the track.
Workflow
This book is structured the same way as most edits, and you can use your own footage alongside it if you wish. Not every edit will go in exactly this order, but many will be pretty close, and this is a great way to explore the program if you’re not sure how to get going. Use this outline as a starting point, and change it up as needed. We’ll start the process (and the book) with:
Part 1: Importing and Organizing
Chapter 1. Quick Start: An Introduction to FCP
You’re reading this now!
Chapter 2. Before the Edit: Production Tips
You need to make sure you shoot in the right formats, with the right cameras, and shoot the right things to make an edit work. This is the only chapter in the book that’s not strictly about FCP, but it’s still important.
Chapter 3. Bring It In: Importing your Footage
No matter how many Events you decide to use, you’ll want to import your footage. This should be easy but there are a few different ways to work, and you’ll hear strong opinions about which way is best.
Next, you’ll sync up clips shot with multiple devices that recorded the same scene at the same time, such as two or three cameras, or an audio recorder and video camera. If you used good practices on set (Chapter 2, Before the Edit: Production Tips) then this will be straightforward.
Chapter 4. Sort It Out: Reviewing and Keywording
First, you’ll watch what you’ve shot, or have been given, and there are a number of good ways to do that. After or during that process, you’ll organize your footage using Keywords, putting them in “virtual buckets” for easier retrieval later on.
Chapter 5. Choose Your Favorites: Selecting, Rating, and Searching
After keywords come Favorites, which mark the best parts, and possibly Rejecting, to mark the parts you won’t use. Marking up your clips here is a far more useful method than the traditional technique of making timeline-based collections of clips you like, because your choices are permanently recorded and searchable, and you can instantly refer back to them way down the track. This is a trick that only FCP can really offer, and it’s a fantastic way of working.
The next part of of the process (and, again, the book) is editing:
Part 2: Rough Cut to Fine Cut
Chapter 6. Build the Spine of the Story: Quick Assembly
With all the clips organized, you finally make a Project, matching the technical requirements (frame rate and resolution) of what you want to deliver. Those may be the same settings you shot with, though if they’re different it’s not the end of the world.
With a view on the organized footage, you’ll build up a rough cut, getting the best parts of the best clips in order on a timeline, until it all sounds good. Maybe you’ll drag and drop; maybe you’ll use keyboard shortcuts; but you’ll definitely use a few basic edits to trim, cut, rearrange, and delete your clips.
Chapter 7. Cover It Up: Connections, Cutaways, and Storylines
Now, you’ll get a little fancier, disguising edits, adding clips above or below other clips, using the B-roll you shot to make your edit feel more complete, moving clips around, and fleshing it all out. You might use Storylines to group connected clips together, and you might use three-point editing if you want to be precise.
Chapter 8. Neaten the Edges: Trimming Techniques
Further finesse your edit, to make sure every frame is needed and is in exactly the right place. Slip, slide, and roll your edits, and use the precision editor if you wish. Soften any audio edits that need it, expand and collapse audio, and use plenty of shortcuts.
Chapter 9. Consider Your Options: Multicam, Replacing, and Auditions
This chapter discusses how to deal with Multicam media in the most efficient way. With or without Multicam, you’ll learn how to revisit your earlier choices, switch clips out for other clips, swap one music track for another, and generally try to make the edit even better.
Chapter 10. Explore a Little: Compound Clips and Timeline Tricks
If you’re wanting to try something fancier, such as treating a group of clips as a single clip, or you’re becoming frustrated with the magnetic timeline for some reason, this is where you discover how the Timeline Index works, how to lift and merge, and how to use the Position tool. With luck and good planning, you won’t need to relink media, but this chapter has some tips on that too.
With the edit locked (or nearly locked?) it’s time for:
Part 3: Finishing and Exporting
Chapter 11. Play with Light: Color Correction and Grading
First, you’ll fix basic color issues such as white balance and exposure, and then perform shot-to-shot matching. Next, you’ll add curves if you want to change contrast, and use color or shape masks to selectively brighten, darken, or change the color of part of the frame. You might also use adjustment layers to quickly change many clips at once.
Chapter 12. Refine and Smooth: Video Properties and Effects
If some of your clips need a further tweak, you’ll adjust their properties to move, scale, crop and apply effects now, and maybe even animate those properties. If a shot is too shaky, you can stabilize; if it's too soft, you can sharpen, and if there’s something else you’d like to fix, there’s an effect for that too.
Chapter 13. Blend and Warp: Video Transitions and Retiming
Transitions help to soften the transition between two clips, and here, you’ll learn all about how to apply and adjust them. Simplicity is often a good idea with transitions, but maybe subtlety isn’t your thing and you’d like to go crazy — it’s all good. Perhaps you’re also experimenting with high-speed footage and you want to add some speed ramping, or even just pause it? Now’s the time.
Chapter 14. Boost the Signal: Audio Sweetening
Video sorted? Don’t forget audio. Adjust the volume for each clip to get things roughly in the right spot, apply automatic enhancements if you need to, and then add whatever audio effects are going to improve the overall sound. Viewers don’t forgive bad sound, so don’t skip this step.
Chapter 15. A Few Words: Titles and Generators
Adding titles to introduce an entire video or your speakers, or simply to deliver a message, can fill in gaps that your subjects didn’t, and can also give your work a cohesive overall look that helps it to stand out. Generators are a good idea if you need custom backgrounds. With the edit nearly complete, this is also the time to add captions, to make your videos more accessible and searchable.
Chapter 16. You’re done: Exporting Your Edit and Finishing Up
Export your video in a few different ways, then send it to your client or direct to a video-sharing service. Or, maybe you might need to send an editable Project to someone else — that’s fine too. When you’re really, finally done with this job, archive its Library to some other storage medium.
That really is just about it. Anything this book doesn’t cover in detail can be found in Apple’s official user guide, and many other links will be provided along the way.