Book Image

Microsoft Office Live Small Business: Beginner's Guide

By : Rahul Pitre
Book Image

Microsoft Office Live Small Business: Beginner's Guide

By: Rahul Pitre

Overview of this book

Microsoft Office Live Small Business is an internet service that helps small businesses create web sites, and promote and market themselves. And you don't need to buy or install any new software to use it. All you need is a web browser. Office Live Small Business's WYSIWYG, browser-based tools make developing a web site a breeze. But you can't build good web sites with great tools alone; you also need a basic understanding of web design fundamentals. This book will walk you through Office Live Small Business's fundamentals, and then show you how to use its design tools effectively. While you may not become a professional web designer just by reading this book, you'll certainly be able to build a web site for your small business that will make your competitors envious and your friends jealous. This book is all you need for getting started and developing your web presence with Microsoft Office Live Small Business. From setting up and running Small Business for the first time to creatively using its tools, this book delivers everything you need to know. Microsoft Office Live Small Business is controlled from the browser, so all you require is an internet connection, and this book, to get rolling. Over the course of 10 chapters, and five appendices, this book will teach you to create effective content, organize it efficiently, and present it aesthetically. It also covers fine tuning, optimizing your site to be SEO friendly, and how to use the Reports that Office Live offers. This book is not about hard to build web animations or slick rollover effects. It's about providing concise, easy-to-find, and easy-to-understand information about your business on the web. Don't just build a web site - build a brand.
Table of Contents (22 chapters)
Microsoft Office Live Small Business
Credits
About the Author
Acknowledgments
About the Reviewers
Preface
Signing Up: Opening a New Office Live Small Business Account
Submitting Your Site to Search Engines
Backup and Restore: Recovering From Disasters

Time for action - building a header with a logo and a picture


  1. 1. Go to Site Designer.

  2. 2. Make sure your site's header is showing either a built-in theme picture or a custom picture that you uploaded in the previous activity.

  3. 3. Click the Header button on the ribbon. The Header dialog opens.

  4. 4. Click on the Logo tab to display the logo information.

  5. 5. Click the Upload pictures button to upload the logo.

  6. 6. The now-familiar Image Uploader window pops up.

  7. 7. Upload the logo image. It appears in the Header dialog.

  8. 8. Click on the logo to select it as shown:

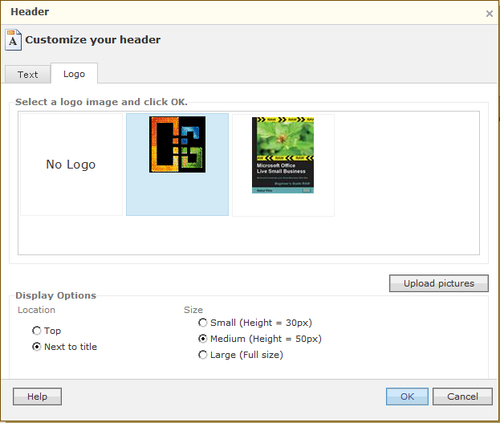
  1. 9. Choose the Next to title radio button.

  2. 10. Depending on how big your logo is, choose one of the radio buttons: Small, Medium, or Large, in the Size group.

  3. 11. Click OK.

  4. 12. The Header dialog goes away and the page currently displayed in the Site Designer displays the modified header with the logo. My site looks something like this:

  1. 13. Pull down the Style headers menu by clicking on the Style button on the ribbon.

  2. 14. Try selecting each of the styles...