
Interface basics
Here’s a quick screenshot of the main window in FCP. On the left, I have several libraries open in the Browser, where a few media clips can be seen. The Timeline is showing a music video I worked on, and you can see a drone shot visible in the Viewer. The Effects pane and Audio Meters are open in the bottom right, and the Inspector is showing Color Wheels in the top right, as you can see here:
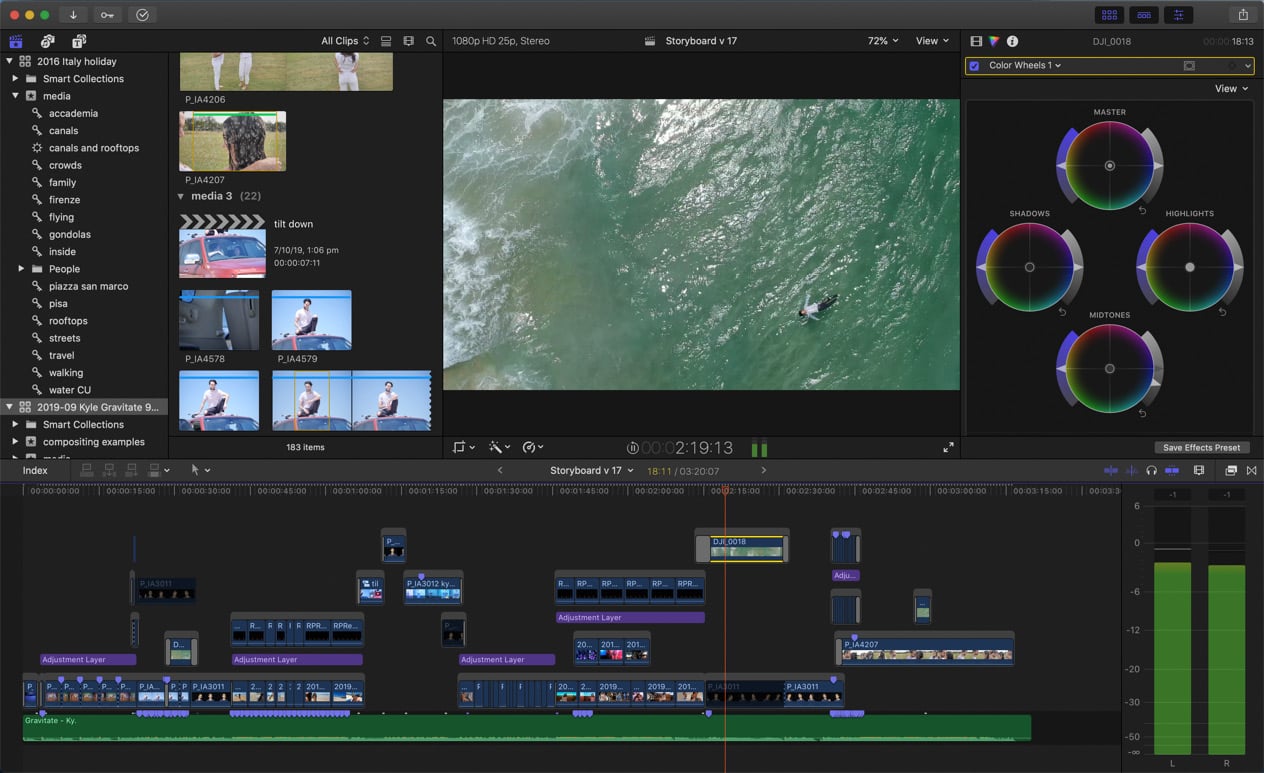
Figure 1.1: The main window, with several panes open
The interface is quite changeable. You can choose which panes you want to see, and how much space they each take up. There are several floating windows too, but let’s go over the basics first.
Overview
Most of the time you spend in FCP will be working in a single window. While additional windows will be shown to adjust preferences, import media, and export, the editing process is largely a single-window experience. Within this single window there are several panes, each of which can be resized by dragging its edges and can have its contents adjusted, by using menus and dropdowns. (If your workspace looks very different from these images, press ⌘0 to reset it to Default).
First, look to the top left of the screenshot here:
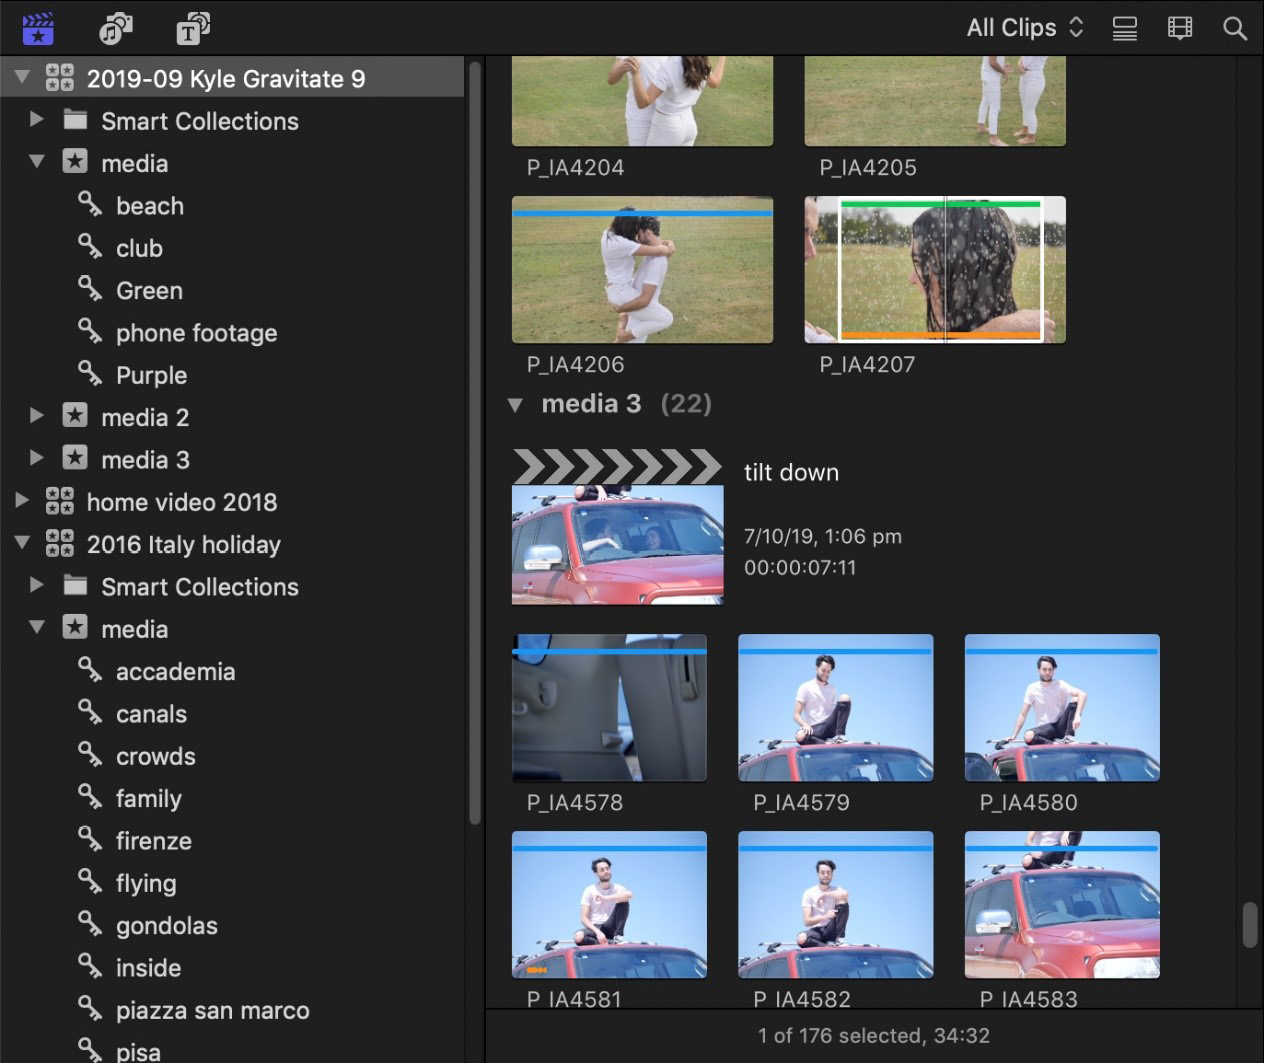
Figure 1.2: The Browser, including a sidebar to the left and the main area to the right
This area is called the Browser, and it’s where you locate, organize, tag, and choose your footage. It’s where you locate photos, music, and sound effects, and where you look through pre-designed title and background templates. All up, it’s where you find things you want to include in your edit, and it’s where we’ll spend the first part of this book, Importing and Organizing.
Central to all operations is the Viewer, a place to view video, which is shown in the following screenshot:
Figure 1.3: The Viewer, surrounded by properties, details, menu, buttons, and a timecode display
This could be a clip from the browser that you’re considering, a frame from your current timeline, or it could show more: video scopes to judge color, angles in a multicam clip, or additional controls for effects or titles. You’ll use the Viewer in just about every part of this book.
To the bottom of the screen is the Timeline — your current edit, as can be seen in the following screenshot:
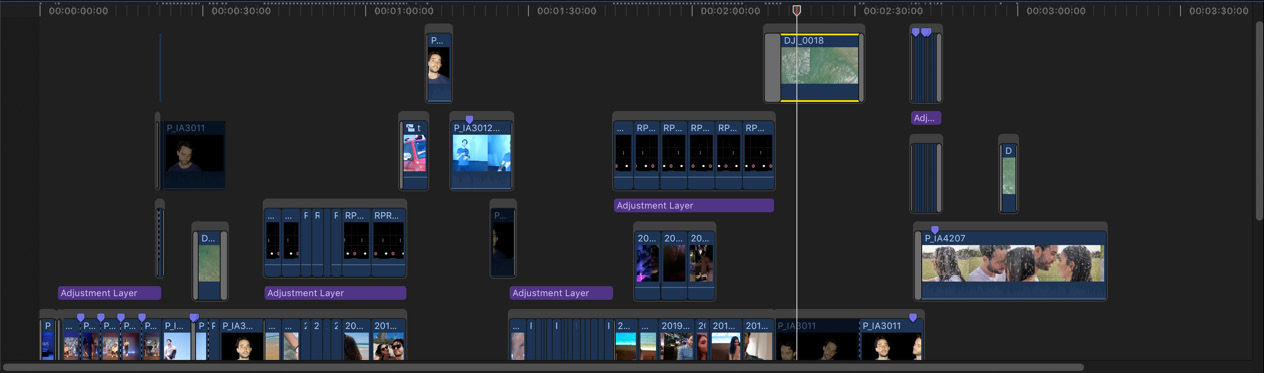
Figure 1.4: Part of the timeline for a music video; your timelines might be simpler, or more complex
This is where clips are arranged in sequence, reordered, and placed above or below other clips. It’s where you trim, roll, slip, and slide your edits; where clips are replaced; where speeds are changed; where markers are set; and much more. It’s where the “magic” happens, and it’s where we’ll spend Part 2 of this book, Rough Cut to Fine Cut.
To the right of the screen is the Inspector — a place to change all kinds of properties, as illustrated in the following screenshot:
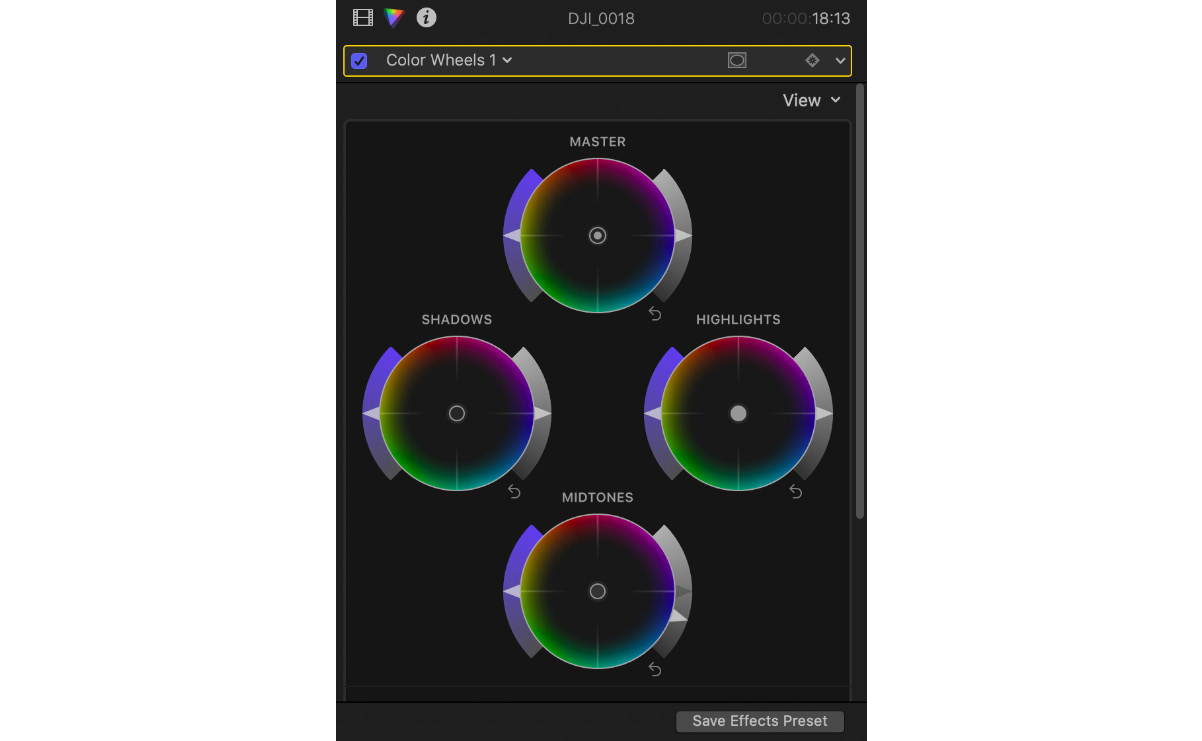
Figure 1.5: The Inspector has many faces; these are the Color Wheels in the Color tab
Usually, you’d use this to adjust one or more clips in the timeline, changing color, or size, or volume, or the video effects you’ve applied. However, you’ll probably use this earlier in the process too, to inspect or modify the properties of a clip in the browser, and for other operations too. We’ll spend a lot of time here in Part 3 of this book, Finishing and Exporting.
With the basics covered, let’s take a slightly deeper look at some of the specific areas in the interface. (While you can simply follow along with the screenshots here, if you’d like to click on your own copy of FCP, you’ll need to have some footage already imported and a timeline open.)
In the central bar
In the center of the screen, at the top of the Timeline panel, is a bar with several icons and a few words, as illustrated in the following screenshot:

Figure 1.6: These buttons and menus live on the left of the main gray central bar
From left to right, you’ll first see the word Index, which opens the Timeline Index and lets you navigate and refine the display of your timeline. More on that in Chapter 10, Explore a Little: Compound Clips and Timeline Tricks.
Next are four editing buttons that let you copy footage from the browser above to the timeline below. When you hover over these buttons, each shows a shortcut key that you could press instead of clicking on the button, and that’s often a better way. To the right of these buttons, there’s a Tools pop-up menu, currently showing an arrow. Yes — these tools are helpful, and we’ll explore them in Chapter 6, Build the Spine of the Story: Quick Assembly, Chapter 7, Cover it Up: Connections, Cutaways, and Storylines, and Chapter 8, Neaten the Edges: Trimming Techniques of this book.
In the center of the screen, there’s a title and a menu next to a duration or a timecode, surrounded by two arrows, as can be seen in the following screenshot:

Figure 1.7: There’s an arrow to go back to the previous timeline, a name, a menu, a timecode display, and an arrow to go forward
The name and time code tell you which Project you’re currently working on and where you’ve parked the playhead within it, while the arrows allow you to jump to other recent Projects or to step back out of nested items, such as Compound Clips.
New in 10.4.9, the menu lets you duplicate your current Project, change its properties, and more.
Moving to the right, several toggle switches are lit in blue if they’re on and white if they’re off, as can be seen in the following screenshot:

Figure 1.8: These buttons, to the right of the main gray bar, provide toggle switches and display options
The first four are Skimming, Audio Skimming, Solo, and Snapping. These let you control some of the finer points of timeline editing.
Next along is a filmstrip icon — the Clip Appearance menu — which lets you change how the timeline appears: how far you have zoomed in, how much space audio and video are allocated, how tall clips are, and so forth:
Figure 1.9: This popup lets you control the appearance of clips on your timeline — use ⌘minus and ⌘plus for zoom, and ⇧⌘minus and ⇧⌘plus for clip height
You’ll see a similar clip appearance icon to the right of the Browser, and a slightly different icon when you bring up Video Scopes. They’ll always give you display options for that part of the interface.
Finally, the Effects and Transitions buttons to the far right of the main gray bar will show or hide an additional browser when clicked, letting you access a range of ways to change how a clip looks, sounds, or changes over the course of an edit. And that’s the central bar.
In the Browser
Back up in the Browser, you’ll see buttons and menus on the left and right, as follows:

Figure 1.10: The toggles, menus, and buttons in the Browser will change what you see here
On the left, the first icon represents Libraries, where you’ll find your footage; the second icon takes you to Photos and Audio, and the third icon displays Titles (for showing text) and Generators (for creating backgrounds and filler content). In each of these areas, you’ll see higher-level categories in a sidebar to the left and actual content on the right, but you can hide or show the sidebar with an extra click on the currently selected icon.
Moving across, you’ll see a different selection of icons and menus that are different for each of the Libraries, Photos and Audio, and Titles and Generators areas. In general, these allow you to search and control your current view, and we’ll look at them in more detail throughout the book.
In the Viewer pane
The Viewer pane includes several pieces of information and important controls, and is shown in the following screenshot:

Figure 1.11: The top of the Viewer shows information above and to the left, and menus to the right
At the top left, you’ll see the resolution and frame rate of whatever thing you’re playing back, and at the top center, you’ll see its name. To the top right, you’ll see two menus, the first of which controls how big the video appears on screen (usually set to Fit to the space available), and the View menu to the far right lets you show additional panes and overlays, and adjust playback settings.
At the bottom left of the Viewer, three drop-down menus give you access to onscreen controls that you can adjust in the Viewer, as shown in the following screenshot:

Figure 1.12: Menus on the left; buttons and display controls below and to the right
The first offers Transform, Crop, and Distort: to resize, rotate, crop, and stretch the video directly — though we’ll see in Part 3, Finishing and Exporting that you can also find these controls in the Inspector. Next along is a drop-down menu with a selection of color-correction and audio enhancements, and the third icon lets you retime video in a variety of ways: speeding up, slowing down, freezing time, and changing speed over time.
In the bottom center of the Viewer, on the left of a small group of numbers and icons, you’ll see a play/pause button; it also indicates if looping is active. Next is a timecode readout, showing the current hour, minute, second, and frame of the clip or timeline playing back. To the right of the timecode you’ll see mini Audio Meters, but this small icon can be clicked to show a much larger version, down to the right of the timeline. Finally, in the bottom right of the Viewer, you’ll see an icon to enter fullscreen video playback. (Press Escape to leave this mode).
Other important windows and controls
At the very top of the main window, just below the standard Mac menu bar to the left, you’ll see the standard circular “traffic light” window controls, as illustrated in the following screenshot:

Figure 1.13: Close, minimize, resize/fullscreen; Import, Keywords, Background Tasks, and Extensions
Pressing the green button enters fullscreen mode, which is helpful if you prefer to focus on a single app at a time, but is less helpful if you want to see multiple apps at once. It also hides the traffic light controls, but you can hover at the top of the screen to show them, or simply press Escape to leave.
Next to the traffic lights you’ll see three (or perhaps four) buttons, each of which spawns an additional window. They handle importing footage, creating and assigning keywords, and displaying the progress of background tasks, and the fourth (optional) button shows workflow extensions — if you have any installed. These allow third-party developers to integrate with FCP for more advanced workflows.
The menu bar gives quick access to some additional important windows. Choose Final Cut Pro > Preferences to bring up the Preferences window, where you can change a few important settings regarding warnings, background rendering, and more, as illustrated in the following screenshot:
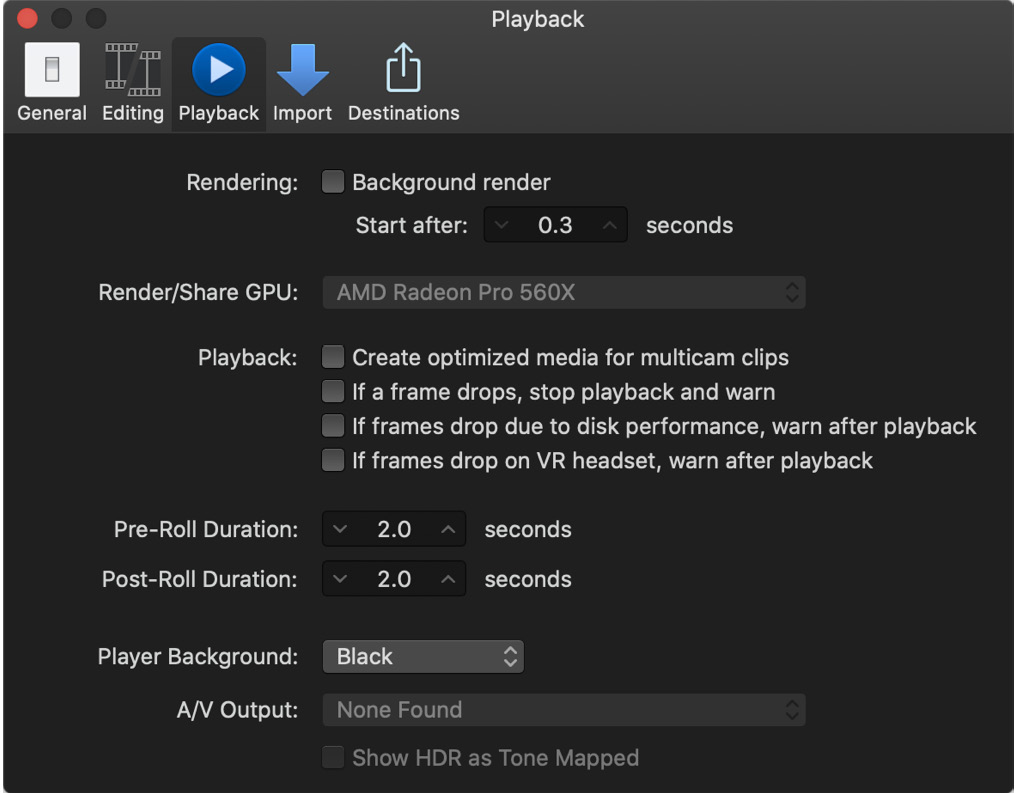
Figure 1.14: The surprisingly spartan Preferences window, with just five sections along the top
Choose Final Cut Pro > Commands > Customize to bring up the Command Editor, where you can discover and assign keyboard shortcuts, as illustrated in the following screenshot:
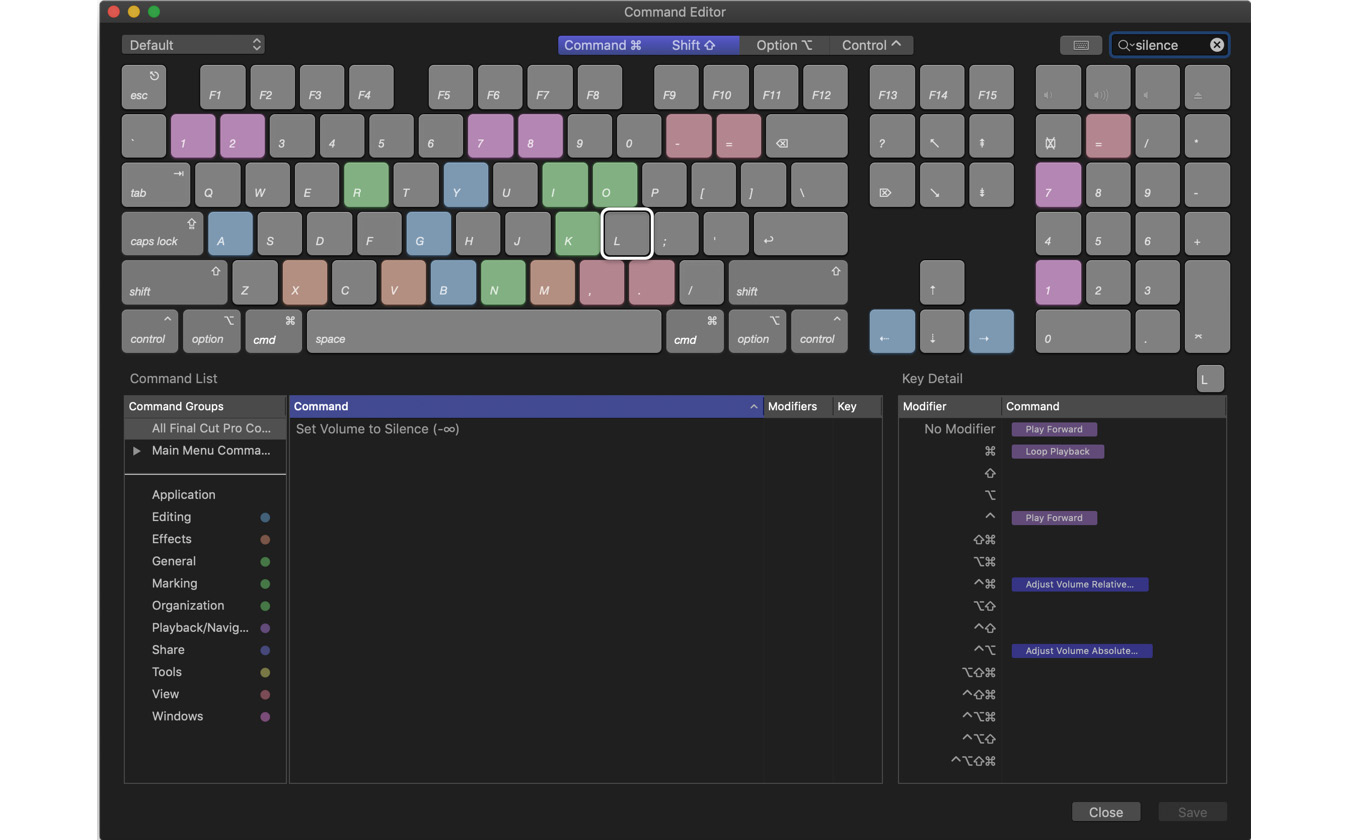
Figure 1.15: The Command Editor provides an excellent way to create your own shortcuts
Importantly, modifier keys such as Command (⌘), Option (⌥), Control (⌃), and Shift (⇧) are not required when creating shortcuts, though they can of course be used. This means that the 0 key alone could be assigned to a command just as easily as ⇧0 or ⌥0.
Throughout this book, symbols are used for the modifier keys instead of names. While keyboards vary in different regions, no matter what your keyboard looks like, the symbols are what you’ll see in the menus, so you’ll need to learn them. To recap, these are the modifier keys:
- Command: ⌘
- Option: ⌥
- Control: ⌃
- Shift: ⇧
With the modifier keys in mind, you can use the Command Editor window to discover shortcuts, as follows:
- To discover a shortcut, simply click a key in the onscreen keyboard, and you’ll see which commands that key maps to — when using any combination of modifier keys — in the bottom-right part of the window.
This is useful when you’re exploring the program, and want to find the function attached to a recently-pressed key. To make new shortcuts, there are a few more steps, as follows:
- To create a shortcut, first search for the command in the top-right search field to see matching commands at the bottom of the window.
For example, you could search for silence, and you’ll see the single command Set Volume to Silence (-∞) in the lower part of the window.
- Next, click your desired modifier keys above the keyboard, then drag the command to the key you want to assign it to. (Alternatively, you can type the shortcut key instead. Zero is a perfect key for the Silence command above.)
- If this is the first shortcut you’ve made, make a copy of the command set, and give it a new name.
- Finally, verify that the command has been assigned, by checking below or below left.
Command sets (collections of shortcuts) can be chosen, imported, exported, and managed with the menu at the top left of this floating window.
- When you’re done, press Save and Close.
Controlling the main window
While any additional windows can be opened, closed, resized, and positioned freely, you’ll have to use a slightly different technique to resize, show, or hide the panes in the main window.
To resize two panes, you need to hover over the thin line between them, as seen between the Browser and the Viewer, or at the top of the gray bar above the Timeline, until you see a resize cursor, as illustrated in the following screenshot:

Figure 1.16: The resize cursor appears when your cursor is in just the right spot
You can then click and drag to resize multiple panes together. The panes themselves can also be toggled on or off with the buttons shown in the following screenshot:

Figure 1.17: These controls appear in the top-right and toggle parts of the interface on or off, except for the rightmost Share button
To show or hide an entire pane, click one of the icons at the top right of the interface. There are three buttons here that control the visibility of the Browser, Timeline, and Inspector respectively, and they’re visible when the icons show blue. Note that one of the Browser and Timeline panes must remain visible, and that the Viewer cannot be hidden.
If you have an independent external display connected, you’ll see an additional button and drop-down menu to the left of these three buttons. Push the button, and the external display will show just one pane: the Timeline, Viewer, or Browser.
Happily, you won’t have to manage all these panes manually, because you can store and recall as many layouts as you wish. Here’s how:
- Choose Window > Workspaces > Color & Effects to see this in action.
The browser is hidden, four scopes are shown with the Viewer, and the Inspector and Effects pane are visible.
- Choose Window > Workspaces > Organize to hide the Timeline and scopes, leaving you with a big Browser pane ideal for organization.
- After applying your own tweaks, use Window > Workspaces > Save Workspace as to store your own layout.
- Choose Window > Workspaces > Default to return to the standard set of interface panes.
Custom layouts can be recalled from the same Window > Workspaces submenu. This will be revisited later in the book.
Under Window > Show in Workspace, you’ll see commands and shortcuts to show or hide any part of the interface, including two I haven’t mentioned yet: the Event Viewer and the Comparison Viewer. These are both optional and will be discussed later in the book.
Finally — because it’s the only button left — is Share. Located in the very top-right corner of the main window, this lets you export your finished Project. But that’s a little way off! Before we move on, if you’re using a laptop, you might also have a Touch Bar, and that’s worth a look too.
The Touch Bar
Apple’s current Pro laptops all include a Touch Bar at the top of the keyboard, as have most of their Pro laptops since 2016. It replaces the F1-F12 keys normally found above the number keys with a touchscreen offering custom buttons and sliders for the current app, and Final Cut Pro takes great advantage of this. The options available also change as you move between different parts of the app:

Figure 1.18: Click on the Timeline pane to see these general-purpose buttons
While you browse, you can switch between views and clear selections. While you edit, you can switch tools, use trim commands, play around with the edit, or even show an overview of your entire timeline:

Figure 1.19: This timeline view is a great way to move around and zoom in on part of your edit
When you tap the audio button, you can also change volume, add fades, or silence a clip:

Figure 1.20: Audio controls in the Touch Bar, including volume changes and fades
While none of these are essential, they’re all really nice to have. If you don’t have a Touch Bar on your Mac, you can still assign keyboard shortcuts for quick access to these features, and if you want to push your Touch Bar to do even more, then you’ll want to explore the third-party app Command Post (commandpost.io).
Where to next? A quick overview of the editing workflow.