There are multiple options for developing using the Julia language. The choice of development environment depends on the task at hand. We will use three of them in this book – one Integrated Development Environment (IDE) and two notebooks. We generally use the IDE to write scripts and develop packages and applications. The notebooks allow us to perform exploratory and interactive data analysis and visualization. In this section of the book, we are going to introduce those development environments. Let's start with the IDE.
The Julia extension for VS Code
The official IDE for Julia is the Julia extension for VS Code. It provides a way to execute Julia code, search documentation, and visualize plots among many utilities. Describing all its features goes beyond the scope of this book. In this section, you will learn how to run Julia code on VS Code, but first, let's install the IDE.
Installing Julia for VS Code
To install and use the Julia extension, you will need Julia installed on your system and the julia executable on PATH. Then, you should install VS Code from https://code.visualstudio.com/. Once you have VS Code installed, you can install the Julia extension from it:
- Click on the View menu and then on Extensions to open Extensions View.
- Type
julia in the search box at the top of Extensions View.
- Click on the Install button of the Julia extension provided by julialang.
- Restart VS Code once the installation has finished.
Let's now use our Julia IDE to run some code.
Running Julia on VS Code
There are multiple ways to run code using the Julia extension on VS Code. Here, we will run code blocks by pressing the Alt and Enter keys together (Alt + Enter) or entire files by pressing Shift + Enter. Let's test that with a simple Julia script:
- Click on the File menu and then on the New File option; VS Code creates a new empty file.
- Click on File and select the Save option.
- Choose a location and name for your file using the
jl extension (for example, first_script.jl) and click the Save button. The jl extension is crucial, as it will indicate to VS Code that you are coding in Julia.
- Click on the JULIA button on the sidebar; it is the one with three dots, which you can see selected in Figure 1.2. It opens the workspace, documentation, and plot navigator panes of the Julia IDE.
- Click on the first line of the empty file and type
a = 2 + 2.
- Press together the Alt and Enter keys; this will execute the code block. You will see the operation's output inlined on the file, just after the executed code block. Note that this can take some time the first time, as the Julia extension should precompile the
VSCodeServer package. The Julia extension will open a Julia REPL, showing the status of the package precompilation and the result of the executed code block. After this first execution, you can also see the recently assigned a variable in the workspace pane.
- Press Enter to create a new line and type
println("Hello World").
- Press Alt + Enter on that line to execute that code block. Now, the Julia extension only inlines a checkmark to indicate that Julia successfully ran the
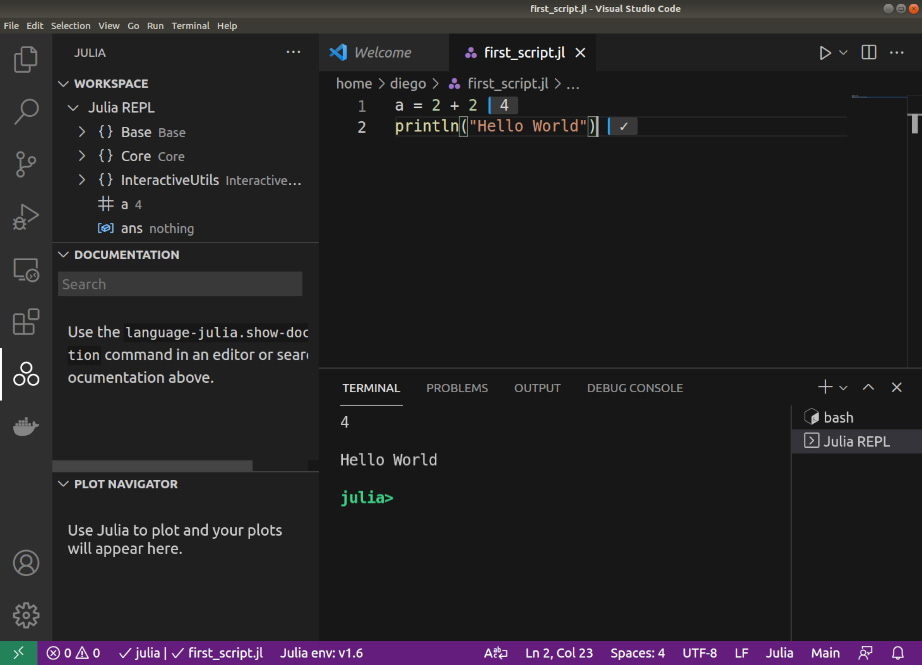
println function. The Julia extension uses a checkmark when the function returns nothing. The println function, by default, prints to the standard output and returns nothing. In this case, you can see Hello World printed in the Julia REPL. There is a Julia variable named ans when you run Julia interactively that holds the last object returned. You can see on the WORKSPACE pane that the ans variable contains nothing (see Figure 1.2).
- Press the Shift and Enter keys together to execute the whole file. The Julia extension only inlines the output of the last expression of the executed file – in this case, the checkmark. Also, you will see that Julia did not print the result of the first expression on the Julia REPL. If you want to show a value when running a file, you need to print it explicitly, as we did with the
"Hello World" string.
- Save the changes by pressing the Ctrl and S keys together (Ctrl + S).
After finishing that process, your VS Code session will look similar to the one in the following figure:
Figure 1.2 – The Julia extension for VS Code
At this point, you have set up VS Code to work with Julia on your computer, and you have learned how to run Julia code on it. This will come in handy when developing Julia scripts, packages, and applications. Also, you can now use VS Code anytime a text editor is required throughout this book. In the following section, we will learn how to execute code using Julia notebooks.
Using Julia notebooks
Notebooks are an excellent way to do literate programming, embedding code, Markdown annotations, and results into a single file. Therefore, they help to share results and ensure reproducibility. You can also code interactively using Julia notebooks instead of the Julia REPL. There are two main notebooks that you can use for Julia – Jupyter and Pluto. We are going to describe them in the following sections.
Taking advantage of Jupyter notebooks through IJulia
Jupyter notebooks are available for multiple programming languages. In Julia, they are available thanks to the IJulia package. Let's create our first Jupyter notebook:
- Copy and paste the following code block into the Julia REPL:
import Pkg
Pkg.add("IJulia")
This will install the IJulia package needed for using Jupyter with Julia.
- Type
using IJulia in the Julia REPL and press Enter to load the package.
- Now, type
notebook(dir=".") and press Enter to open Jupyter. Because we set the dir keyword argument to ".", Jupyter will use the same current working directory as the Julia REPL. If this is the first time that you have run the notebook function, Julia will ask you to install Jupyter using the Conda package. You can press Enter to allow Julia to install Jupyter using a Miniconda installation private to Julia. Note that the process is automatic, but it will take some time. If you prefer using an already installed Jupyter instance instead, please read the IJulia documentation for instructions. Once Jupyter is installed, the notebook function of the IJulia package will open a tab in your web browser with Jupyter on it.
- Go to the browser tab that is running the Jupyter frontend.
- Click the New button on the right and select the Julia version you are using; this will open a new tab with a Julia notebook named Untitled stored in the current directory with the name
Untitled.ipynb.
- Click on Untitled and change the name of the notebook – for example, if you rename the notebook to
FirstNotebook, Jupyter renames the file to FirstNotebook.ipynb.
- Click on the empty cell and type
a = 2 + 2, and then press Shift + Enter to run it. You will see that Jupyter shows the output of the expression just after the cell. The cursor moves to a new cell; in this case, as there was no cell, Jupyter creates a new one below. Note that Jupyter keeps track of the execution order by enumerating the cells' inputs (In) and outputs (Out).
- Type
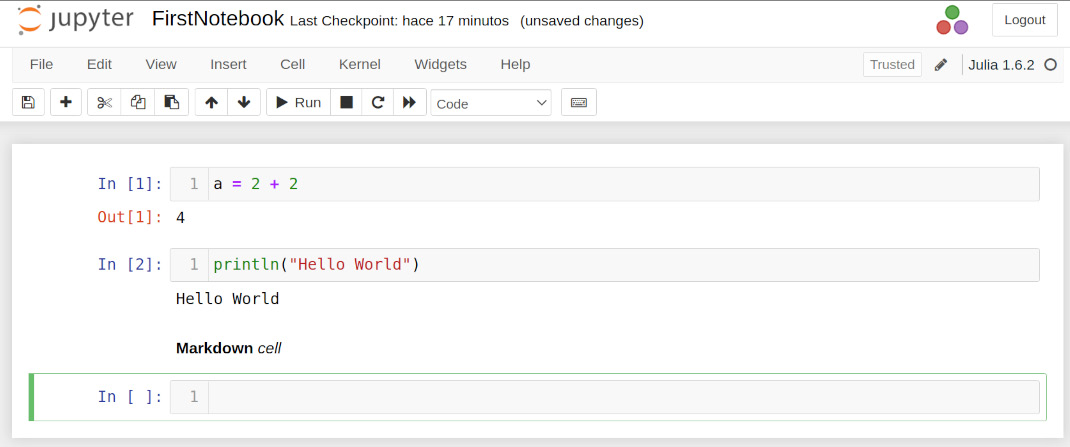
println("Hello World") in the new cell and press Shift + Enter to run that code. You will see the output of the println function below the cell code. As println returns nothing, there is no numbered output for this cell (see Figure 1.3).
Jupyter supports Markdown cells to introduce formatted text, images, tables, and even LaTeX equations in your notebooks. To create them, you should click on an empty cell and then on the drop-down menu that says Code and select the Markdown option. You can write Markdown text on that cell, and Jupyter will render it when you run it (Shift + Enter). You can see an example of running **Markdown** *cell* in the following figure:
Figure 1.3 – A Jupyter notebook using Julia
In these examples, we have used one line of code for each cell, but you can write as many lines of code as you want. However, if there are multiple code blocks inside a cell, Jupyter only shows the output of the last expression. You can suppress the output of a cell by ending it with a semicolon. That trick also works on the Julia REPL and in Pluto notebooks.
Finally, you can close Jupyter by going back to the Julia terminal that runs it and pressing Ctrl + C. Jupyter autosaves the changes every 120 seconds, but if you want to save changes manually before exiting, you need to click on the save icon, the first on the toolbar, or press Ctrl + S. Now that we've had our first experience with Jupyter, let's move on to Pluto.
Using Pluto notebooks
Pluto notebooks are only available for the Julia language, and they differ from Jupyter notebooks in many aspects. One of the most important is that Pluto notebooks are reactive; that means that changing the code of one cell can trigger the execution of the dependent cells. For example, if one cell defines a variable and the second cell does something with its value, changing the variable's value in the first one will trigger the re-execution of the second. To install Pluto, you only need to install the Pluto package. Once you have installed it, let's create a new Pluto notebook:
- Type
import Pluto on the Julia REPL and press Enter.
- Type
Pluto.run() and press Enter. The run function will open Pluto in a tab in your web browser.
- Click on the New notebook link. It will redirect you to an empty Pluto notebook.
- Click on Save notebook... at the top middle and type a name for the notebook; it should have the
jl extension – for example, FirstNotebook.jl.
- Press Enter or click the Choose button. Pluto will create a new notebook file on the indicated path.
- Select the empty cell, type
name = "World", and press Ctrl + Enter. This will run the cell and add a new cell below. You will see that Pluto shows the cell output over the cell code.
- Type
"Hello $name" in the new cell and press Shift + Enter to execute the cell. You will see the "Hello World" string appear over the cell. The executed code creates a string by interpolating the value of the name variable.
- Double-click on the word World in the first cell to select it and type the word
Pluto.
- Press Shift + Enter to run the cell, changing the value of the name from the
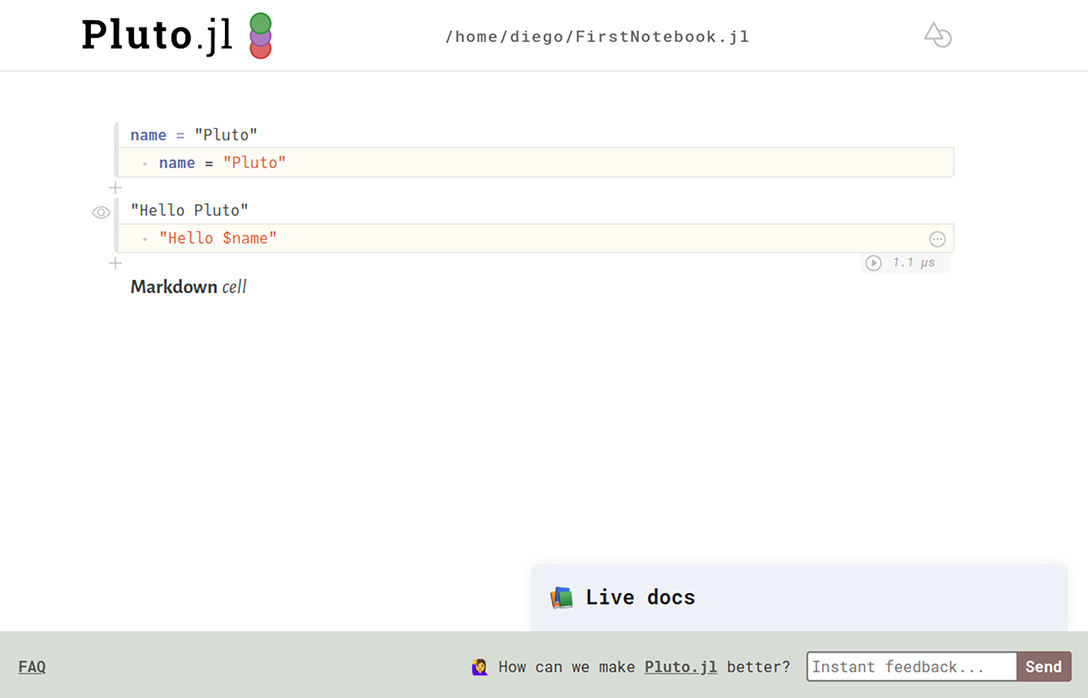
"World" string to "Pluto". You will see that Pluto automatically executes the last cell, changing its output to "Hello Pluto".
Excellent! You have now had a first taste of what a reactive notebook is. Let's see how we can create a Markdown cell in Pluto:
- Hover the mouse over the last cell; you will see that two plus symbols, +, appear over and below the cell (see Figure 1.4).
- Click on the + symbol below the last cell to create a new cell below.
- Type
md"**Markdown** *cell*" into the new cell and press Shift + Enter to run the cell and render the Markdown string. md"" created a single-line Markdown string.
- Hover the mouse over the cell that contains the Markdown string; you will see an eye symbol that appears on the left of the cell.
- Click on the eye button to hide the cell code; note that Pluto has crossed out the eye icon.
There you have it! As you can see, a Markdown cell in Pluto is simply a cell that contains a Markdown string and for which we have decided not to show its source code. You can see the result of this process in the next figure:
Figure 1.4 – A Pluto notebook
Pluto also differs from Jupyter by the fact that each cell should preferably do one thing. Therefore, if you plan to write multiple lines inside a single cell, they must belong to a single code block – for example, you can use multiple lines inside a function body, or a block defined between the begin and end keywords. Another difference is that Pluto doesn't allow the definition of the same variable name, nor the load of the same module in multiple cells.
Pluto notebooks are Julia files using the jl extension. You can read a Pluto notebook like any other Julia file and run it as a script. Most of the things encoding for notebook-specific aspects are just comments on the code. The outputs and figures are not stored in the file but recreated each time we open a notebook.
The best way to conserve and share code and results is to export the static HTML page. You can achieve that by clicking on the export button, a triangle over a circle located in the top-right corner of the notebook, and selecting the Static HTML option. The exported HTML also has the Julia notebook file encoded inside. This allows you to download the notebook using the Edit or run this notebook button that appears on the downloaded HTML document. There, you need to click on the notebook.jl link in the Download the notebook item in the On your computer section to download the notebook file to your machine. Then, you follow the instructions in the On your computer section to open the notebook using Pluto.
One unique aspect of Pluto notebooks that ensures reproducibility is that the notebook file also stores the project environment of the notebook. Pluto manages the notebook environment depending on the import and using statements. For example, loading a package will automatically install it in the notebook environment. If you need it, you can use the activate function of the Pkg module to disable that feature and manage the project environment yourself.
We have not used the println function in the Pluto examples because Pluto doesn't show things printed to stdout on the notebook. Instead, you can find the printed elements on the Julia REPL that is running Pluto. If you need to print something in the notebook, you will need the Print function from the PlutoUI package.
Pluto has a documentation panel that can show you the docstrings of the function and objects you are using. To open it, you need to click on the Live Docs button at the bottom right. Then, if you click on an object, for example, the Print function, you will see its documentation on the panel.
Pluto saves changes on a cell every time it runs. A Ctrl + S button at the top right will remind you to keep any unsaved changes. You can click on it or press Ctrl + S to save the changes. To close Pluto, do the following:
- Click on the Pluto.jl icon to return to the Pluto main page.
- Click on the dark x button at the side of the open notebooks in the Recent sessions section to close the notebooks.
- Close the open Pluto tabs of your web browser.
- Go to the Julia terminal that is running Pluto and press Ctrl + C to close it.
Now you know the basics of working with the three primary development environments for Julia.
Running examples using prompt pasting
Julian mode of the Julia REPL and Pluto notebooks has a nice feature called prompt pasting. It means that you can copy and paste Julia code examples, including the julia> prompt and the outputs. Julia will strip out those, leaving only the code for its execution.
In the Julia REPL, you need to paste everything after the julia> prompt; you will see that Julia automatically extracts and executes the code. In Pluto, click on a cell and paste it. You will see that Pluto pastes the code on new cells under the selected cell without running it. You should note that prompt pasting doesn't work on the standard Windows Command Prompt, nor in Jupyter.
Now you know that if you see code examples starting with the julia> prompt in this book or elsewhere, you can copy and paste them in the Julia REPL or Pluto to execute them.


 Free Chapter