

AutoML with SageMaker Autopilot
SageMaker Autopilot allows ML practitioners to build high-quality ML models without having to write a single line of code. Of course, it is possible to programmatically configure, run, and manage SageMaker Autopilot experiments using the SageMaker Python SDK, but we will focus on using the SageMaker Studio interface to run the AutoML experiment. Before jumping into configuring our first Autopilot experiment, let’s see what happens behind the scenes:
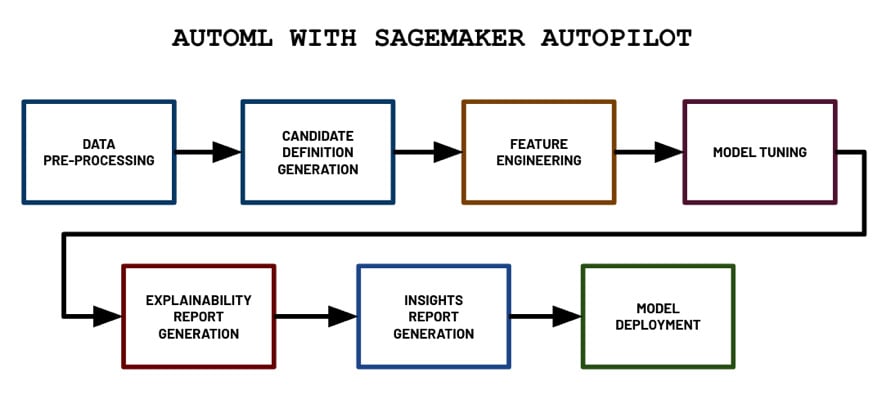
Figure 1.21 – AutoML with SageMaker Autopilot
In the preceding diagram, we can see the different steps that are performed by SageMaker Autopilot when we run the AutoML experiment. It starts with the data pre-processing step and proceeds with the generation of candidate models (pipeline and algorithm pair) step. Then, it continues to perform the feature engineering and model tuning steps, which would yield multiple trained models from different model families, hyperparameter values, and model performance metric values. The generated model with the best performance metric values is tagged as the “best model” by the Autopilot job. Next, two reports are generated: the explainability report and the insights report. Finally, the model is deployed to an inference endpoint.
Let’s dive a bit deeper into what is happening in each step:
- Data pre-processing: Data is cleaned automatically and missing values are automatically imputed.
- Candidate definition generation: Multiple “candidate definitions” (composed of a data processing job and a training job) are generated, all of which will be used on the dataset.
- Feature engineering: Here, data transformations are applied to perform automated feature engineering.
- Model tuning: The Automatic Model Tuning (hyperparameter tuning) capability of SageMaker is used to generate multiple models using a variety of hyperparameter configuration values to find the “best model.”
- Explainability report generation: The model explainability report, which makes use of SHAP values to help explain the behavior of the generated model, is generated using tools provided by SageMaker Clarify (another capability of SageMaker focused on AI fairness and explainability). We’ll dive a bit deeper into this topic later in Chapter 9, Security, Governance, and Compliance Strategies.
- Insights report generation: The insights report, which includes data insights such as scalar metrics, which help us understand our dataset better, is generated.
- Model deployment: The best model is deployed to a dedicated inference endpoint. Here, the value of the objective metric is used to determine which is the best model out of all the models trained during the model tuning step.
Important note
If you are wondering if AutoML solutions would fully “replace” data scientists, then a quick answer to your question would be “no” or “not anytime soon.” There are specific areas of the ML process that require domain knowledge to be available to data scientists. AutoML solutions help provide a good starting point that data scientists and ML practitioners can build on top of. For example, white box AutoML solutions such as SageMaker Autopilot can generate scripts and notebooks that can be modified by data scientists and ML practitioners to produce custom and complex data processing, experiment, and deployment flows and pipelines.
Now that we have a better idea of what happens during an Autopilot experiment, let’s run our first Autopilot experiment:
- On the Control Panel page, click the Launch app drop-down menu and choose Studio from the list of drop-down options, as shown in the following screenshot:
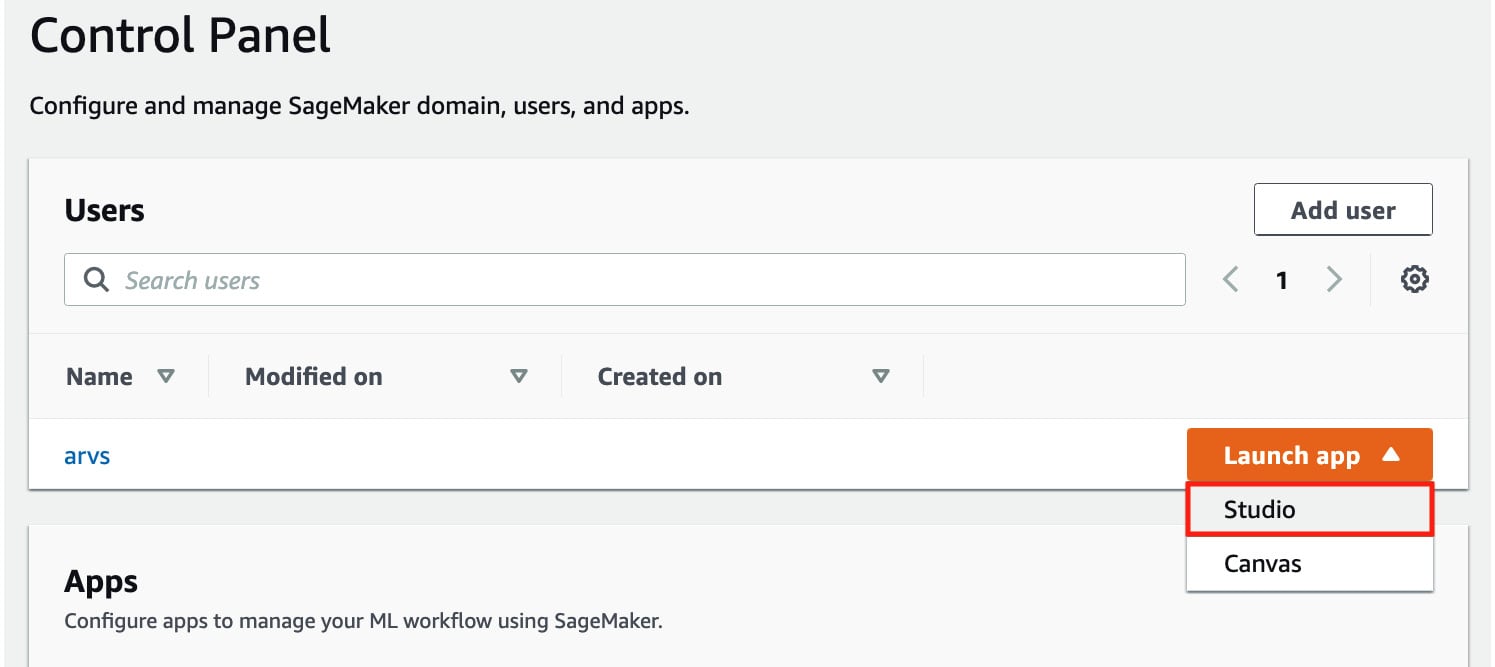
Figure 1.22 – Opening SageMaker Studio
Note that it may take around 5 minutes for SageMaker Studio to load if this is your first time opening it.
Important note
AWS releases updates and upgrades for SageMaker Studio regularly. To ensure that you are using the latest version, make sure that you shut down and update SageMaker Studio and Studio Apps. For more information, go to https://docs.aws.amazon.com/sagemaker/latest/dg/studio-tasks-update.html.
- Open the File menu and click Experiment under the New submenu:
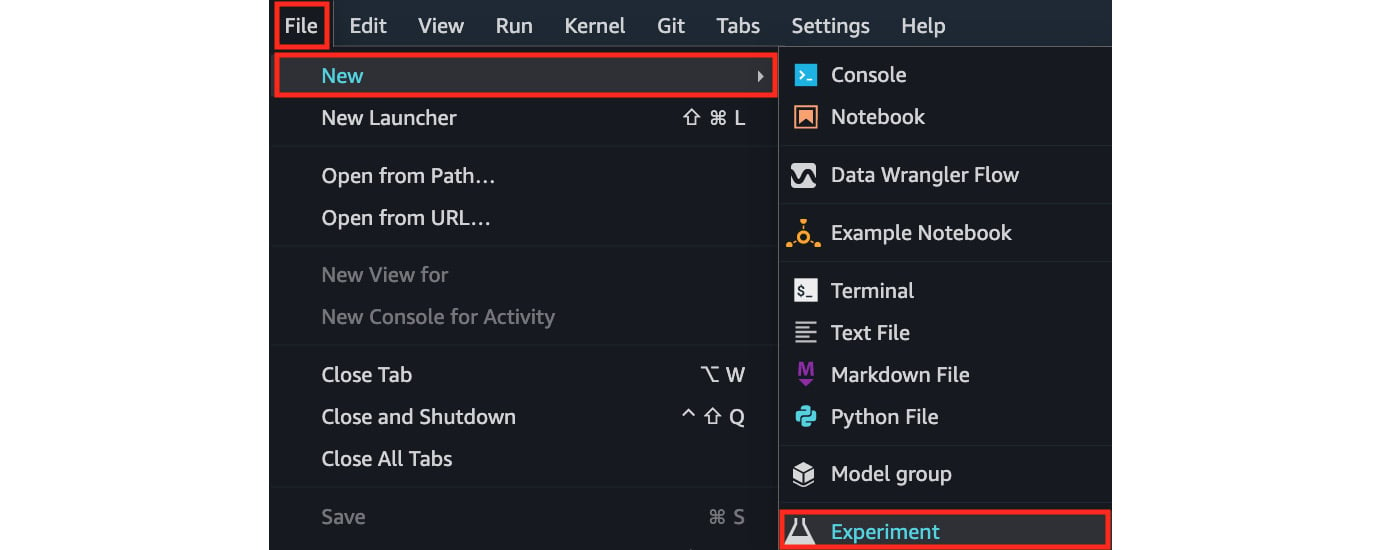
Figure 1.23 – Using the File menu to create a new experiment
Here, we have multiple options under the New submenu. We will explore the other options throughout this book.
In the next set of steps, we will configure the Autopilot experiment, similar to what is shown in the following screenshot:
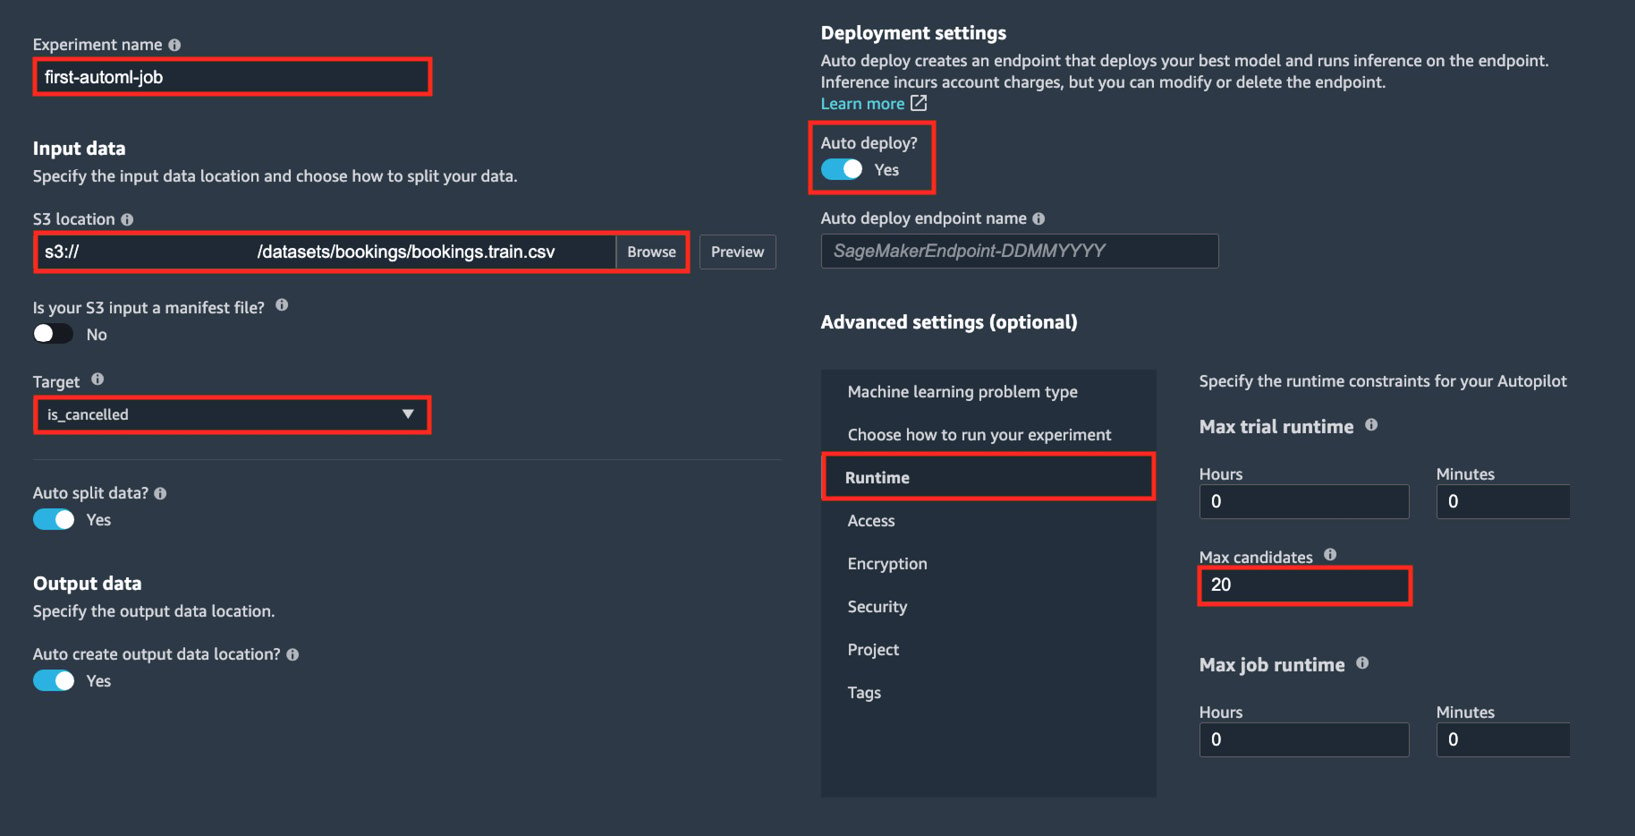
Figure 1.24 – Configuring the Autopilot experiment
Here, we can see the different configuration options that are available before running the Autopilot experiment. Note that the actual Autopilot experiment settings form only has a single column instead of two.
- Specify the Experiment name value (for example,
first-automl-job). - Under Input data, locate and select the
bookings.train.csvwe uploaded earlier by clicking Browse. - In the Target drop-down menu, choose is_cancelled. Click Next: Training method.
- Leave everything else as is, and then click Next: Deployment and advanced settings.
- Make sure that the Auto deploy? configuration is set to Yes.
Important note
You may opt to set the Auto deploy configuration to No instead so that an inference endpoint will not be created by the Autopilot job. If you have set this to Yes make sure that you delete the inference endpoint if you are not using it.
- Under Advanced Settings (optional) > Runtime, set Max Candidates to 20 (or alternatively, setting both Max trial runtime Minutes and Max job runtime Minutes to 20). Click Next: Review and create.
Important note
Setting the value for Max Candidates to 20 means that Autopilot will train and consider only 20 candidate models for this Autopilot job. Of course, we can set this to a higher number, which would increase the chance of finding a candidate with a higher evaluation metric score (for example, a model that performs better). However, this would mean that it would take longer for Autopilot to run since we’ll be running more training jobs. Since we are just trying out this capability, we should be fine setting Max Candidates to 20 in the meantime.
- Review all the configuration parameters we have set in the previous steps and click Create experiment. When asked if you want to auto-deploy the best model, click Confirm. Once the AutoML job has started, we should see a loading screen similar to the following:

Figure 1.25 – Waiting for the AutoML job to complete
Here, we can see that the Autopilot job involves the following steps:
- Pre-processing
- Candidate Definitions Generated
- Feature Engineering
- Model Tuning
- Explainability Report Generated
- Insights Report Generated
- Deploying Model
If we have set the Auto deploy configuration to Yes, the best model is deployed automatically into an inference endpoint that will run 24/7.
Important note
This step may take around 30 minutes to 1 hour to complete. Feel free to get a cup of coffee or tea!
After about an hour, we should see a list of trials, along with several models that have been generated by multiple training jobs, as shown in the following screenshot:
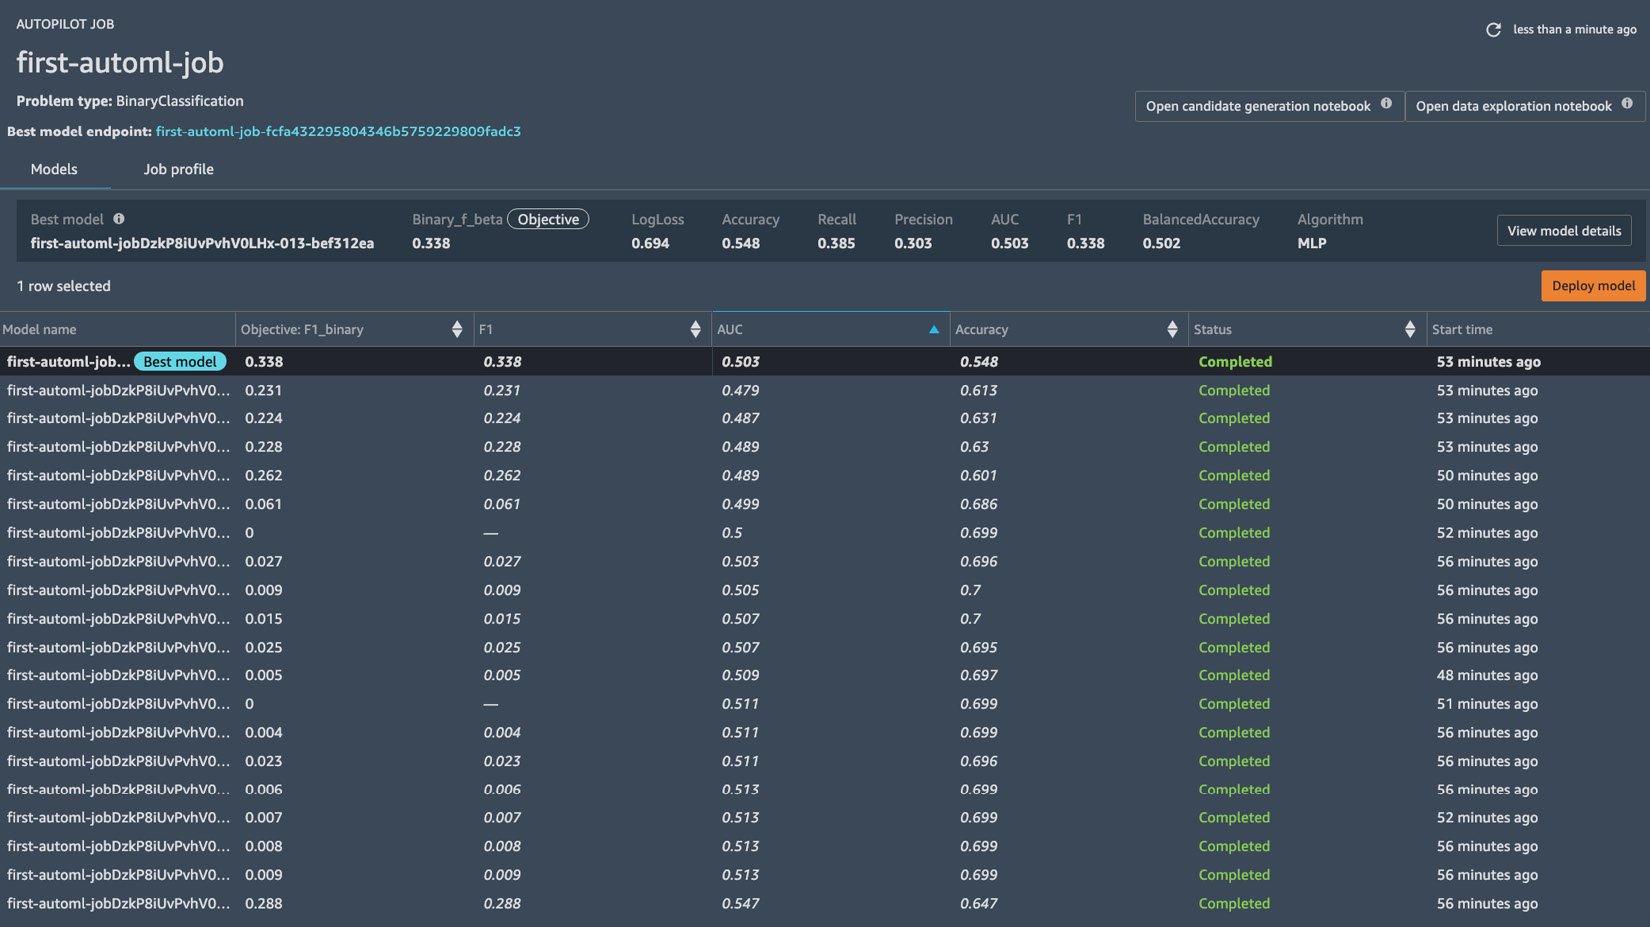
Figure 1.26 – Autopilot job results
We should also see two buttons on the top right-hand side of the page: Open candidate generation notebook and Open data exploration notebook. Since these two notebooks are generated early in the process, we may see the buttons appear about 10 to 15 minutes after the experiment started.
- Click the Open candidate generation notebook and Open data exploration notebook buttons to open the notebooks that were generated by SageMaker Autopilot:
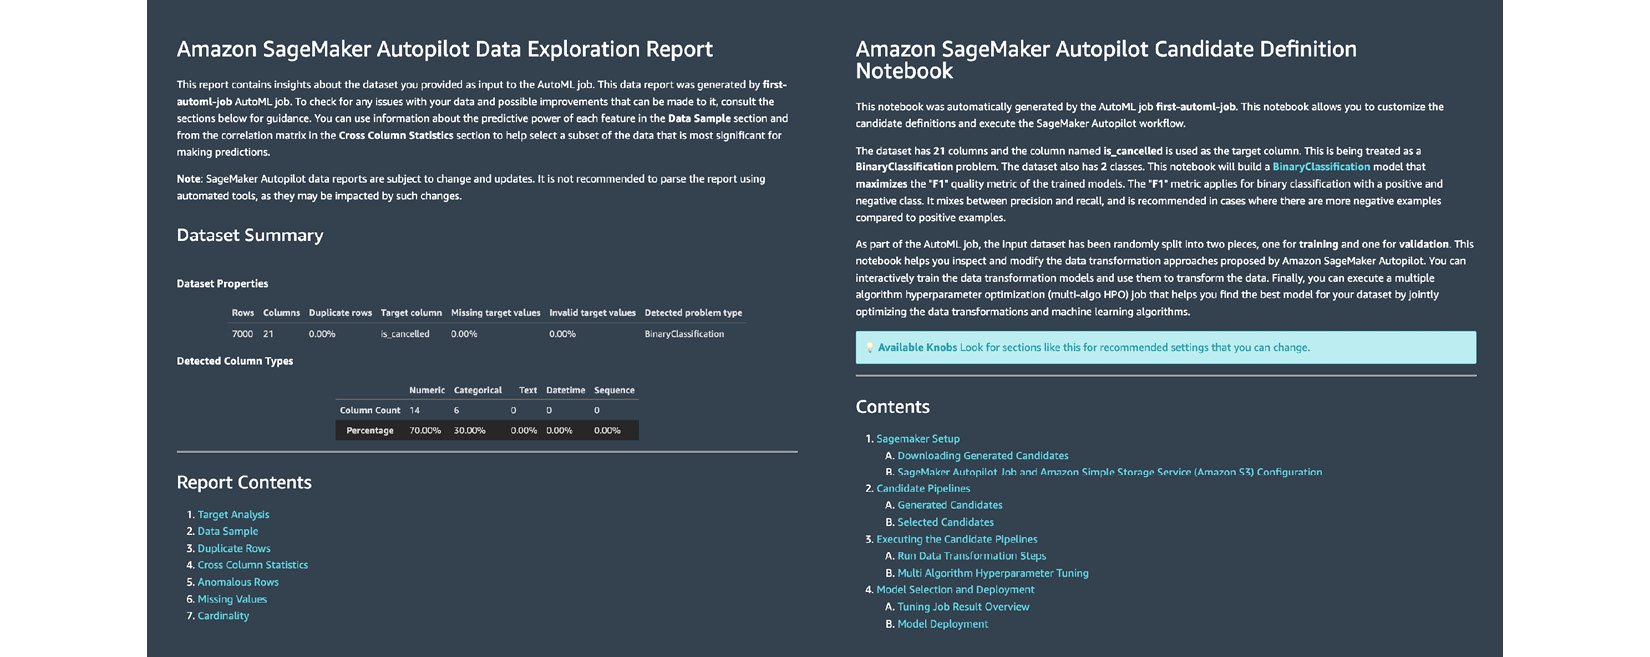
Figure 1.27 – The Data Exploration Report (left) and the Candidate Definition Notebook (right)
Here, we can see the Data Exploration Report on the left-hand side and the Candidate Definition Notebook on the right. The Data Exploration Report helps data scientists and ML engineers identify issues in the given dataset. It contains a column analysis report that shows the percentage of missing values, along with some count statistics and descriptive statistics. On the other hand, the Candidate Definition Notebook contains the suggested ML algorithm, along with the prescribed hyperparameter ranges. In addition to these, it contains the recommended pre-processing steps before the training step starts.
The great thing about these generated notebooks is that we can modify certain sections of these notebooks as needed. This makes SageMaker Autopilot easy for beginners to use while still allowing intermediate users to customize certain parts of the AutoML process.
Important note
If you want to know more about SageMaker Autopilot, including the output artifacts generated by the AutoML experiment, check out Chapter 6, SageMaker Training and Debugging Solutions, of the book Machine Learning with Amazon SageMaker Cookbook. You should find several recipes there that focus on programmatically running and managing an Autopilot experiment using the SageMaker Python SDK.
- Navigate back to the tab containing the results of the Autopilot job. Right-click on the row with the Best Model tag and choose Open in model details from the options in the context menu. This should open a page similar to what is shown in the following screenshot:
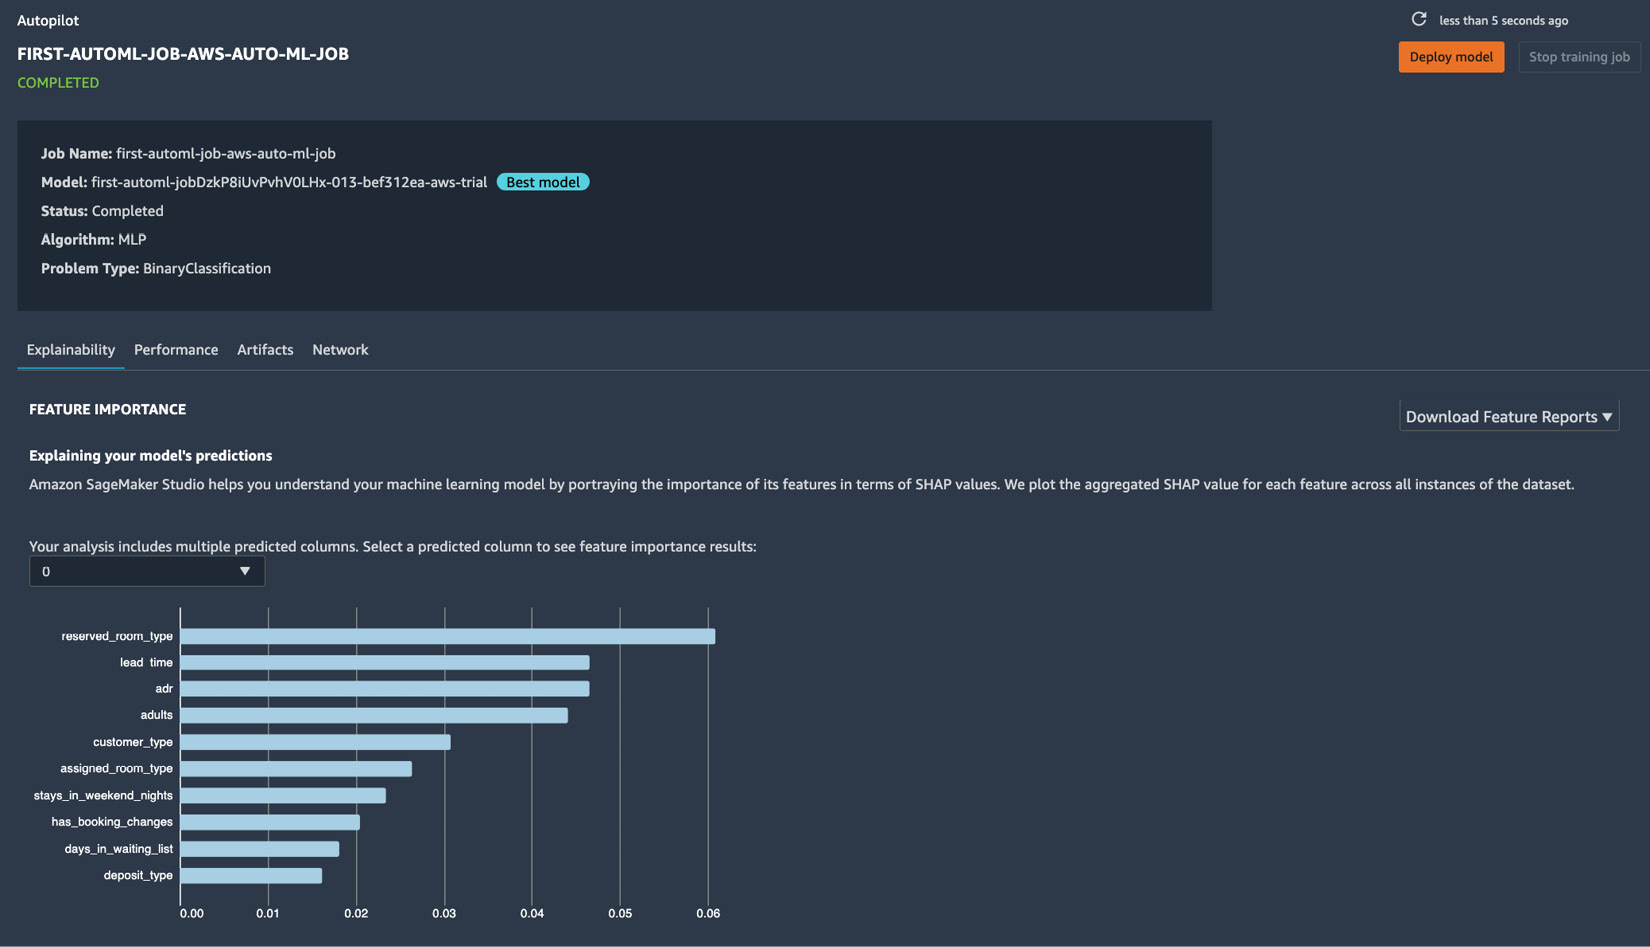
Figure 1.28 – The model details page
Here, we can see that reserved_room_type, lead_time, and adr are the most important features that affect the chance of a hotel booking getting canceled.
Note
Note that you may get a different set of results from what we have in this section.
We should see the following information on the model details page as well:
- Problem type
- Algorithm used
- Location of the input and output artifacts
- Model metric values
- Hyperparameter values used to train the model
Important note
Make sure that you delete the inference endpoint(s) created after running the SageMaker Autopilot experiment. To find the running inference endpoints, simply navigate to https://us-west-2.console.aws.amazon.com/sagemaker/home?region=us-west-2#/endpoints and manually delete the unused resources. Note that the link provided assumes that the inference endpoint has been created in the Oregon (us-west-2) region. We will skip performing sample predictions using the inference endpoint for now. We will cover this, along with deployment strategies, in Chapter 7, SageMaker Deployment Solutions.
At this point, we should have a good grasp of how to use several AutoML solutions such as AutoGluon, SageMaker Canvas, and SageMaker Autopilot. As we saw in the hands-on solutions of this section, we have a significant number of options when using SageMaker Autopilot to influence the process of finding the best model. If we are more comfortable with a simpler UI with fewer options, then we may use SageMaker Canvas instead. If we are more comfortable developing and engineering ML solutions through code, then we can consider using AutoGluon as well.