Since Python is the language in which we will design pipelines, it is a good idea to go through Python’s core fundamentals.
Python is a general-purpose, dynamically typed programming language with a highly versatile nature that can be powerfully used for scripting, object-oriented, procedural, or functional programming. Built on top of C, a low-memory but complex imperative procedural language that efficiently maps machine instructions with minimal runtime support, this human-readable language has become one of the most popular programming languages of the 21st century.
Python’s ubiquitous nature is echoed by its vast online community and well-supported open source libraries.
In this section, we are going to cover the following topics:
- Python data structures
if…else conditions- Looping techniques
- Python functions
- Object-oriented programming using Python
- Working with files in Python
To brush up on the key concepts necessary for ETL pipelines, let’s take a look at each of these topics in detail so that we can understand them better.
An overview of Python data structures
Here are the data structures available natively in Python:
- List: This is like a one-dimensional dynamic array but can hold heterogeneous or homogeneous elements separated by commas. Python lists are mutable and ordered. Like arrays, the index of the first item is
0. The index of the last item in a list starts from -1 and counts arguments toward the beginning in descending order. Lists are represented by []. An index can be used to get a value from a list. In the following section, we will discuss some of the most important indexing operations on lists:sample_list = [1, "another", "list", "a", [3,4]]print(sample_list[0]) # 1print(sample_list[1]) # "another",print(sample_list[-1]) # [3,4]]print(sample_list[1:4])# ["another", "list", "a"]print(sample_list[:4])# [1, "another", "list", "a"]print(sample_list[3:])# ["a",[3,4]]]
We can work with lists in Python using a variety of methods that are available for working with lists.
Python list methods can be found in the following documentation: https://docs.python.org/3/tutorial/datastructures.html.
- Dictionary: Dictionaries are like HashMaps in Python. Dictionaries are represented by key-value comma-separated pairs inside curly braces. Dictionary keys are unique and can be of any Python immutable data type except for a few. The main purpose of a dictionary is to store a value with some key and return the value for that key when needed. Like lists, there are various methods for dictionaries:
sample_dict = {"Key1": "Value1", 2: 3, "Age": 23}print(sample_dict["Age"]) # 23print(sample_dict[2]) # 3You can refer to the following documentation for more details on dictionary methods: https://docs.python.org/3/tutorial/datastructures.html#dictionaries.
- Tuple: Tuples are an ordered collection of elements. Like lists, they can hold both heterogeneous and homogenous data. The only major difference between a tuple and a list is that tuples are immutable while lists aren’t.
Tuples are represented by parentheses or round brackets:
sample_tuple = (1,"2","brij")print(sample_tuple [0]) # 1
Refer to the following documentation for more details on tuples: https://docs.python.org/3/tutorial/datastructures.html#tuples-and-sequences.
- Sets: Python sets are collections of items that are unordered, changeable, and do not allow duplicate values. It is useful to use sets when you need to store a collection of elements, but do not care about order or duplicates.
Like dictionaries, sets are represented by curly braces:
sample_set = {5,9}sample_set.add(4)print(sample_set) # {5,9,4}sample_set.remove(9)print(sample_set) # {5, 4}
In this section, we covered Python data structures. Other data structures, such as the frozen set, are not very frequently used, so we will skip them.
In the next section, we will discuss if…else conditions in Python.
Python if…else conditions or conditional statements
We often need decision-making capabilities in programming languages to execute a block of code based on certain conditions. These are known as if…else conditions or conditional statements.
A conditional statement in Python allows you to specify a certain action to be taken only if a certain condition is met. This is useful because it allows you to make your code more efficient by only performing certain actions when they are necessary.
For example, if you wanted to check if a number is divisible by 3, you could use a conditional statement to only perform the division operation if the number is actually divisible by 3. This would save time and resources because you would not have to perform unnecessary calculations.
The following is an example of a sample if…else condition:
'''In this program,we check if a number is divisible by 3 and
display an appropriate message'''
num = 9
# Try below two as well:
# num = 7
# num = 6
if num  == 0:
    print("This is a Zero")
elif num%3 ==0:
    print("Number is divisible by 3")
else:
    print("Number is not divisible by 3")
Those of you who are familiar with Python will be aware that the else-if condition in Python is symbolized by elif. The next section will be dedicated to looping techniques, so let’s get started!
Python looping techniques
A loop iterates over a sequence or block of code until a condition is met or until a fixed number of iterations are performed.
The Python language supports various looping techniques. They are very useful in programming and in maintaining code structures. Unlike traditional loops, they also save time and memory by avoiding the need to declare extra variables. There are two types of loops in Python:
- for loop: Python
for loops are used to traverse through sequences such as strings, lists, sets, and so on. Once started, the loop continues until it reaches the last element of the sequence. The break statements terminate the iteration prematurely: # Program to return a list of even number from a given list# Given listnumbers = [7,4,3,5,8,9,8,6,14]# Declare an empty listeven_numbers = []# iterate over the listfor num in numbers: #Add the even numbers to even_numbers list if num%2 == 0: even_numbers.append(num)print("The Even number list is ", numbers) - while loop:
while loops in Python are used to iterate through sequences until a given condition is satisfied. The while loop will continue indefinitely if a condition is not given:count = 0while (count < 11): print ('The current number is :', count) count = count + 1print('While loop terminates here.')
Now that we have gained an understanding of Python loops, let’s move on to discussing functions. Functions are a vital part of Python programming as they allow us to create reusable blocks of code that can be easily executed multiple times. By utilizing functions, we can write more efficient and organized code, making it easier to debug and maintain. In the upcoming section, we will discuss how to create and utilize functions in our programs.
Python functions
A function is a reusable block of code that can be used to execute certain tasks. A Python function starts with the def keyword. The Python function can be thought of as a recipe in a cookbook – it tells the computer what steps to follow to complete a certain task. You can give a function a name, and then use that name to call the function whenever you need to perform that task. Functions can also accept input (arguments) and can return a result (return values). Functions are useful because they allow you to reuse code, making your programs more efficient and easier to read.
The following is an example of a function in Python:
def div_of_numbers(num1, num2):    """This function returns the division of num1 by num2"""
     # This function takes two parameters namely num1 and num2.
     if num2==0:
     #Below is a return statement.
     return 'num2 is zero.'
     else:
     #Below is another return statement.
     return num1/num2
#This is how a python function is called.
print(div_of_numbers(8,0))
print(div_of_numbers(8,4))
We just saw how to write a sample function in Python and call it with arguments. The next step will be to see how a function can be used as a method within a Python class.
Object-oriented programming with Python
Python is a programming language that allows the use of multiple programming paradigms, including object-oriented programming. In object-oriented programming, everything is considered an object, which can have attributes and behaviors. This means that in Python, every element in the language is considered an object. Additionally, Python supports the concept of multiple inheritance, which allows an object to inherit characteristics and behaviors from multiple parent objects. This allows greater flexibility and customization within the language. Overall, Python’s support for object-oriented programming and multiple inheritance make it a powerful and versatile language. Let’s take a look at this in more detail:
- Class: A class is the blueprint of objects. Python uses the
Class keyword to create a class:Class DataPipeline(): first_tool = "AirFlow"
The following is how we can create an instance (or object) of this class:
datapipeline = DataPipeline()
We can pass parameters while creating an instance of the class. These parameters are collected in an initializer method known as __init__. This method is called as soon as the object is created.
We can also write functions inside a class. A function inside a class is known as a method.
A method can be called using a dot operator on the instance of the class. The first parameter is self. We can use any names other than self but it is discouraged as it will impair the readability of the code.
- Inheritance: Inheritance is a fundamental aspect of object-oriented programming that allows developers to create new classes based on the properties and behaviors of existing classes.
By utilizing inheritance, we can create a new class that inherits the data and methods of an existing class without having to modify the original class in any way. This means that we can create a new class that has all the same features as the original class but with the added ability to modify or extend the inherited data and methods to fit the needs of the new class. Inheritance is a powerful tool that enables developers to create complex and reusable code, and it is a key aspect of object-oriented programming languages such as Java, C++, and Python.
The following example illustrates inheritance:
# parent classclass DataPipelineBook: def __init__(self): print("This book is very hot in market") self.pages =300 def what_is_this(self): print("Book") def pages(self): return self.pagesThe preceding code defines a class called DataPipelineBook in Python. A class is a template for creating objects, and an object is an instance of a class.
The __init__ method is a special method in Python classes that is called when an object is created from a class. It is commonly known as the constructor. In this case, the __init__ method prints a message to the console and sets the value of the pages attribute to 300.
The what_is_this method is a regular method that is defined within the class. It simply prints the Book string to the console.
The pages method is also defined within the class. It returns the value of the pages attribute, which is set to 300 in the __init__ method.
To use this class, you would need to create an object from it and then call its methods. The next step is to create a child class. An example of creating a child class is shown here:
# child classclass PythonDataPipelineBook(DataPipelineBook): def __init__(self): # call super() function super().__init__() print("Create Data Pipeline with Python") def what_technology_is_used(self): return "Python"pipeline = PythonDataPipelineBook()pipeline.what_is_this()peggy.what_technology_is_used()
The preceding code is defining a child class called PythonDataPipelineBook that inherits from a parent class called DataPipelineBook. The child class has a constructor method (init) that calls the super() function to initialize the parent class. It also has a method called what_technology_is_used that returns the Python string.
The code then creates an object of the PythonDataPipelineBook class called pipeline and calls the what_is_this method from the parent class on it. Finally, it calls the what_technology_is_used method on the pipeline object.
Next, we’ll talk about how Python handles files.
Working with files in Python
The Python language is powerful and makes handling files a breeze. In Python, several operations can be performed on files, including opening, reading, writing, and appending. Let’s take a look at how each of these operations can be performed in Python:
- Open: To read or write to a file, you first need to open it. Here’s how you can open a file in Python:
f = open("yellowtaxidata.txt") - Read, write, or append: When you open a file, you can specify the mode in which you want to open it. The three most common modes are
r (for reading), w (for writing), and a (for appendingHere’s an example of how you can open a file in each of these modes:
f = open("test_file.txt", "r") #This file is opened in read mode.f = open("test_file.txt", "w") #This file is opened in read mode.f = open("test_file.txt", "a") #This file is opened in append mode. - Close: Did you know that every time you open a file, it’s important to close it once you’re finished with it? It’s easy to do – just use the
f.close() function.But there’s an even better way to ensure your files are closed properly: using a context manager. When you open a file using a context manager, the file is automatically closed once you’re done with it. This helps prevent any potential issues or errors that could arise from leaving a file open.
So, the next time you’re working with files, remember to close them properly by using either f.close() or a context manager. It’s a simple step that can save you a lot of headaches in the long run!
Are you tired of constantly forgetting to close your file after writing to it? Don’t worry – Python has a solution for that! Using a context manager, you can easily make sure that your file is closed after performing a write operation.
Take a look at the following code:
with open("test_file.txt", "w") as f:f.write("This is test data")
By using the with keyword, you can ensure that the test_file.txt file will be closed automatically after the write operation is completed. No more worrying about leaving your file open and causing issues down the line!
For more information on file handling in Python, check out the official Python documentation.
In this section, we introduced Python and its various capabilities as a programming language. We saw that Python can be used for scripting, object-oriented programming, functional programming, and creating machine learning models and interactive data visualizations. We also discussed that Python has a large online community and many well-supported open source libraries. We also covered several fundamental Python concepts, including data structures (lists and dictionaries), if-else conditions, looping techniques, functions, object-oriented programming, and working with files.
In the next section, we will learn how to set up a development environment for Python, which will allow us to easily start working with the language. This includes installing the necessary software and tools and configuring our system to support Python development.
Establishing a development environment
Before you hit the ground running creating an exciting project with Python, it is essential to create a development environment with a strong foundation in system integrity.
A unique way to think of a Python project is to think in terms of a lab experiment. When designing a lab experiment, a scientist first starts by jotting down the purpose of the experiment and all possible expected outcomes of the experiment. Why are we creating this experiment? and What outputs do we reasonably expect to get from this experiment? This frame of reference is important to maintain because it leads into the next, and arguably the most important, perspective: How can we limit confounding factors from impacting the results? This is where the idea of a clean, sterile, experimental environment comes to the forefront; this idea is synonymous with the needs of a programming environment with a clear and reproducible workflow.
So, how do we design a development environment that not only limits both known and unknown confounding factors from impacting end-pipeline products but is also highly reproducible and shareable? In this section, we will review the primary building blocks of a highly effective and “sterile” development environment:
- Version control with Git tracking
- Making development easy with local integrated development environments (IDEs)
- Documenting environment dependencies with
requirements.txt
- Utilizing module management systems (MMSs)
Let’s get started!
Version control with Git tracking
The first step of any programming project is to instantiate a version control repository unique to your environment. This keeps the project’s development and production environments in separate buckets.
Several version control systems use the Git version control software and protocol. They each offer similar functionality, but some key differences may make one a better fit for your needs than the others.
We will be using GitHub to track and store our data pipelines throughout this book.
One reason to choose GitHub is that it is the most popular platform for hosting and collaborating on Git repositories. It has a large user base, which means that it is well-supported and has a wealth of resources and documentation available. GitHub also has several features specifically designed for collaboration, such as pull requests, which allow users to propose changes to a repository and discuss them with other contributors before merging them into the main code base.
While there are several internet-hosting Git-tracking providers (GitLab and Bitbucket come to mind), we will be using GitHub to track and store our data pipelines throughout this book.
The importance of Git-tracking your code
You might have seen the term “Git” an uncountable number of times but as a general overview, “Git” is any distributed version control system (VCS) designed to track changes in source code and manage a code base. GitHub is one of these systems. When you’ve created and cloned a new GitHub repository onto your local device, any changes you make can be tracked, committed, and pushed up to your online storage location.
It’s best practice to get into the habit of always committing and pushing your changes frequently so that your work is backed up with Git; this way, you won’t lose all of your hard-earned code if you ever do something silly such as spill coffee all over your laptop... (like we have... more than once...). Additionally, your GitHub repositories serve as a portfolio to showcase your code projects publicly (or keep them private, if you prefer).
GitHub also allows others to contribute to your code base. Git version control enables collaboration without the fear of losing or overwriting changes since multiple developers can work on different branches, and changes can be reviewed and merged through pull requests. Code reviews ensure that the code quality of your projects remains high, and helps catch bugs or issues early in the development life cycle.
Additionally, GitHub can be integrated with various services, such as project management tools and various CI/CD tools, and allows automated testing and deployment of your code. We will learn more about project testing and CI/CD tools later in this book.
For now, we encourage you to leverage Git-tracking with GitHub to push code changes “early and often” so that your work is not only backed up online but you can also add your developing data engineering skills to a public code portfolio.
Before moving on to the next section, take a moment to fork the GitHub repository associated with this book so that it is available in your own personal GitHub profile: https://github.com/PacktPublishing/Building-ETL-Pipelines-with-Python.
Making development easy with IDEs
As Python programmers, you most likely have a preference in terms of local development environments. However, to avoid the risk of instilling any redundancies, we will walk you through our preferred local development landscape in case you want to mimic the same workflow we’ll follow for this tutorial.
iTerm2
We pride ourselves on being superfans of strategic laziness, where we set up programming landscapes that are not only easy on the eyes but also take little to nothing to maintain. As Mac programmers, the Terminal interface can be quite dull; that’s why we recommend installing iTerm2, which works well on Macs that run macOS 10.14 or newer. As stated on their website, “iTerm2 brings the Terminal into the modern age with features you never knew you always wanted.” Take some time to install and customize your new iTerm2 Terminal so that it’s aesthetically pleasing; it’s much easier to fall into the creativity of development design when your eyes are intrigued by your Terminal.
You can follow the instructions mentioned here to download and set up iTerm2: https://iterm2.com/downloads.html.
PyCharm
Next, we recommend using your newly remodeled Terminal to download our favorite IDE: PyCharm. For those of you unfamiliar with IDEs, you can think of an IDE in a similar fashion to iTerm: a visual interface that not only creates an aesthetically pleasing coding environment but also allows you to quickly, efficiently format and structure files with a few short commands. Our local PyCharm environment will be where we choose to clone the Git repository that we created in the previous section.
You can follow the instructions mentioned here to download and set up PyCharm: https://www.jetbrains.com/pycharm/download/#section=mac.
You will also need to register your GitHub account to your new PyCharm app by following these steps: https://www.jetbrains.com/help/pycharm/github.html.
Jupyter Notebook
Lastly, since we will be working with data, visualizing sections of DataFrames can be quite difficult in a standard Python script without a bit of finagling. Staying with the theme of strategic laziness, we recommend downloading the beautiful and user-friendly Jupyter Notebook for easy data visualization. As a word of warning, Jupyter Notebooks is an amazing tool for development, but we stress that it is not recommended that you deploy Jupyter scripts in a production environment. Jupyter’s friendly UI interface and easy visualization of code are due to its memory- and processing-heavy framework that is inevitably quite clunky and slow in a pipeline.
You can follow the instructions mentioned here to download and set up Jupyter Notebook: https://jupyter.org/install.
Next, we will document the environmental dependencies using a requirements.txt file.
Documenting environment dependencies with requirements.txt
Creating and maintaining a requirements.txt document is a standard practice in Python application development. Future updates or major changes to dependencies could potentially break the application, but developers can always install the recorded previous versions, ensuring smooth execution of the code without errors. By freezing the application to specific versions of dependencies, it ensures that, given the correct requirements, your project will maintain its original state. This approach proves beneficial, providing a win-win situation for developers and the application’s reliability.
Let’s look at how to install dependencies using the requirements.txt file:
(base) usr@project%   pip install -r requirements.txtex: requirements.txt
pip==3.9
python==3.9.4
pandas==1.4.2
requests==2.28.0
Additionally, you can update and store the new package imports and versions with the following command to keep the requirements.txt file up to date:
(base) usr@project % pip freeze >> requirements.txt
That is how we can collect dependencies in the requirements.txt file. The next section will review some key concepts that are essential to know before we start building data pipelines.
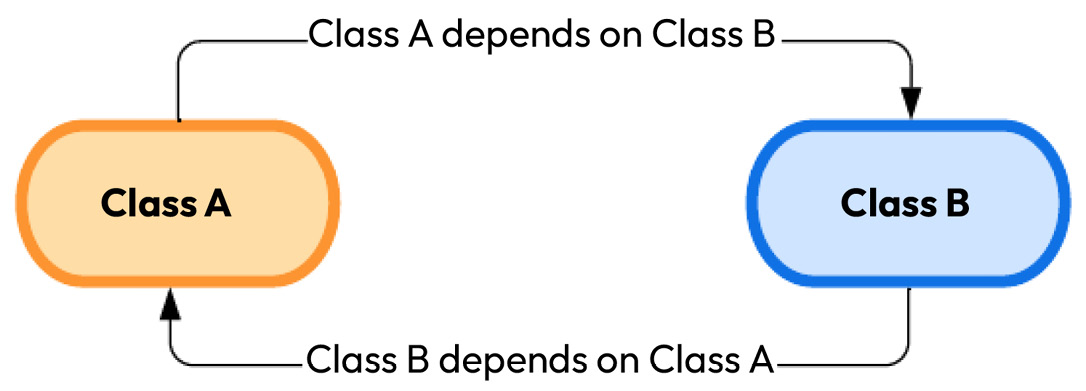
Accounting for circular dependencies
The concept of circular dependency is not always talked about when first learning Python, but it’s a concept where one or more modules depend on each other:
Figure 1.1: A circular dependency
While there are many useful aspects of this interdependency, underlying second and third-degree inconsistencies, such as one Python module version being incompatible with another Python module version, can result in a cascading effect of uncontrolled errors that lead to a smorgasbord of application failures. Alluding back to our initial analogy about a development project being similar to a laboratory experiment, this is why system sterility comes into play. To create an internally consistent environment, versions of the dependencies must be flexibly adjusted to account for the circular interdependencies of imports. This magic of MMS begins!
Utilizing module management systems (MMSs)
MMSs are like special folders that only work in certain environments. They do this by changing sys.prefix and sys.exec_prefix so that they point to the base directory of the virtual environment. This is helpful because it lets developers create “clean” applications and also makes sure that all the different parts of the project work well together.
There are many different module management systems to choose from, but Anaconda is the most popular. However, it doesn’t always have the most up-to-date packages for data engineers, and pip, the regular package manager for Python, doesn’t work well with Anaconda. That’s why we’re using pipenv in this book. It’s a virtual environment and package management system that uses Pipfile and Pipfile.lock, similar to a requirements.txt file.
Instigating a virtual MMS environment within your local IDE
Creating a virtual MMS environment within your local IDE can be a helpful way to test and run your code before you implement it in a larger system. This virtual environment allows you to simulate different scenarios and conditions to ensure that your code is working properly and efficiently. It can also help you identify and fix any errors or bugs that may arise during the development process.
Overall, setting up a virtual MMS environment within your local IDE can be a valuable tool for streamlining your coding workflow and ensuring that your projects are successful.
Configuring a Pipenv environment in PyCharm
In Python development, managing project environments is crucial to keep your project’s dependencies organized and controlled. One way to achieve this is by using pipenv. Let’s start the process by installing Pipenv. Open your Terminal and execute the following command:
(base) usr@project % pip install --user pipenv
This command instructs pip (a Python package manager) to install Pipenv in your user space. The --user option ensures that Pipenv is installed in the user install directory for your platform.
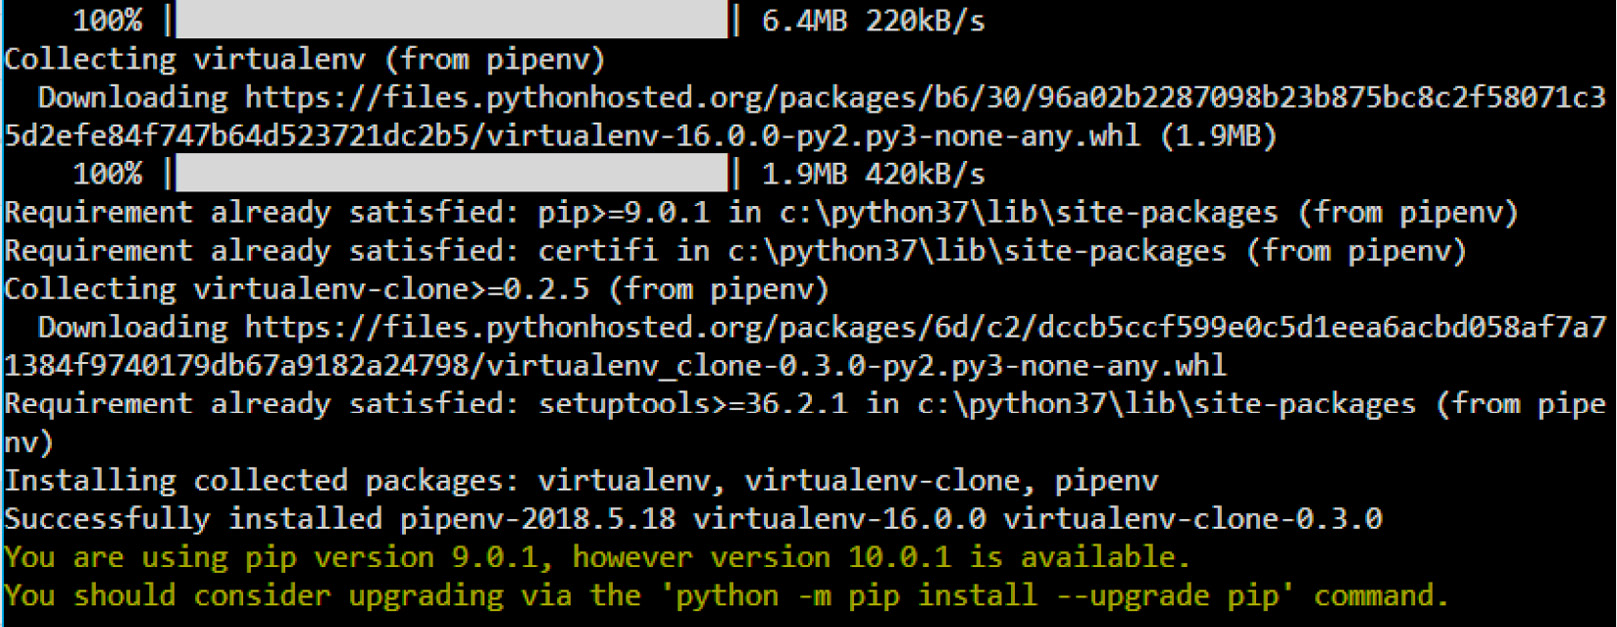
After successful installation, this is what your Terminal should look like:
Figure 1.2: Command-line view of installing pipenv
Once installed, remember to activate the pipenv environment before you begin to work on your new project. This way, the entirety of your project is developed within the isolated virtual environment.
Each time you activate pipenv, the command line will display the following:
(base) usr@project % pipenv shellCreating a virtualenv for this project...
Pipfile: /Users/usr/project/Pipfile
Using /Users/usr/.pyenv/versions/3.10.4/bin/python3 (3.10.4) to create virtualenv...
 Creating virtual environment...created virtual environment CPython3.10.4.final.0-64 in 903ms
creator CPython3Posix(dest=/Users/usr/.local/share/virtualenvs/ project-dGXB4pbM, clear=False, no_vcs_ignore=False, global=False)
seeder FromAppData(download=False, pip=bundle, setuptools=bundle, wheel=bundle, via=copy, app_data_dir=/Users/usr/Library/Application Support/virtualenv)
added seed packages: pip==22.1.2, setuptools==62.6.0, wheel==0.37.1
activators BashActivator,CShellActivator,FishActivator,NushellActivator,PowerShellActivator,PythonActivator
Creating virtual environment...created virtual environment CPython3.10.4.final.0-64 in 903ms
creator CPython3Posix(dest=/Users/usr/.local/share/virtualenvs/ project-dGXB4pbM, clear=False, no_vcs_ignore=False, global=False)
seeder FromAppData(download=False, pip=bundle, setuptools=bundle, wheel=bundle, via=copy, app_data_dir=/Users/usr/Library/Application Support/virtualenv)
added seed packages: pip==22.1.2, setuptools==62.6.0, wheel==0.37.1
activators BashActivator,CShellActivator,FishActivator,NushellActivator,PowerShellActivator,PythonActivator
 Successfully created virtual environment!
Virtualenv location: /Users/usr/.local/share/virtualenvs/TestFiles-dGXB4pbM
Launching subshell in virtual environment...
. /Users/usr/.local/share/virtualenvs/project-dGXB4pbM/bin/activate
(Project) usr@project %% . /Users/usr/.local/share/virtualenvs/project
-dGXB4pbM/bin/activate
Successfully created virtual environment!
Virtualenv location: /Users/usr/.local/share/virtualenvs/TestFiles-dGXB4pbM
Launching subshell in virtual environment...
. /Users/usr/.local/share/virtualenvs/project-dGXB4pbM/bin/activate
(Project) usr@project %% . /Users/usr/.local/share/virtualenvs/project
-dGXB4pbM/bin/activate
Now that we have learned how to activate a virtual environment using pip, we can move on to installing packages within that environment.
Installing packages
pip- packages can be added or removed from the environment via simple $ pipenv install or $ pipenv uninstall commands since activating the pipenv environment is designed to replace the need for the pip- tag in the command line.
Pipfile and Pipfile.lock
When a pipenv environment is initiated, an empty Pipfile is automatically created. As mentioned previously, Pipfile is synonymous with the requirements.txt file.
Pipfile.lock is created to specify which version of the dependencies referenced in Pipfile should be used to avoid automatic upgrades of packages that depend on each other. You can run the $ pipenv lock command to update the Pipfile.lock file with the currently used versions of all the dependencies within your virtual environment. However, pipenv takes care of updating the Pipfile and Pipfile.lock files with each package installation.
The following example shows how we can use Pipfile and Pipfile.lock:
(Project) usr@project %%  pipenv install numbaInstalling numba...
Adding numba to Pipfile's [packages]...
 Installation Succeeded
Pipfile.lock (aa8734) out of date, updating to (d71de2)...
Locking [dev-packages] dependencies...
Locking [packages] dependencies...
Building requirements...
Resolving dependencies...
 Success!
Updated Pipfile.lock (d71de2)!
Installing dependencies from Pipfile.lock (d71de2)...
     1/1 — 00
Now, let’s summarize what we have learned in this chapter in the next section.


 Free Chapter