
SceneKit is a 3D game development framework. So, it can be used to create 3D games or apps for iOS and OS X. It was initially released in OS X 10.8, and now it is available on iOS 8. It is a high-level API built on OpenGL and OpenGL ES, and can be integrated with SpriteKit, as we saw earlier.
In SceneKit, as in any 3D game development framework, we need to provide the camera, lights, and objects for the scene so that the scene can be rendered from the viewpoint of the camera and be processed and displayed on the viewport of the device.
All objects need to be added to the nodes by creating one for every object you place, whether it is a camera, light, or an object.
You can either add a predefined object, such as boxes, spheres, tori, and planes and add texture to it; or import COLLADA files or Alembic files created in a 3D program, export it in .dae or .abc format, and import it into SceneKit. These can be opened in Preview so that you can take a look and check the file before importing it to the SceneKit project. Apart from the geometries; the animations, textures, lights/camera, and so on that you added to the imported scene will also be imported. You can also add 3D text and shapes to your game using SceneKit.
If you assign a texture to the object in the COLLADA file, the texture maps need to be imported along with the file. You can add textures to primitive shapes, 3D text, and complex shapes. You will also be able to modify the 3D text and shapes by extruding them to give them depth, or chamfering the corners, in code.
Custom objects and shapes can also be created by providing the position, texture, coordinates, and color for each of the vertices used to create the shape. You have full freedom over the polygon count; if you want smoother models, you can divide the polygons to get a smoother result—all through code.
SceneKit, along with a camera, also provides different light types such as Ambient, Omni, Direction, and Spot light. These can be attached to the nodes, making them easy to place and move around.
There is also an editor that can be used to view your scene and all the objects added to the scene. You will also be able to look at the properties of the individual objects and modify them if you wish, after importing them to the scene.
The game assets will be managed by the Asset Catalogue, which will optimize the assets at build time, similar to the texture atlas creator in SpriteKit.
Similar to SpriteKit, SceneKit has actions that can be performed on objects to animate them. It also has a physics engine for physics simulations and collision detection. Like the physics engine in SpriteKit, you can add joints, constraints, and inverse kinematics to your objects and scenes.
Similar to how you created a SpriteKit project, create a SceneKit project. The only difference when creating the project is that while selecting Game Technology in the drop-down list, select SceneKit instead of SpriteKit. Name the project SceneKitTest.
Once the project is created, double-click on the SceneKitTest.xcodeproj file. Once it opens, you should see a project structure similar to what you saw in the case of SpriteKit.
As we did earlier, you can click on the play button on the top of the window and select the simulator of your choice. Once the simulator loads, you should see a window similar to what is shown in the following screenshot. I have once again changed the view to landscape for the sake of convenience.
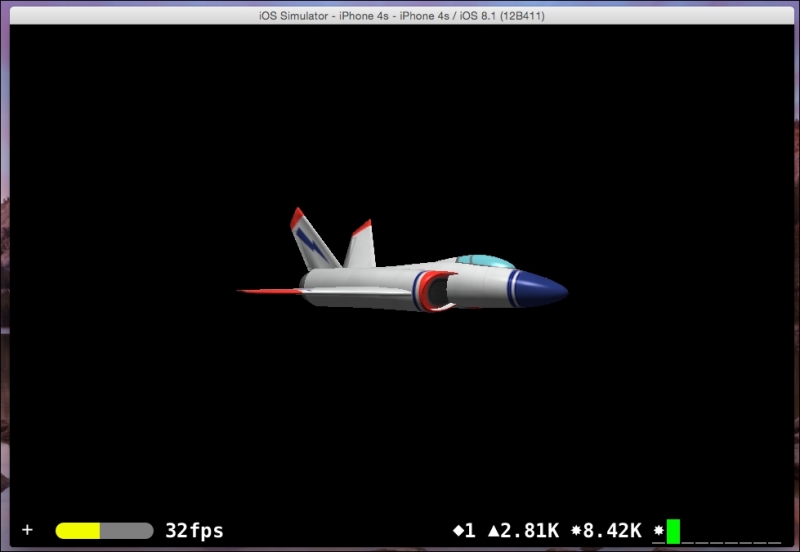
At the bottom, you get more debug information than in SpriteKit. In the bottom-left corner, you have the FPS counter, which is the same as in SpriteKit. As expected, the FPS will be less than SpriteKit projects. This is because we are now looking at 3D models, which include a higher number of vertices and polygons for the processor to calculate, causing the FPS to dip. This is only on the simulator; on the actual device, the FPS will be at 60.
In the bottom-right corner of the screen, the diamond shows the number of draw calls, which is similar to the nodes in SpriteKit. Since there is only one object on the screen—the fighter jet—you get one draw call. The more the objects added, the higher the draw call.
The triangle tells the number of polygons that form the object. The star, or the asterisk, shows the number of vertices that are present in the object. You can click on the + sign on the left to get additional information such as Animations, Physics, Constraints, Particles, Delegate, Rendering, GL Flush, and 2D.
3D objects are made of vertices, and these vertices are joined by lines forming triangular or rectangular shapes called polygons. These in turn form the mesh, giving a shape to the object, the fighter jet in this case. Then a 2D image is painted over the shape, giving it the look of a fighter jet. In the left panel, you can open art.acnassets. This is where all the art assets of the game will be stored. Select it to look at the mesh and the image, or texture files that get placed on the mesh.