Book Image

Swift Game Development - Third Edition

By : Siddharth Shekar, Stephen Haney
Book Image

Swift Game Development - Third Edition

By: Siddharth Shekar, Stephen Haney

Overview of this book

Swift is the perfect choice for game development. Developers are intrigued by Swift and want to make use of new features to develop their best games yet. Packed with best practices and easy-to-use examples, this book leads you step by step through the development of your first Swift game. The book starts by introducing Swift's best features – including its new ones for game development. Using SpriteKit, you will learn how to animate sprites and textures. Along the way, you will master physics, animations, and collision effects and how to build the UI aspects of a game. You will then work on creating a 3D game using the SceneKit framework. Further, we will look at how to add monetization and integrate Game Center. With iOS 12, we see the introduction of ARKit 2.0. This new version allows us to integrate shared experiences such as multiplayer augmented reality and persistent AR that is tied to a specific location so that the same information can be replicated on all connected devices. In the next section, we will dive into creating Augmented Reality games using SpriteKit and SceneKit. Then, finally, we will see how to create a Multipeer AR project to connect two devices, and send and receive data back and forth between those devices in real time. By the end of this book, you will be able to create your own iOS games using Swift and publish them on the iOS App Store.
Table of Contents (22 chapters)
Swift Game Development Third Edition
Contributors
Preface
Other Books You May Enjoy
Index

Setting outlets and adding variables


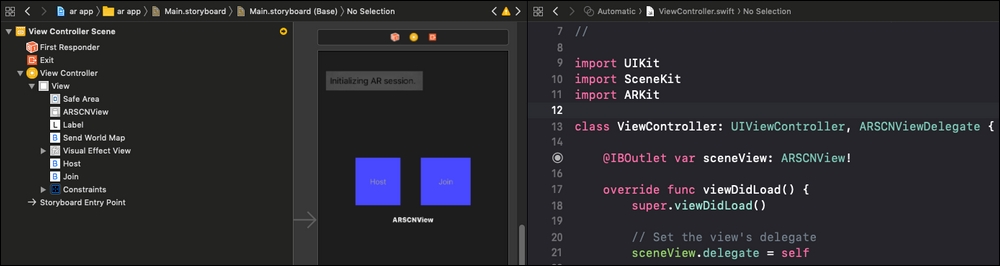
In the ViewController class, we will create the outlets for the buttons and labels and add the required variables for our program.

To get access to the buttons, views, and other objects we created in Main.Storyboard, click on the Assistant Editor (middle of the three buttons on the top right with the two circles). This will open a second window. Now select Main.Storyboard and make sure the ViewController class is also visible to the right of the Assistant Editor, as shown in the following screenshot:

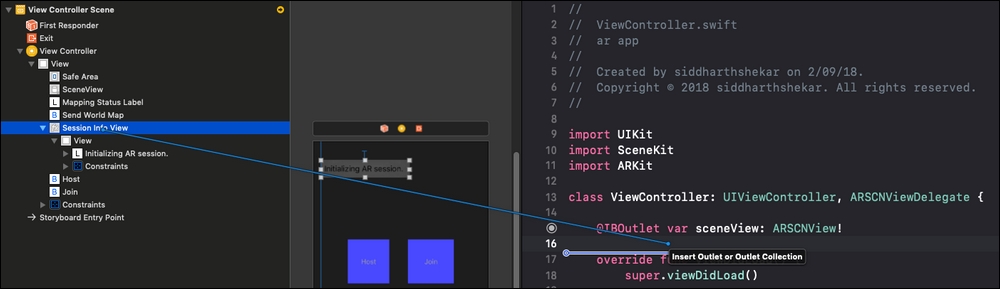
Now select SessionInfoView. While holding the Control key on the keyboard, left-mouse click and drag it into the ViewController.swift file, as shown in the following screenshot. Drag it to where you would like to create the variable in the file and release the left mouse and control buttons:

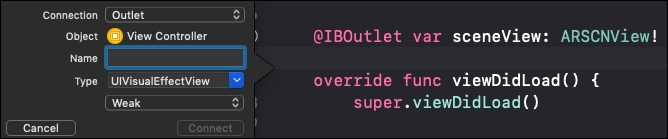
Next, a window will open up asking you to name the variable. Name it sessionInfoView (we will use this name to access the view in the code later on):

Similarly, create variables...