

Using properties in a Surface Shader
Now that we have created some properties, let's hook them up to the shader so that we can use them as tweaks and make the material process much more interactive. We can use the Properties values from the material's Inspector tab because we have attached a variable name to the property itself, but in the shader code, you have to set up a couple of things before you can start calling the value by its variable name.
How to do it...
The following steps show you how to use the properties in a Surface Shader:
- Continuing from the previous example, let's create another shader called
ParameterExample. Remove the_MainTexproperty, just like we did in the Adding properties to a shader recipe of this chapter:// Inside the Properties block _MainTex ("Albedo (RGB)", 2D) = "white" {} // Below the CGPROGRAM line sampler2D _MainTex; // Inside of the surf function fixed4 c = tex2D (_MainTex, IN.uv_MainTex) * _Color; - Afterward, update the
Propertiessection so that it contains the following code:Properties { _Color("Color", Color) = (1,1,1,1) _AmbientColor("Ambient Color", Color) = (1,1,1,1) _Glossiness("Smoothness", Range(0,1)) = 0.5 _Metallic("Metallic", Range(0,1)) = 0.0 _MySliderValue("This is a Slider", Range(0,10)) = 2.5 } - Next, add the following lines of code to the shader, below the
CGPROGRAMline:float4 _AmbientColor; float _MySliderValue;
- With Step 3 complete, we can now use the values from the properties in our shader. Let's do this by adding the value from the
_Colorproperty to the_AmbientColorproperty and giving the result of this to theo.Albedoline of code. So, let's add the following code to the shader in thesurf()function:void surf(Input IN, inout SurfaceOutputStandard o) { // We can then use the properties values in our // shader fixed4 c = pow((_Color + _AmbientColor), _MySliderValue); // Albedo comes from property values given from // slider and colors o.Albedo = c.rgb; // Metallic and smoothness come from slider // variables o.Metallic = _Metallic; o.Smoothness = _Glossiness; o.Alpha = c.a; } - Finally, your shader should look like the following shader code. If you save your shader and reenter Unity, your shader will compile. If there were no errors, you will now have the ability to change the ambient and emissive colors of the material, as well as increasing the saturation of the final color, using the slider value. This is pretty neat:
Shader "CookbookShaders/Chapter 02/ParameterExample"
{
    Properties
    {
        _Color("Color", Color) = (1,1,1,1)
        _AmbientColor("Ambient Color", Color) =
            (1,1,1,1)
        _Glossiness("Smoothness", Range(0,1)) = 0.5
        _Metallic("Metallic", Range(0,1)) = 0.0
        _MySliderValue("This is a Slider",
                       Range(0,10)) = 2.5
    }
    SubShader
    {
        Tags { "RenderType" = "Opaque" }
        LOD 200
        CGPROGRAM
        float4 _AmbientColor;
        float _MySliderValue;
        // Physically based Standard lighting model,
        // and enable shadows on all light types
        #pragma surface surf Standard
            fullforwardshadows
        // Use shader model 3.0 target, to get nicer
        // looking lighting
        #pragma target 3.0
        struct Input
        {
            float2 uv_MainTex;
        };
        half _Glossiness;
        half _Metallic;
        fixed4 _Color;
        // Add instancing support for this shader. You
        // need to check 'Enable Instancing' on
        // materials that use the shader.
        // See https://docs.unity3d.com/Manual/
        // GPUInstancing.html  for more information
        // about instancing.
        // #pragma
        // instancing_optionsassumeuniformscaling
        UNITY_INSTANCING_BUFFER_START(Props)
            // put more per-instance properties here
        UNITY_INSTANCING_BUFFER_END(Props)
        void surf(Input IN, inoutSurfaceOutputStandard
                   o)
        {
            // We can then use the properties values
            // in our shader
            fixed4 c = pow((_Color + _AmbientColor),
                          _MySliderValue);
            // Albedo comes from property values given
            // from slider and colors
            o.Albedo = c.rgb;
            // Metallic and smoothness come from
            // slider variables
            o.Metallic = _Metallic;
            o.Smoothness = _Glossiness;
            o.Alpha = c.a;
        }
        ENDCG
    }
FallBack "Diffuse"
}
Note
The
pow(arg1, arg2)function is a built-in function that will perform the equivalentmathfunction of power. So, thearg1argument is the value that we want to raise to a power, while thearg2argument is the power that we want to raise it to.To find out more about the
pow()function, look at the Cg tutorial. It is a great free resource that you can use to learn more about shading. There is also a glossary of all the functions available to you in the Cg shading language: http://http.developer.nvidia.com/CgTutorial/cg_tutorial_appendix_e.html. - When you save and return to Unity, the shader will compile. Now, we need to create a material that will use our new shader. From the Project window, go to the Chapter 02 | Materials folder, duplicate one of the previous materials, and rename the newly created material
ParameterExample. - From the Inspector window, change the shader to the CookbookShaders | Chapter 02 | ParameterExample option. Then, assign the material to the spheres in the scene by dragging and dropping the material on top of them in the Scene view and releasing the mouse:

Figure 2.15 – Attaching the ParameterExample shader
- After doing this, modify the parameters of the material and see how it affects the objects within the scene.
The following screenshot shows the result that was obtained by using our properties to control our material's colors and saturation from within the material's Inspector tab:
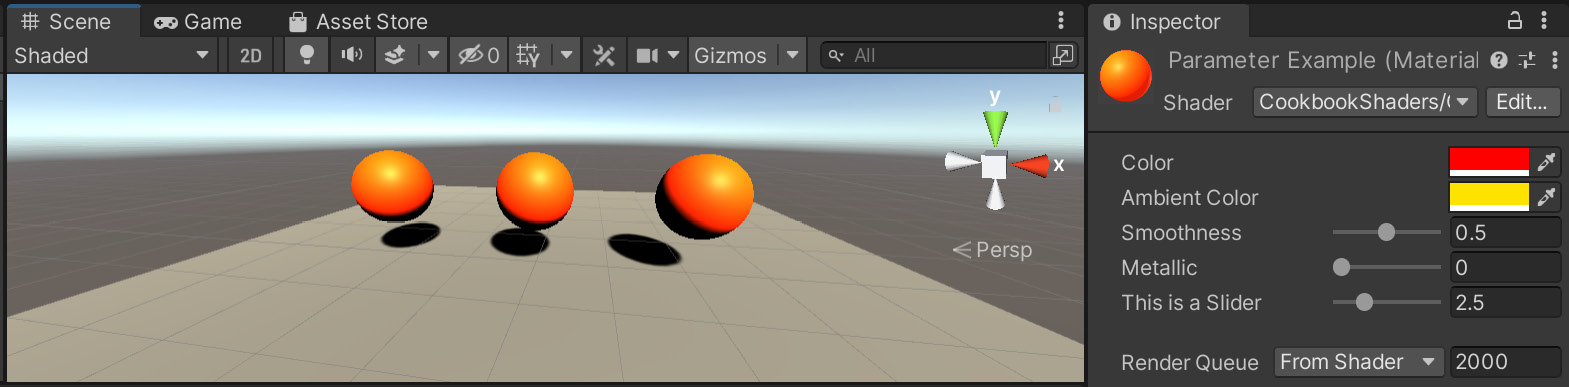
Figure 2.16 – Tweaking the ParameterExample properties
How it works...
When you declare a new property in the Properties block, you are allowing the shader to retrieve the tweaked value from the material's Inspector tab. This value is stored in the variable name portion of the property. In this case, _AmbientColor, _Color, and _MySliderValue are the variables where we are storing the tweaked values.
For you to be able to use the value in the SubShader block, you need to create three new variables with the same names as the property's variable name. This automatically sets up a link between these two so that they know they have to work with the same data. Additionally, it declares the type of data that we want to store in our SubShader variables, which will come in handy when we look at optimizing shaders in a later chapter. Once you have created the SubShader variables, you can then use the values in the surf() function. In this case, we want to add the _Color and _AmbientColor variables together and take it to a power of whatever the _MySliderValue variable is equal to in the material's Inspector tab. The vast majority of shaders start as Standard Shaders and are modified until they match the desired look. With that, we have created the foundation for any Surface Shader you will create that requires a diffuse component.
Note
Materials are assets. This means that any changes that are made to them while your game is running in the editor are permanent. If you have changed the value of a property by mistake, you can undo it using Ctrl + Z.
There's more...
Like any other programming language, Cg does not allow mistakes. As such, your shader will not work if you have a typo in your code. When this happens, your materials will be rendered in unshaded magenta:
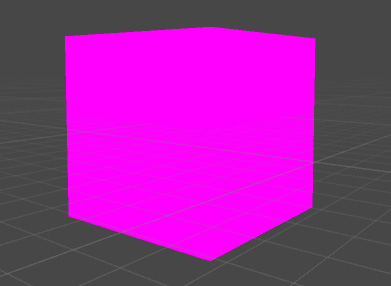
Figure 2.17 – Example of ErrorShader
When a script does not compile, Unity prevents your game from being exported or even executed. Conversely, errors in shaders do not stop your game from being executed. If one of your shaders is magenta, it is time to investigate where the problem is. If you select the incriminated shader, you will see a list of errors in its Inspector tab:
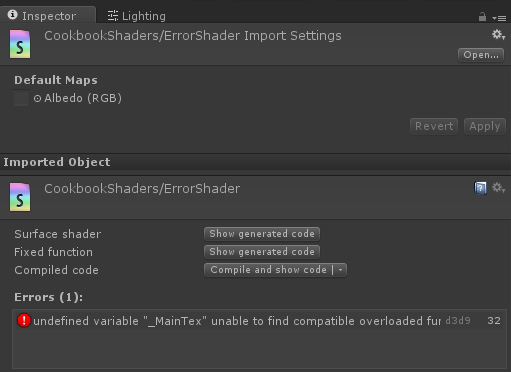
Figure 2.18 – Errors example
Note
Shader errors are also shown within the Console window.
Despite showing the line that raised the error, this rarely means that this is the line that must be fixed. The error message shown in the previous screenshot was generated by deleting the sampler2D _MainTex variable from the SubShader{} block. However, the error is raised by the first line that tries to access such a variable. Finding and fixing what's wrong with code is a process called debugging. The most common mistakes that you should check for are as follows:
- A missing bracket. If you forgot to add a curly bracket to close a section, the compiler is likely to raise errors at the end of the document, at the beginning of the document, or in a new section.
- A missing semicolon. This is one of the most common mistakes but luckily one of the easiest to spot and fix. When looking at the error definition, check whether the line above it contains a semicolon or not.
- A property that has been defined in the
Propertiessection but has not been coupled with a variable in theSubShader{}block. - Compared to what you might be used to in C# scripts, the floating-point values in Cg do not need to be followed by an
f. It's1.0, not1.0f.Tip
The error messages raised by shaders can be very misleading, especially due to their strict syntactic constraints. If you are in doubt about their meaning, it is best to search the internet. The Unity forums are filled with other developers who are likely to have encountered (and fixed) your problem before.
See also
More information on how to master Surface Shaders and their properties can be found in Chapter 3, Working with Surface Shaders.
If you are curious to see what shaders can do when they're used at their full potential, have a look at Chapter 12, Advanced Shading Techniques, for some of the most advanced techniques that will be covered in this book.