Before you can start writing and running Java programs, you’ll need to set up the JDK on your computer. The JDK contains essential tools and libraries required for Java development, such as the Java compiler, the JRE, and other useful utilities that help development.
We will guide you through the process of installing Java on Windows, macOS, and Linux, and we’ll give you some suggestions for when you don’t have access to either one of those. But before proceeding with the installation of Java, it’s a good idea to check whether it’s already installed on your system.
Checking whether Java is installed on your system
Java may have been pre-installed, or you may have installed it previously without realizing it. To check whether Java is installed, follow these simple steps. The first one depends on your operating system.
Step 1 – Open a terminal
For Windows, press the Windows key, type cmd, and press Enter to open the Command Prompt.
For macOS, press Command + Space to open the Spotlight search, type Terminal, and press Enter to open Terminal.
For Linux, open a Terminal window. The method for opening the Terminal window varies depending on your Linux distribution (for example, in Ubuntu, press Ctrl + Alt + T).
Step 2 – Check for the Java version
In the Command Prompt or Terminal window, type the following command and press Enter:
java -version
Step 3 – Interpret the response
If Java is installed, you will see the version information displayed. If not, the Command Prompt will display an error message, indicating that Java is not recognized or found.
If you find that Java is already installed on your system, make sure it’s version 21 or later to ensure compatibility with modern Java features. If it’s an older version or not installed, proceed with the installation process for your specific platform, as described in the following sections. If an older version is installed, you may want to uninstall this first to avoid having an unnecessarily complicated setup. You can install this the common way of uninstalling programs for your operating system.
In Figure 1.2 and Figure 1.6, you’ll see examples of the output you can expect when Java is installed.
Figure 1.2 – The macOS terminal output where Java 19 is installed
Now, let’s see how to install Java on each operating system.
Installing Java on Windows
To install Java on a Windows operating system, follow these steps:
- Visit the Oracle Java SE Downloads page at https://www.oracle.com/java/technologies/downloads/. This software can be used for educational purposes for free, but requires a license in production. You can consider switching to OpenJDK to run programs in production without a license: https://openjdk.org/install/.
- Select the appropriate installer for your Windows operating system (for example, Windows x64 Installer).
- Download the installer by clicking on the file link.
- Run the downloaded installer (the
.exe file) and follow the on-screen instructions to complete the installation.
- To add Java to the system’s
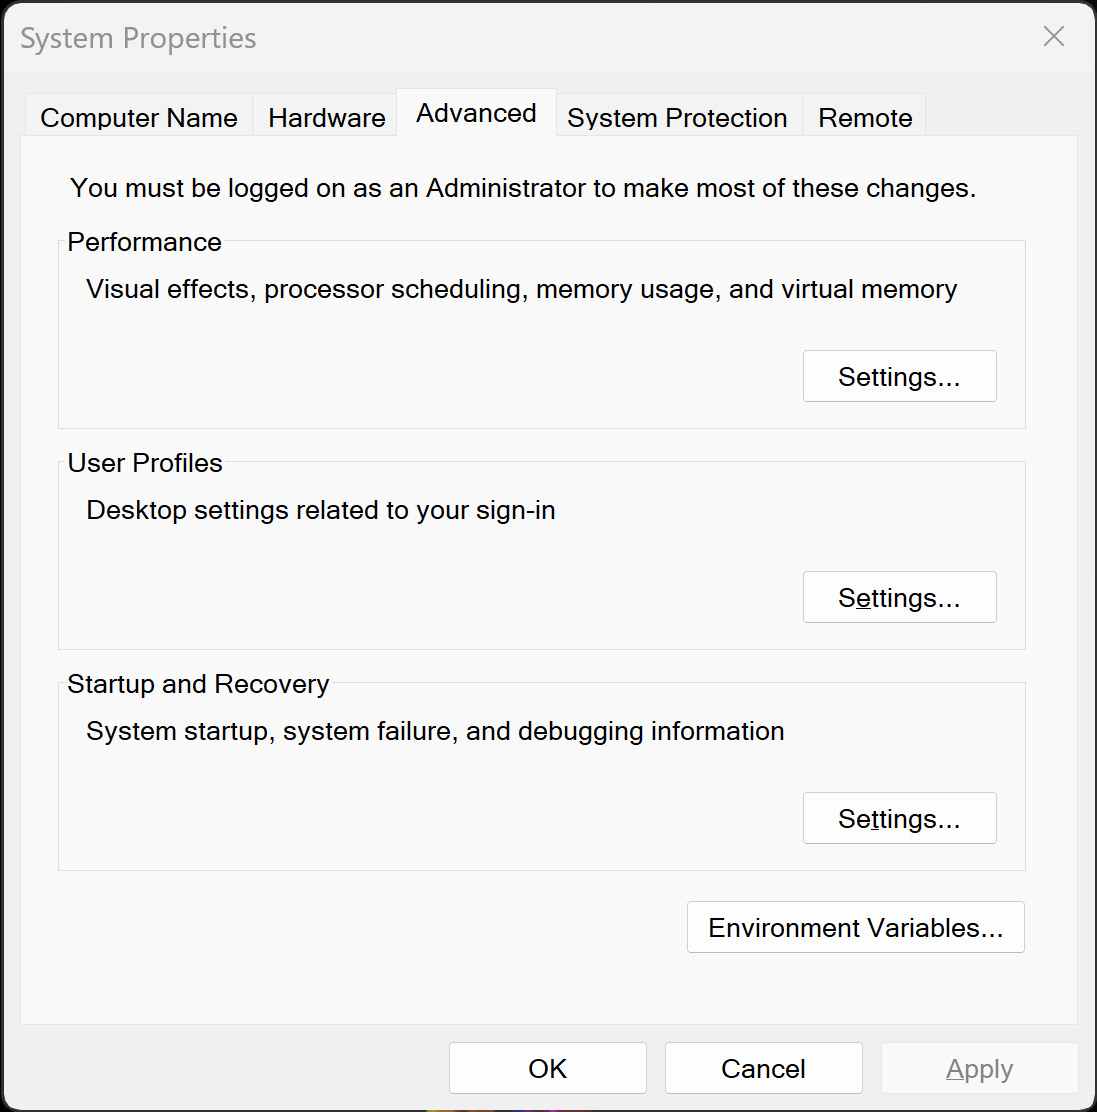
PATH environment variable, search for Environment Variables in the Start menu and select Edit the system environment variables. You should see a screen similar to Figure 1.3.
Figure 1.3 – The System Properties window
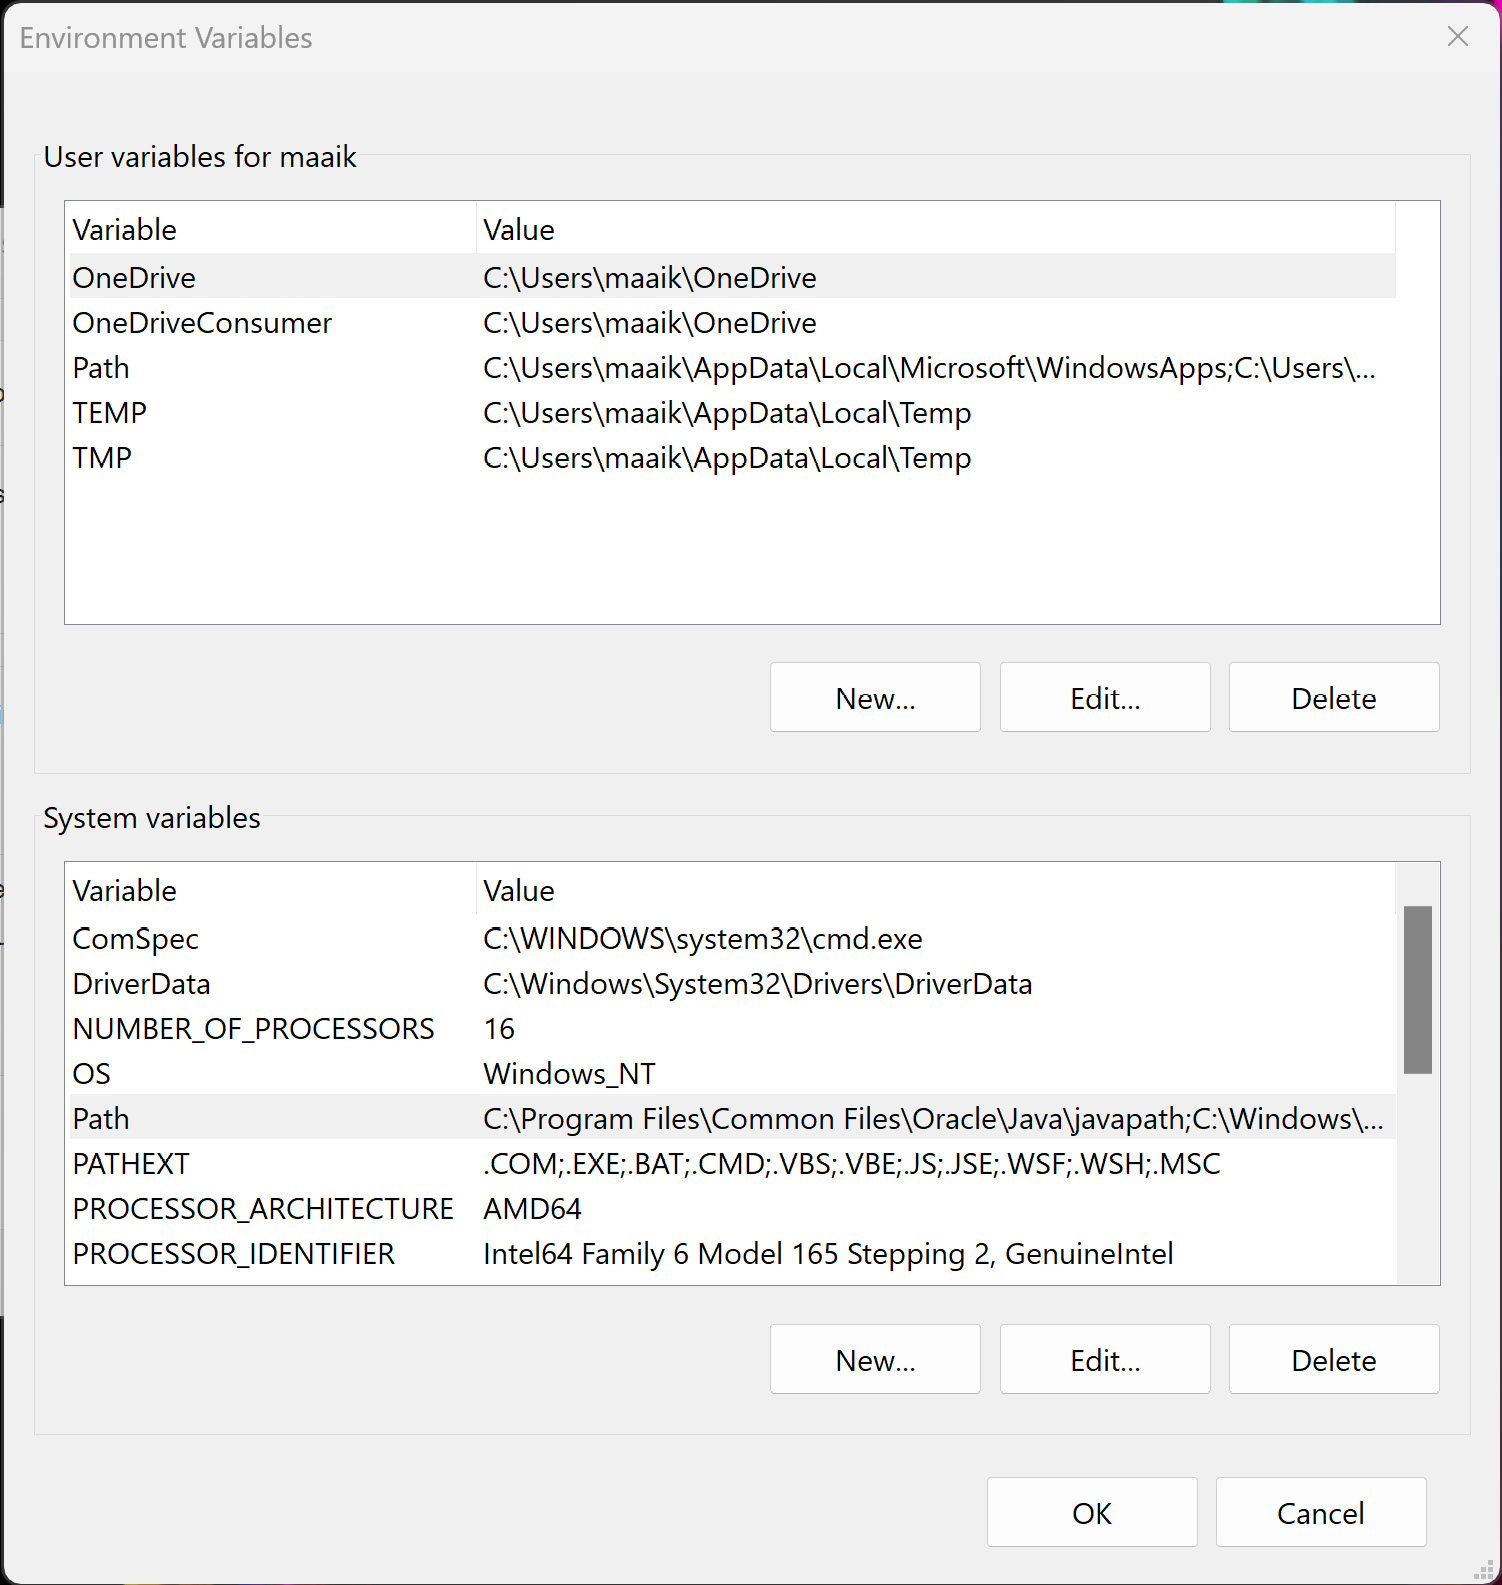
- In the System Properties window, click on the Environment Variables… button. A screen like the one in Figure 1.4 will pop up.
- Under System variables, find the Path variable, select it, and click Edit. You can see an example of which one to select in the following Figure 1.4:
Figure 1.4 – The Environment Variables window
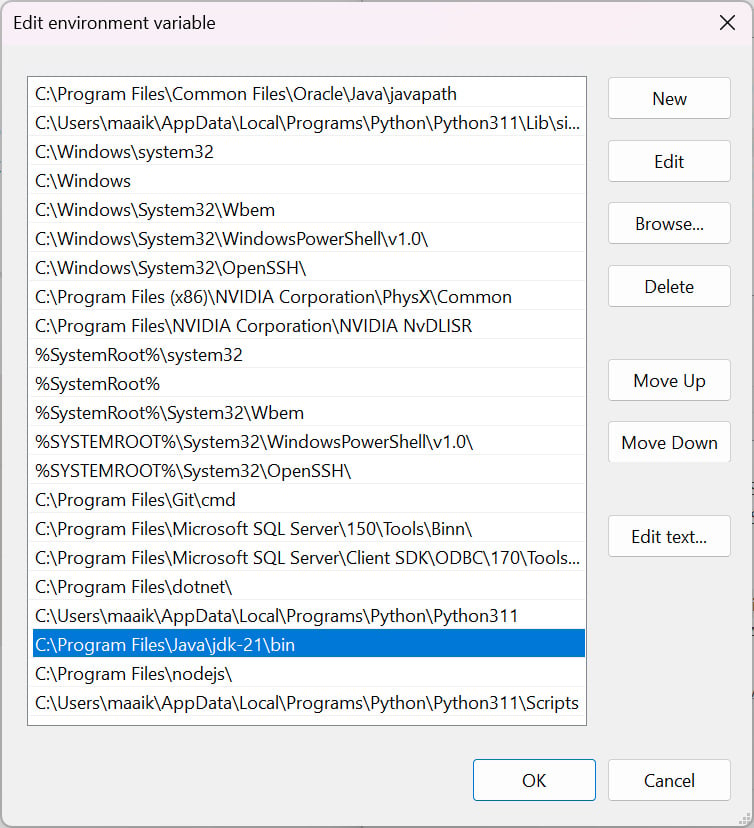
- Click New… and add the path to the
bin folder of your Java installation (for example, C:\Program Files\Java\jdk-21\bin). In Figure 1.5, this has been done already.
Figure 1.5 – Adding the path to Java to the Path variable
- Click OK to save the changes and close the Environment Variables windows.
- Verify Java is installed by opening the Command Prompt (reopen it if you have it open already) and then typing the following:
java -version
- The output should look as shown in Figure 1.6. However, your version should be 21 or higher to keep up with all the snippets in this book.
=
Figure 1.6 – Command Prompt after Java version check after installing Java
Installing Java on macOS
To install Java on a macOS operating system, follow these steps:
- Visit the Oracle Java SE Downloads page at https://www.oracle.com/java/technologies/javase-jdk16-downloads.html.
- Select the macOS installer (for example, macOS x64 Installer).
- Download the installer by clicking on the file link.
- Run the downloaded installer (the
.dmg file) and follow the on-screen instructions to complete the installation.
- Java should be automatically added to your system’s
PATH environment variable. To verify the installation, open the Terminal and run the following command:java -version
- You should see the version of Java you just installed, similar to Figure 1.2.
Installing Java on Linux
Installing on Linux can be a little bit tricky to explain in a few steps. Different Linux distributions require different installation steps. Here, we will see how to install Java on a Linux Ubuntu system:
- Open the Terminal and update your package repository by running the following command:
sudo apt-get update
- Install the default JDK package by running the following command:
sudo apt install default-jdk
- To verify the installation, run the
java -version command. You should see the version of Java you just installed.
- If you need to set the
JAVA_HOME environment variable (which you won’t need for working your way through this book but will need for doing more complex Java projects), you first need to determine the installation path by running the following command:sudo update-alternatives --config java
- Take note of the path displayed (for example,
/usr/lib/jvm/java-19-openjdk-amd64/bin/java).
- Open the
/etc/environment file in a text editor with root privileges:sudo nano /etc/environment
- Add the following line at the end of the file, replacing the path with the path you noted in Step 4 (excluding the
/bin/java part):JAVA_HOME="/usr/lib/jvm/java-19-openjdk-amd64"
- Save and close the file. Then, run the following command to apply the changes:
source /etc/environment
Now, Java should be installed and configured on your Linux operating system.
Running Java online
If you don’t have access to a computer with macOS, Linux, or Windows, there are online solutions out there. The free options are not perfect but, for example, the w3schools solution for trying Java in the browser is not bad at all. There are quite a few of these out there.
In order to work with multiple files there might be free tools out there, but most of them are paid. A currently free one that we would recommend is on replit.com. You can find it here: https://replit.com/languages/java.
You need to sign up, but you can work for free with multiple files and save them on your account. This is a good alternative if you would for example only have a tablet to follow along with this book.
Another option would be to use GitHub Codespaces: https://github.com/codespaces. They have the opportunity to enter a repository (for example the one we use for this book) and directly try the examples that are available in the repo and adjust them to try new things.
Having navigated through the installation of Java, it’s time to talk about compiling and running programs.


 Free Chapter


