Book Image

Swift 2 Blueprints

By : Cecil Costa
Book Image

Swift 2 Blueprints

By: Cecil Costa

Overview of this book

In this book, you will work through seven different projects to get you hands-on with developing amazing applications for iOS devices. We start off with a project that teaches you how to build a utility app using Swift. Moving on, we cover the concepts behind developing an entertainment or social networking related application, for example, a small application that helps you to share images, audio, and video files from one device to another. You’ll also be guided through create a city information app with customized table views, a reminder app for the Apple Watch, and a game app using SpriteKit. By the end of this book, you will have the required skillset to develop various types of iOS applications with Swift that can run on different iOS devices. You will also be well versed with complex techniques that can be used to enhance the performance of your applications.
Table of Contents (15 chapters)
Swift 2 Blueprints
Credits
About the Author
About the Reviewers
www.PacktPub.com
Preface
Index

The first scene


Create a project group (command + option + N) for the view controllers and move the ViewController.swift file (created by Xcode) to this group. As we are going to have more than one view controller, it would also be a good idea to rename it to InitialViewController.swift:

Now, open this file and rename its class from ViewController to InitialViewController:

class InitialViewController: UIViewController {

Once the class is renamed, we need to update the corresponding view controller in the storyboard by:

  • Clicking on the storyboard.

  • Selecting the view controller (the only one we have till now).

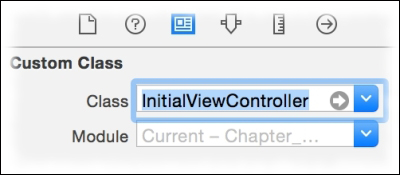
  • Going to the Identity inspector by using the command + option + 3 combination. Here, you can update the class name to the new one.

  • Pressing enter and confirming that the module name is automatically updated from None to the product name.

The following picture demonstrates where you should do this change and how it should be after the change:

Great! Now, we can draw the scene. Firstly, let's change...