Book Image

Data Acquisition using LabVIEW

By : Behzad Ehsani
Book Image

Data Acquisition using LabVIEW

By: Behzad Ehsani

Overview of this book

NI LabVIEW's intuitive graphical interface eliminates the steep learning curve associated with text-based languages such as C or C++. LabVIEW is a proven and powerful integrated development environment to interact with measurement and control hardware, analyze data, publish results, and distribute systems. This hands-on tutorial guide helps you harness the power of LabVIEW for data acquisition. This book begins with a quick introduction to LabVIEW, running through the fundamentals of communication and data collection. Then get to grips with the auto-code generation feature of LabVIEW using its GUI interface. You will learn how to use NI-DAQmax Data acquisition VIs, showing how LabVIEW can be used to appropriate a true physical phenomenon (such as temperature, light, and so on) and convert it to an appropriate data type that can be manipulated and analyzed with a computer. You will also learn how to create Distribution Kit for LabVIEW, acquainting yourself with various debugging techniques offered by LabVIEW to help you in situations where bugs are not letting you run your programs as intended. By the end of the book, you will have a clear idea how to build your own data acquisition system independently and much more.
Table of Contents (18 chapters)
Data Acquisition Using LabVIEW
Credits
About the Author
Acknowledgments
About the Reviewer
www.PacktPub.com
Preface
9
Alternate Software for DAQ

Capturing triangular wave VI


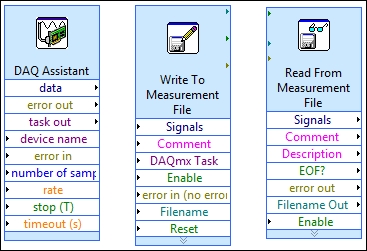
We will use DAQ assistant, which is an express VI, in this example. Unlike other VIs, an express VI contains scripts and automation that guide the user through different windows to make appropriate changes to various settings and entry boxes to customize the VI to manage one or several inputs and outputs and tasks:

Perform the following steps:

  1. Launch LabVIEW and create a new VI, choose an appropriate name for it, and save the VI.

  2. Right-click on the Block Diagram window of the newly created VI and, from Measurement I/O, click on NI-DAQmax and choose DAQ Assist, and place it on the Block Diagram window:

  3. Once the function is placed on the window, quick initialization will take place:

  4. The next screen will present you with two choices. Note the plus (+) signs next to Acquire Signals and Generate Signals. We are going to acquire a voltage signal. Click on the plus sign next to Acquire Signals then click on the (+) next to Analog Inputs and select Voltage.

    A physical...